Pigeon is a simple webcam, dedicated to work in the cloud. It is based on the Raspberry Pi Zero W, costing just $ 10. The minicomputer, together with the camera, are enclosed in a housing made in 3D printing technology. A simple handle is integrated with the housing, which allows it to be mounted anywhere, e.g. on the wall.
The software itself, listed below, should also work with, for example, a normal Raspberry Pi, although the 3D housing was designed for the Zero W model.
The aim of the project is to create a simple and inexpensive webcam with great possibilities and many functions that would work in the cloud.
Main functions * Motion detection.
* Dropbox integration (for storing MP4 files recorded upon motion detection).
* Simple installer.
* Live video streaming to any web browser.
* Authentication when watching a video stream.
* Housing made in 3D printing technology.
* Possibility of interfacing with IFTTT (If this then that - a cloud-based system that allows you to control the behavior of the systems, managed via the web interface) - it allows, for example, to generate notifications: SMS, e-mail, slack messages, etc. when the camera detects motion, saves something in Dropbox etc.
* Automatic deletion of local files after uploading them to Dropbox.
* Integrated, modular design, making it easy to add new modules.
Needed items * Printed cover - downloadable
here .
* Raspberry Pi Zero W with the latest Raspbian (regular Zero, without WiFi module also works, but requires an additional wireless USB network card).
* Internet connection.
* Raspberry Pi Camera.
* 5V power supply with microUSB.
Installing the software Let's connect to our Raspberry Pi Zero computer via SSH or connect the monitor and keyboard to it. We have to make sure that the camera connected to RPi is properly installed and working. To do this, enter in the command line:
If the camera does not work properly, we must make sure that it is enabled in the system (option number five in raspi-config):
In case of problems, help can be found, among others
here .
Then we need to clone the repository, preferably using git, to our computer. In the console, enter:
After downloading the files, we need to give the script execution rights and run it:
Installing the software takes approximately 10 to 15 minutes. During this process, we will have to provide a number of data, including configuration of our Dropbox, etc.
Camera activation After the installation is complete, just go to the website to watch the live video:
http://[IP-NASZEJ-RPI]:[8099]
8099 is the default port for which the camera is configured. If we want to watch the video outside our local network, remember to configure port forwarding in our router.
If we want the camera application to start every time the system starts, we have to edit the rc.local file:
We add the following line in it:
ensuring however that the exit 0 line is at the end of the file. We add our entry right under the comment. After editing, save the file and exit the editor.
Finally, it is worth making sure that the right time zone in our RPi is set so that the files sent by the camera have the correct date and time. Just type in the command line:
And choose options: Internationalization Options, where we can find the time zone settings.
The current stage of project development The project is currently in the initial stage of development. In pigeon.conf, you can change the default settings to suit your needs. Future ideas for device development include:
Software:
* Creation of a web interface for system management
* Remote access to the camera without port forwarding
* IOS app with push notifications
Hardware:
* LED lights on when motion is detected
* Servo to rotate the camera.
The first attempts to detect traffic are very promising. In the photo below we see an image with the detected moving object - a squirrel selected:
Sources:
https://www.thingiverse.com/thing:2230707 https://github.com/geraldoramos/pigeon 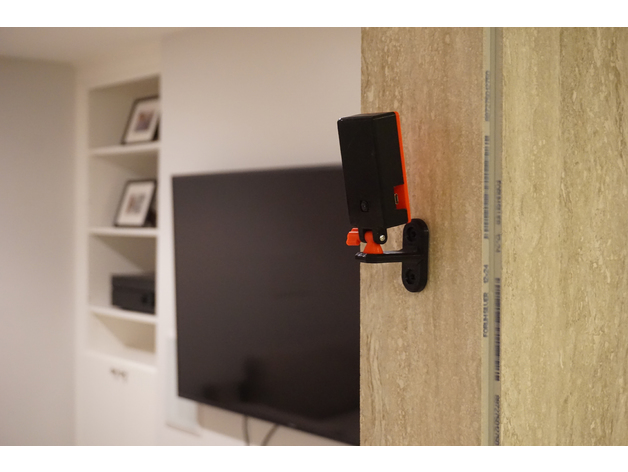


Comments
Only it does exactly the same as my tomato router, with a camera connected to the usb (the first hit in the drawer surprised) and installed motion + a little individualization. And I have the router turned... [Read more]
Or qnap with many usb cameras:] [Read more]
One thing but - here the quality is probably a bit different than cheap webcams :) because the more expensive ones will be more expensive than RPI, I'm thinking about making an HDMI microscope with... [Read more]
That's it. The $ 5 Pi camera is much better than the $ 30 USB camera and maybe even more. Great thing, I already did. [Read more]
You can have some info or photos on how it turned out :) ? [Read more]
The answer in the thread about the microscope: http://www.elektroda.pl/rtvforum/viewtopic.php?p=16527364#16527364 [Read more]
Well, this is the same thread I observe from time to time :) and the lens is purchased or was with the RPi camera module :) ? [Read more]
A regular camera for about $ 5, the lens I bought for about $ 8, I sawed the plate a bit under the lens mount that I had at hand, but you can buy 5 for $ 3. [Read more]
Cool ! I'm taking my own, maybe I'll add some HDMI monitor with Ali, for example 7 "? [Read more]
And where are these $ 5 cameras? [Read more]
On eBay from China. I paid exactly GBP 4.58. [Read more]
Hello, Of course, I pay tribute to the execution and knowledge gained during the project, but I am bothered by the costs and, in my opinion, it is engaging the tank to kill the tulip. Our homes now... [Read more]
I also had fun with openwrt gargoyle usb sound card LCD internet radio for displaying frames and CPU usage and usb webcam but here, as I mentioned, it's all about quality, you can't get quality... [Read more]
@ george2002 Yes, only in some cases you do not need an hd image, but motion detection. Especially at some remote locations. The heart of this solution is not, contrary to appearances, Rasbery PI... [Read more]
Everything agrees with the fact that I am interested in making this Pi a nice compact camera for mounting SMD to the monitor, not monitoring ;) [Read more]
But all the time you write in the thread "Pigeon: open camera for working in the cloud on Raspberry Pi Zero" ;) [Read more]
Okay, but you can do the same as in the thread about RPi with the camera as a microscope ?? [Read more]
You should try it by using Google Firebase. Google Firebase is great for raspberry pi cloud storage and displaying that data in the cloud dashboard. The camera you are using with the raspberry pi will... [Read more]