TP-LINK UH720 USB 3.0 hub with 7 data ports, 2 fast-charging ports, and a 12V external power input gets a full presentation, speed test, and teardown.
Inside, two RTS5411 chips handle the hub logic, each covering four USB ports, while an APW8720B-based converter and separate fuses power and protect the outputs.
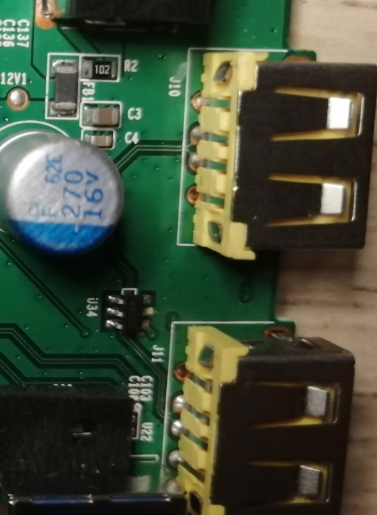
The charging section uses a tiny U34 chip marked 3004 to negotiate fast charging instead of simply wiring the sockets to 5V.
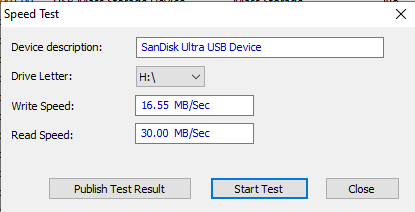
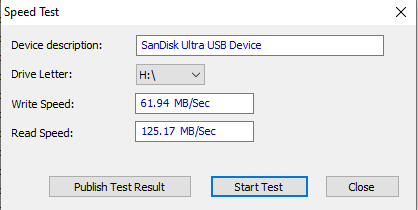
Speed tests showed the hub without external power cutting flash-drive throughput to 16.55MB/s write and 30.00MB/s read, versus 61.94MB/s and 125.17MB/s powered.
A powered hard drive also matched the direct-port baseline, averaging 88.7MB/s through the hub versus 89.2MB/s directly, but the included power supply is very loud.
Hello! This is my first post in this forum section, so please bear with me :)
He presented the operation and construction of a cheap USB hub, i.e. Chinese, which did not impress with either quality or design solutions. Unfortunately, there are more and more such devices, and people buy cheaper ones and do not pay attention to more expensive and better devices according to the principle "If it works, don't touch it!"
In today's presentation, he will be the hero HUB TP-LINK UH720 . It is a splitter operating in the USB 3.0 standard. In addition, there are two fast charging ports and a power switch for the device. I will not focus on tests (which does not mean that I will not do any), because the operation of the USB hub is rather the same in every case and it can be simply boring. Let's start!
PRESENTATION The device (or rather its housing) is made entirely of black plastic. The top surface containing the power button and logo is smooth and shiny. It was not a good idea on the part of the manufacturer, because EVERY, even the smallest scratch can be seen on the shiny housing. The second part of the upper shell is directly above the ports. It is slightly perforated, thanks to which the windows for the LEDs are perfectly integrated and can only be seen when they are lit.
Before someone writes: "But you could at least clean this HUB...". I answer: my copy is three years old and does not look good anymore (scratches), in addition, even the smallest dust particles can be seen on the housing. I cleaned it 3 times before shooting... It didn't turn out very well, but I'm happy to show it to you anyway.
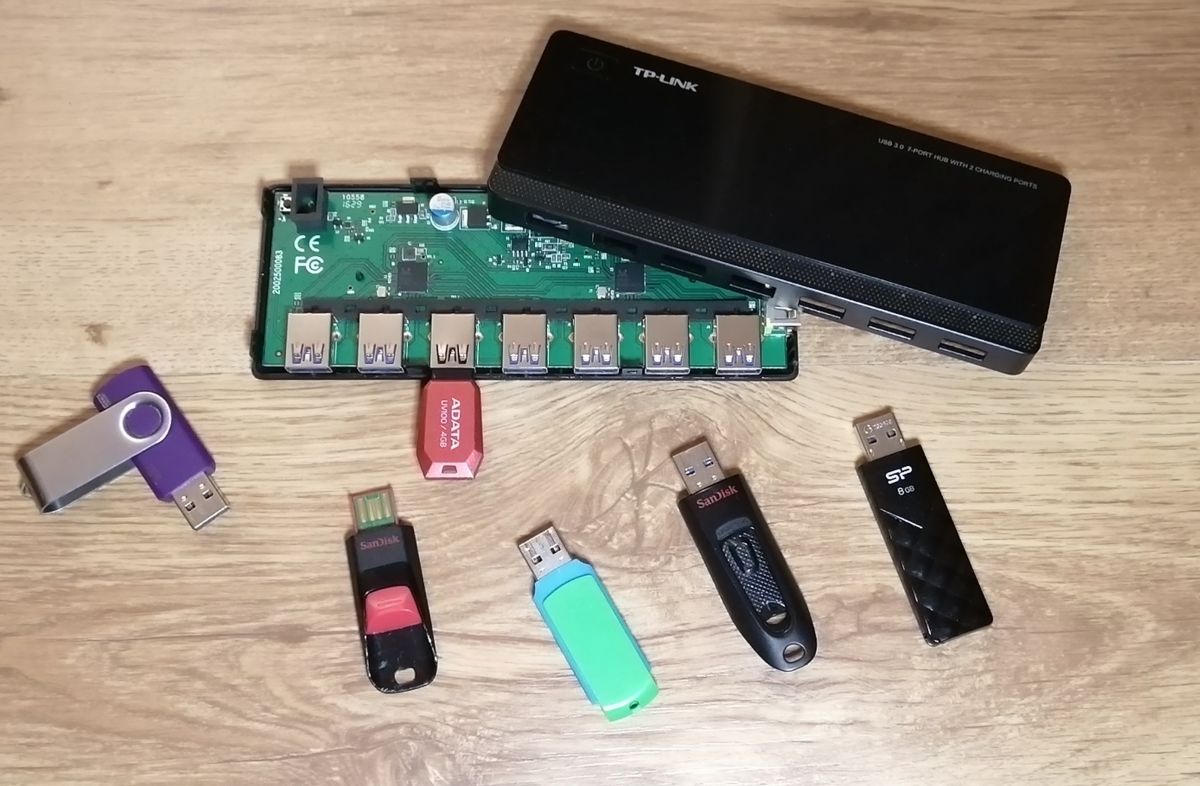
From the front we see 7 USB 3.0 ports. Simply.
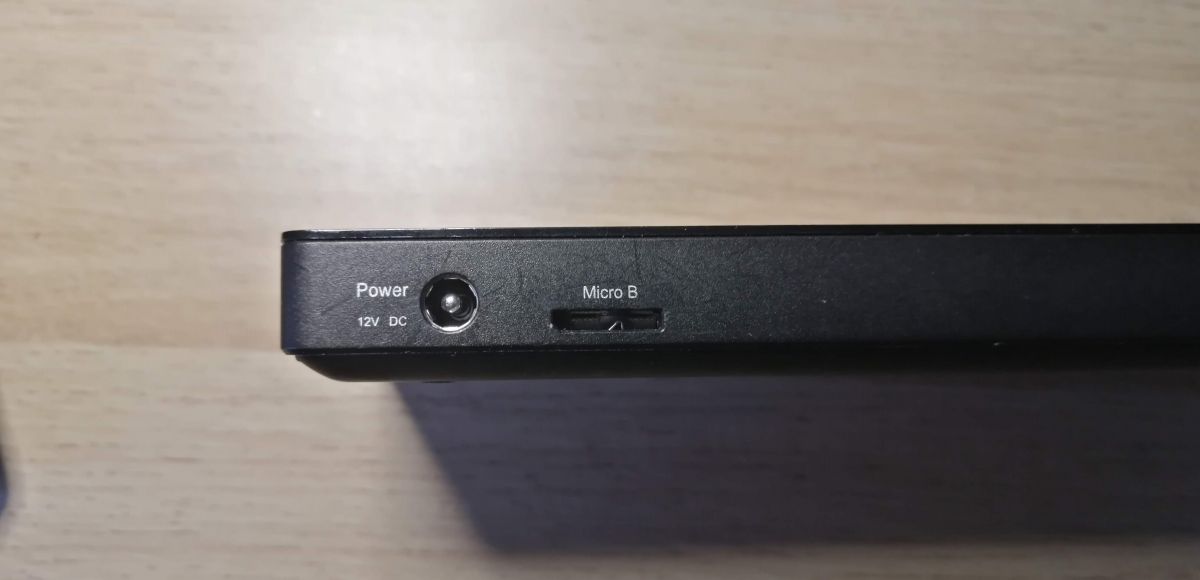
On the back (because it is an active HUB), in addition to the USB micro B socket, there is a 12V power socket.
On the right side - a nice addition - 2 fast charging sockets with a maximum current of 2.4A (not connected by bus to the computer)
Two pieces of rubber are glued to the bottom to prevent slipping.
KIT ELEMENTS In the set we get: ► TP-LINK UH720 USB 3.0 hub ► Power adapter ► USB 3.0 cable ► Instruction
TESTS When I said there wouldn't be many, I wasn't lying. Here they are:
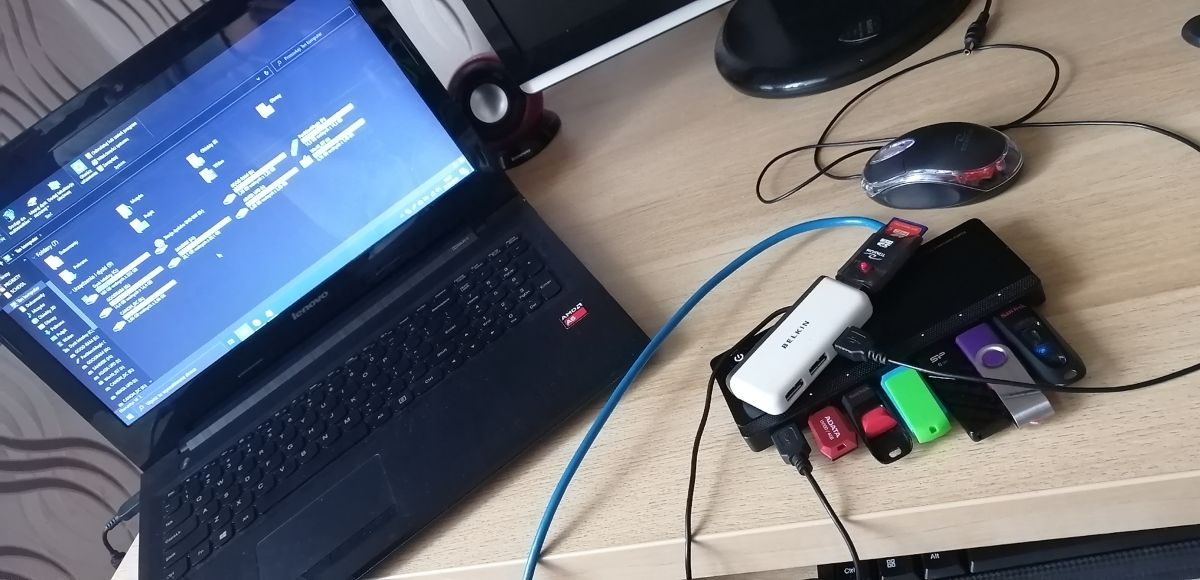
1. Passive power, USB 3.0 Connected to the hub: - 6 portable FLASH memories - additional hub 2.0 - mouse - chinese memory card reader
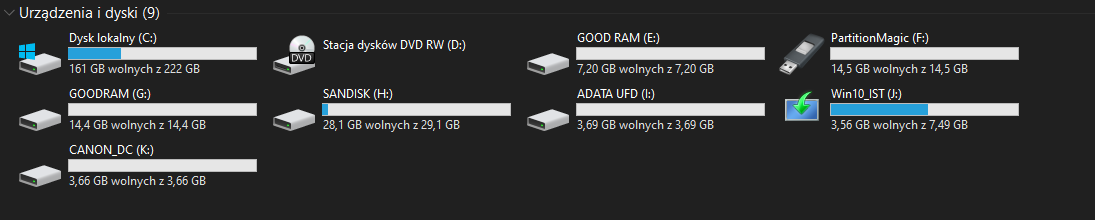
"This PC" view:
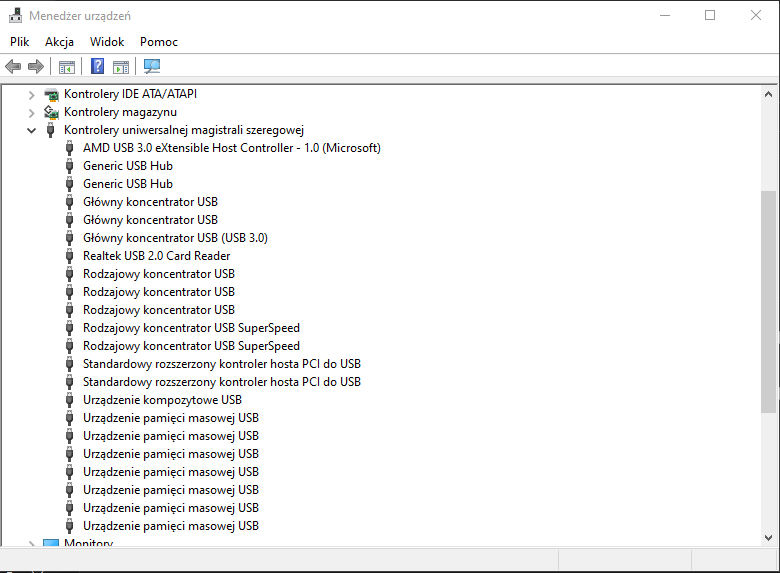
Device manager:
Further loading caused a reset of all devices connected to the hub, and the system displayed the appropriate message:
2. Power on, USB 3.0 Now, in addition to the things above, I was able to connect a hard drive, one additional memory (small hub 2.0 gave up and did not power any more) and charged two phones via the charging sockets.
3. Does the hub reduce the transfer speed?
flash memory (tested in USBDeview):
Test
Record
Reading
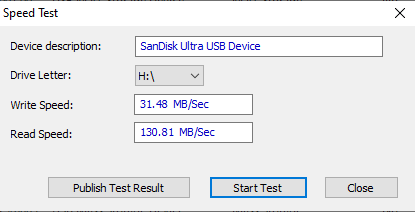
Control sample (memory directly in the USB port of the computer)
31.48MB/s
130.81MB/s
HUB without external power
16.55MB/s
30.00MB/s
HUB with external power supply
61.94MB/s
125.17MB/s
If the pictures appeal to anyone, please let me know
Spoiler:
►control test (memory directly in the USB port of the computer):
► hub without external power supply:
► powered hub:
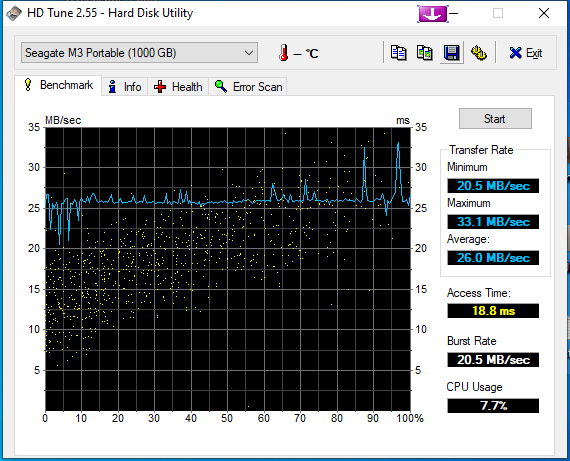
Portable hard drive (tested in HDTune):
Test
Minimal transfer
Maximum transfer
Average transfer
Control sample (memory directly in the USB port of the computer)
43.7 MB/s
114.7 MB/s
89.2MB/s
HUB without external power
20.5MB/s
33.1 MB/s
26.0MB/s
HUB with external power supply
44.8MB/s
114.7MB/s
88.7MB/s
Transfer speed graphs and detailed information...
Spoiler:
► control test (memory directly in the USB port of the computer):
► hub without external power supply:
► powered hub:
I decided to leave the test results to my own interpretation. :D
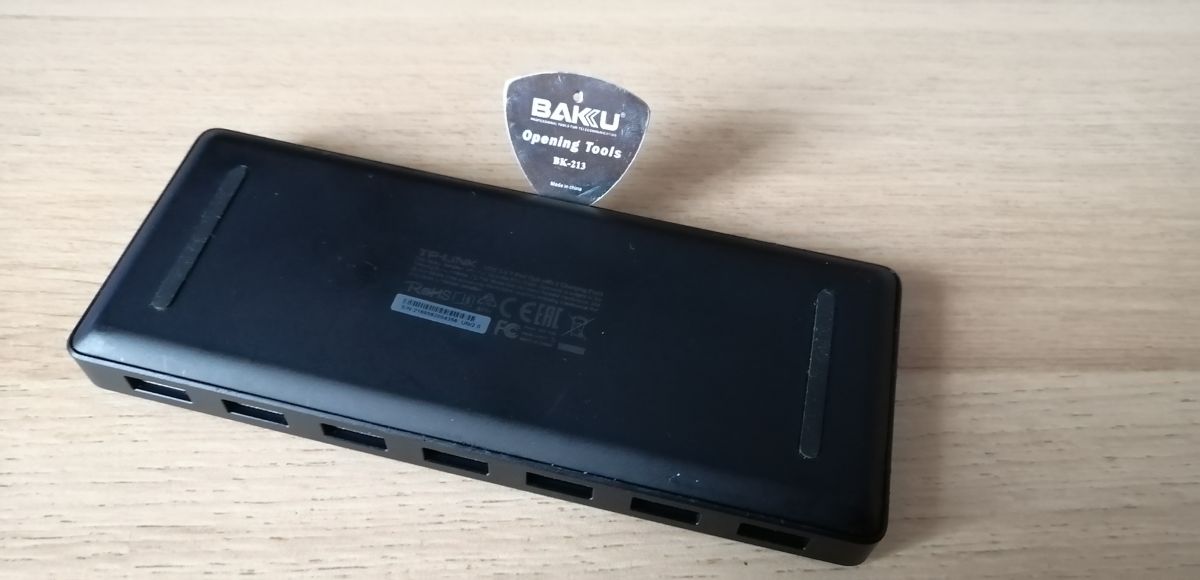
INTERIOR Now for something you've all been waiting for! Time to open the case!
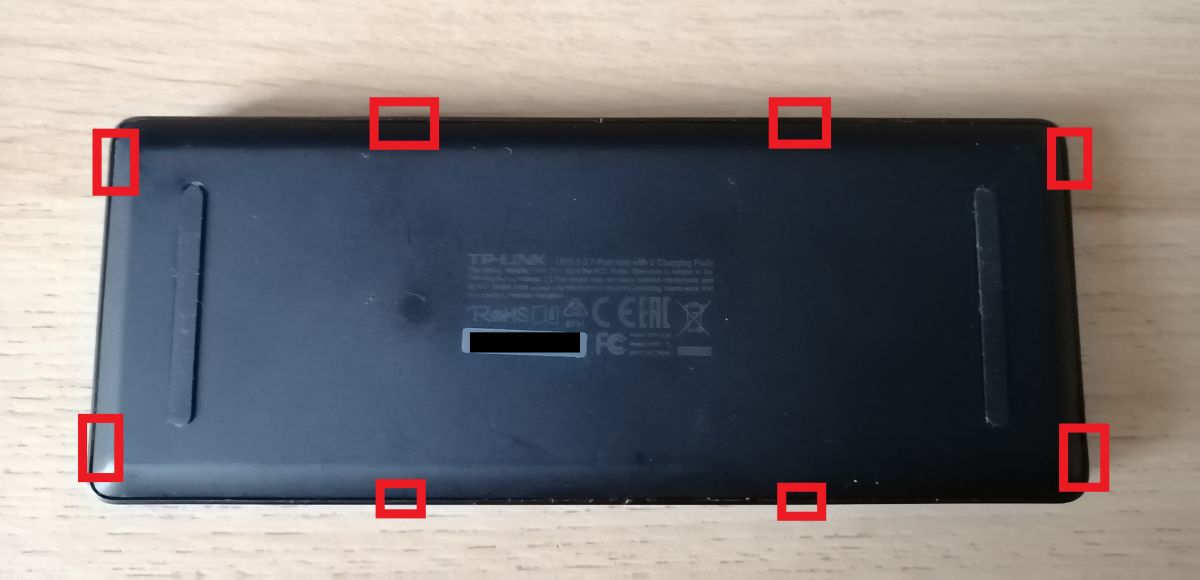
It's not very complicated to open, but it does require a bit of fiddling with the snaps. The device opens from the bottom. I recommend to equip yourself with a special plate for opening - it leaves less traces. We push it into the latch and pry it up. Attention! I do not recommend screwdrivers, probes or knives! - they leave a lot of ugly marks and burrs!
Fortunately, the latches are thick and strong, so they have no chance of breaking when gently unfastening them.
Snap Map:
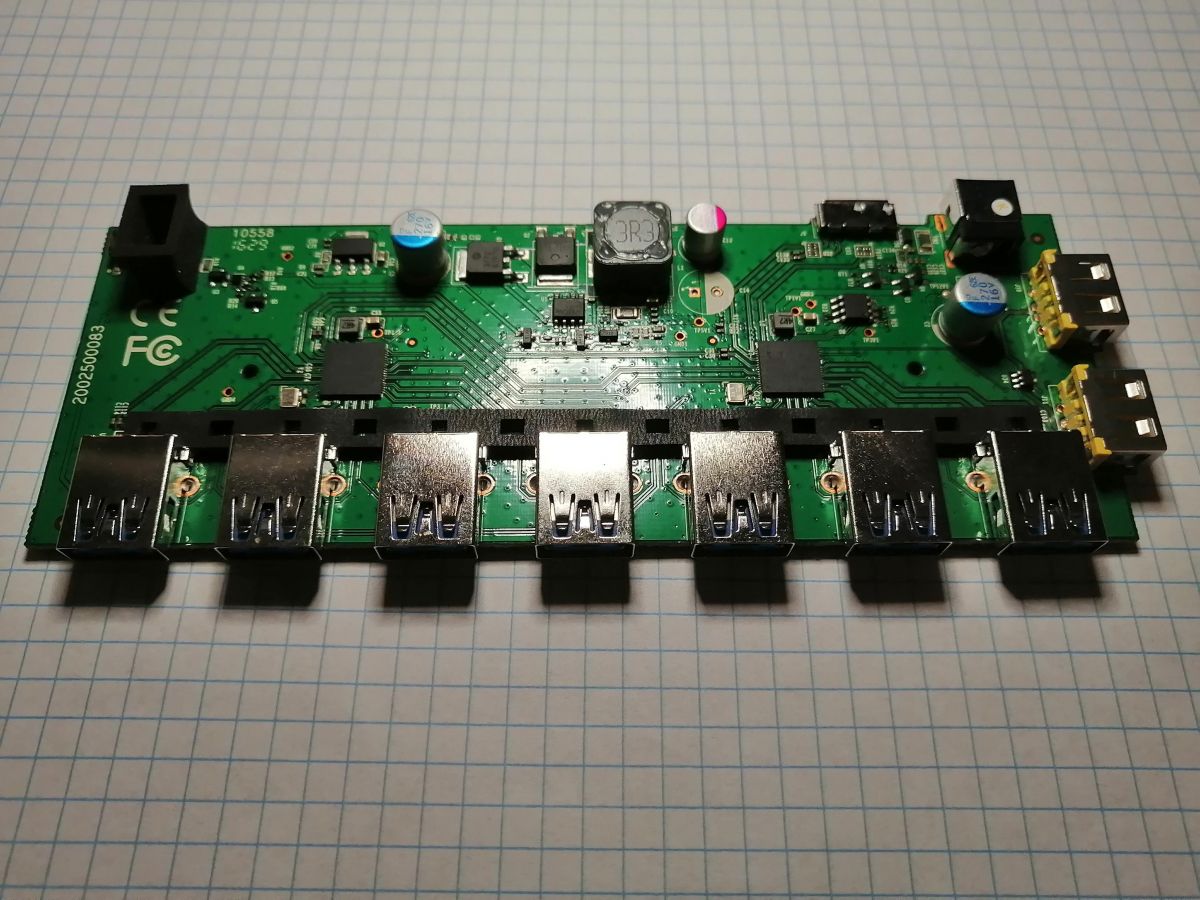
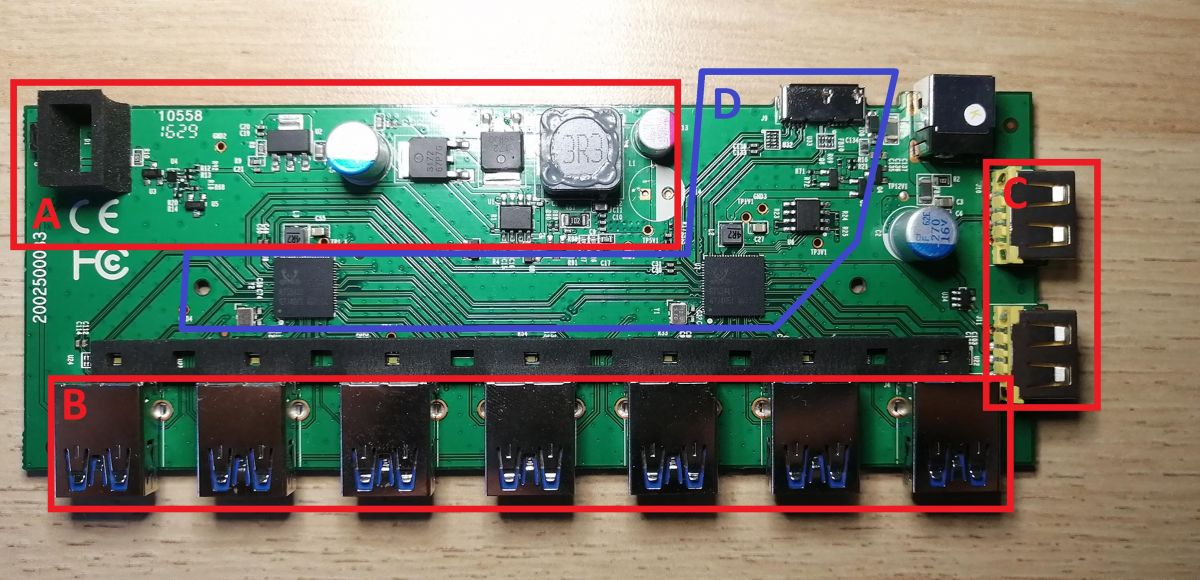
After removing the shell, the motherboard appears, which fills all the available space.
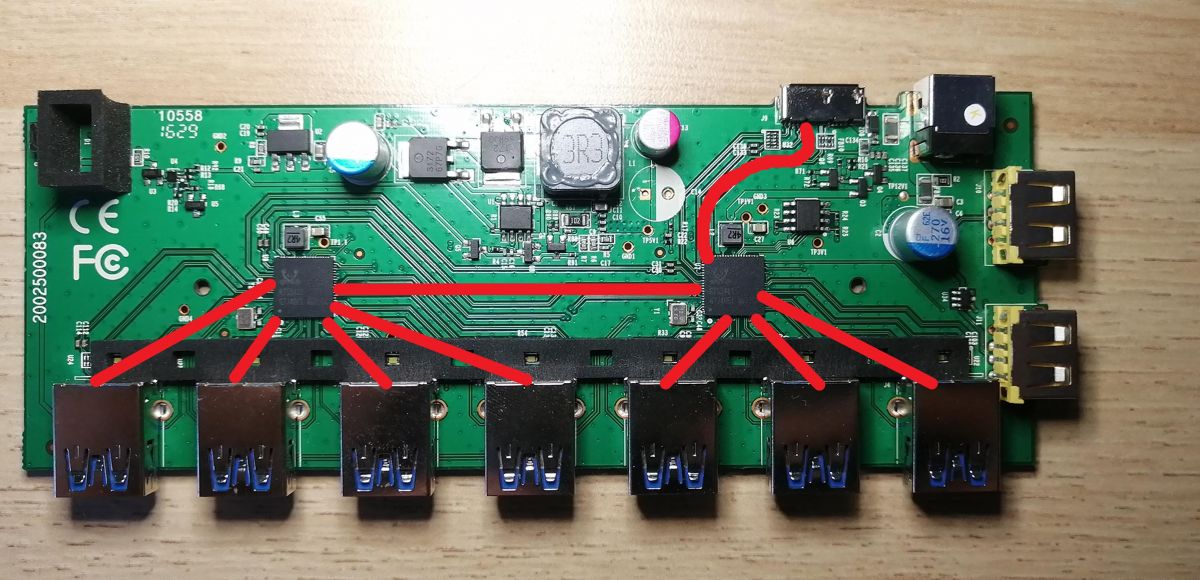
The album itself can be divided into 4 sections. I marked them with the letters A,B,C,D.
A - power section B - 7 USB 3.0 ports C - charging ports D - support for USB ports
Now I will break down the individual sections:
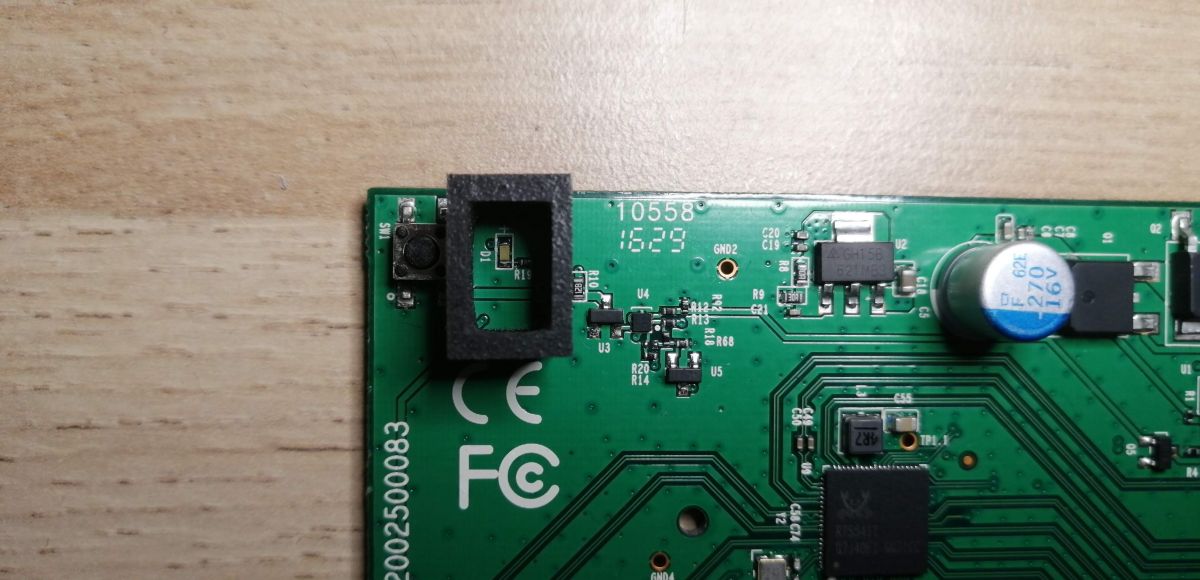
Power:
Power goes to the GH15B stabilizer. It is actually AZ1117 (note in the attachment) in the ADJ version, set with resistors R8 and R9 (10Ω and 30Ω respectively on 5V. This voltage is probably supplied by a tiny U4 chip, which together with the transistors is responsible for switching the whole device on and off with the SW1 monostable button and controlling the D1 LED. There is a sponge around it to stop the light within the button.
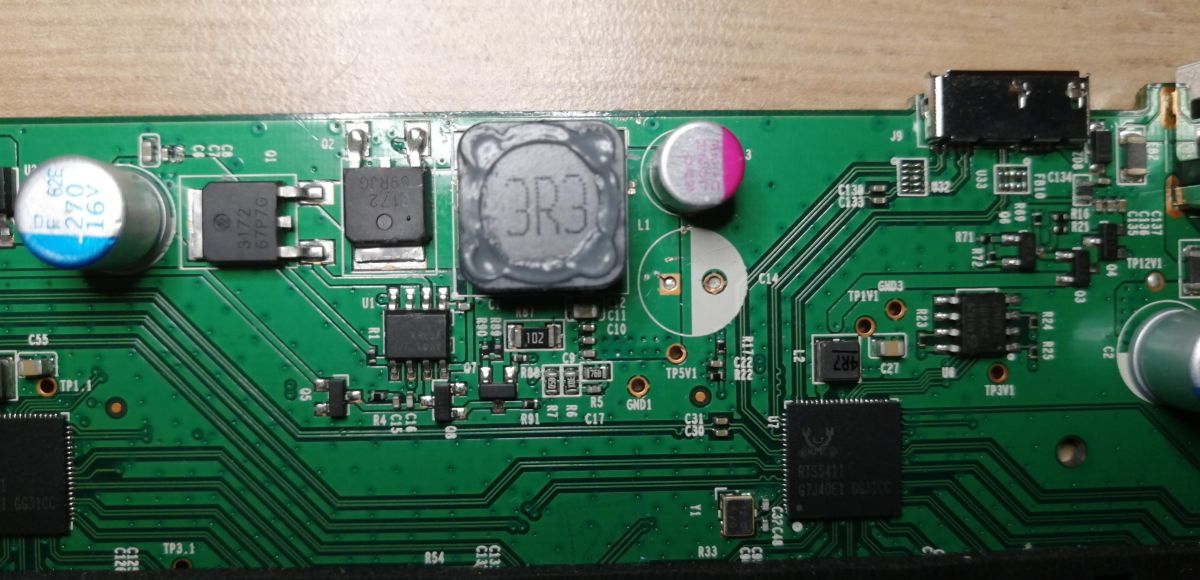
Then the integrated circuit of the main pulse converter built on the APW8720B system is powered (note in the attachment). There is also a coil, smoothing capacitors and two large MOSFET CED3172 transistors (note in the attachment). The converter produces a high-current 5V voltage that powers all USB ports.
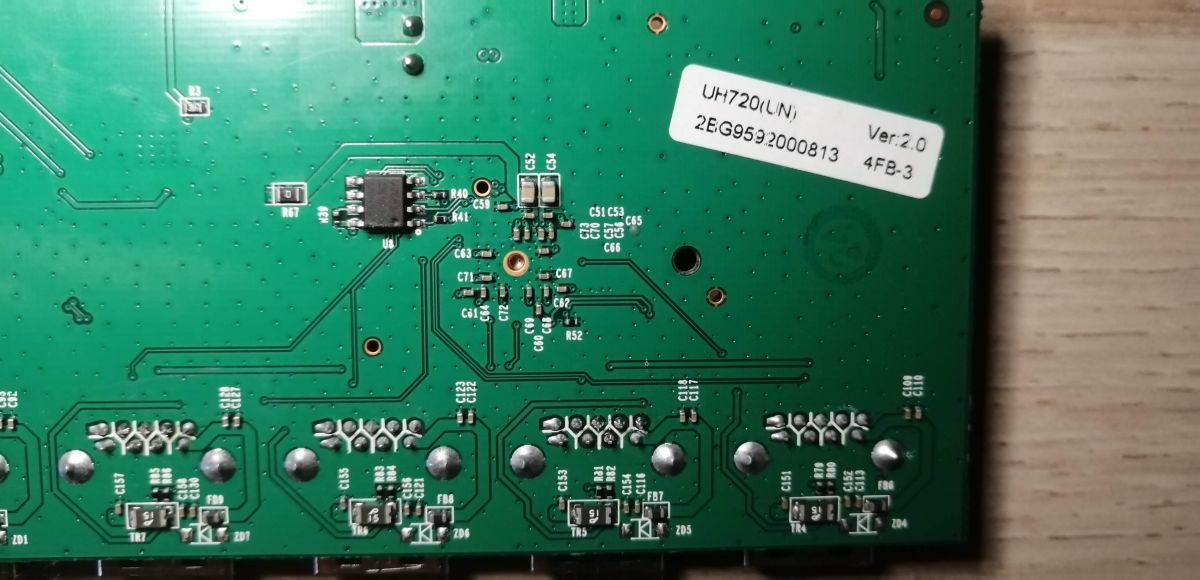
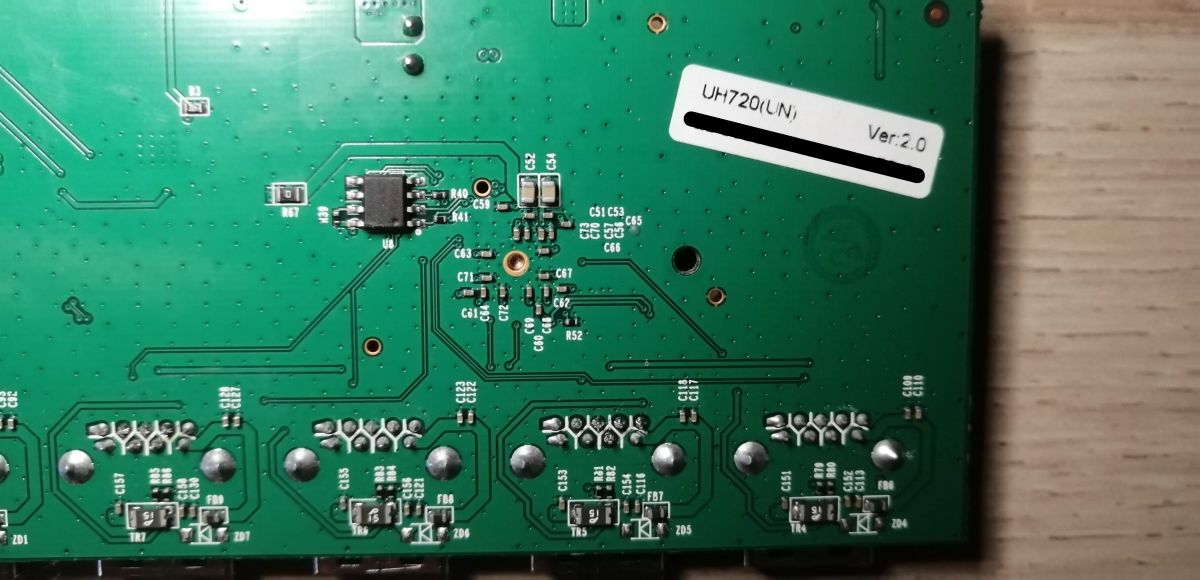
USB 3.0 Ports: An interesting fact about them is that each is protected by a separate fuse.
Charging Ports: Contrary to appearances, it is more than a port connected to 5V. The data lines are routed to a tiny but nifty U34 chip labeled 3004. I haven't found any information about it, but it might be something like the TPS2513. The system informs the charged device about the charging method.
Link to an interesting article on the subject here
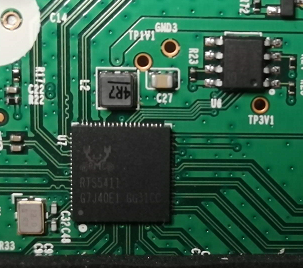
USB port support: The whole thing is supported by two RTS5411 integrated circuits (note in the attachment). Each of them can handle 4 USB ports. So where did the eighth port in the hub go? It was used to connect the systems with each other. Therefore, the operating system detects the entire device as 2 hubs.
Next to each processor we see a chip in a silver casing. It is a quartz generator clocking the RTS5411 chip with a clock frequency of 12MHz. In addition to them, we can also see a flash memory for the SPI interface containing procedural software (firmware). The second bone is on the bottom of the plate.
A WORD OF CONCLUSION It is a really good device. I recommend them to anyone who has some USB devices and a limited amount of ports on their favorite device. Just remember to power it up :)
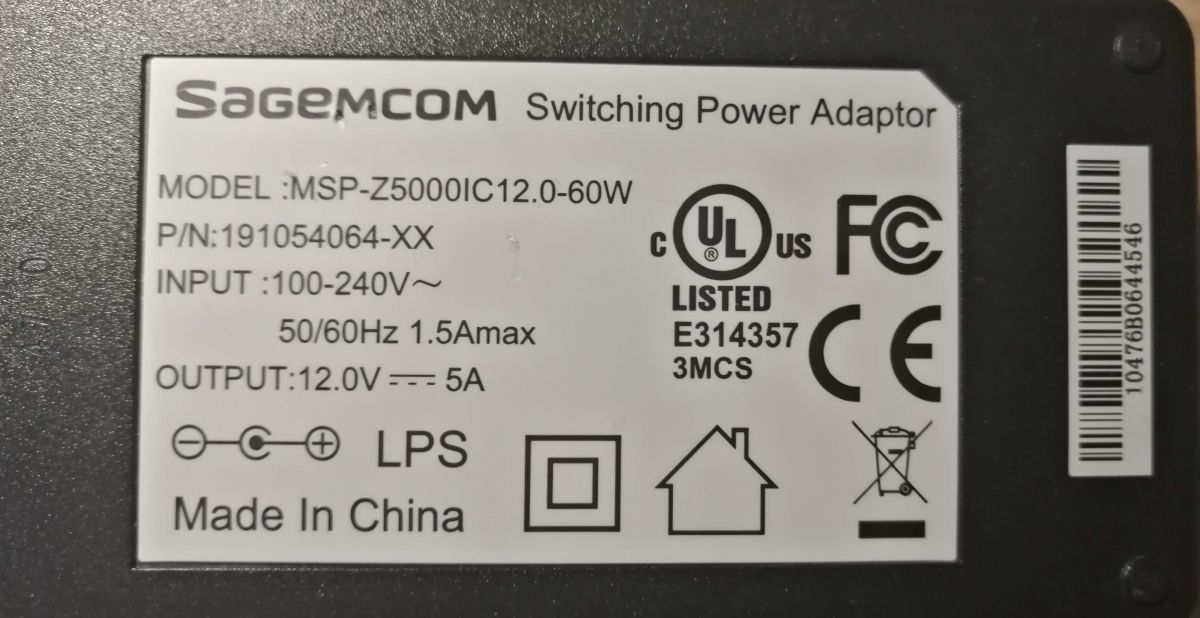
Minuses? ► The factory power supply is EXTREMELY loud and very clumsy. I recently replaced it with a more powerful 12V/5A power supply. Unfortunately - after this operation I had to buy and solder a new DC12V socket because that one had too small a pin inside and did not make contact.
► The USB cable included in the set is of good quality, but I recommend getting a spare one, because the micro USB B plug broke in mine after two years ► the housing scratches terribly
I guess I can end on this. I hope you liked this article. As promised - all the notes are in the attachments.
In addition, I provide a file with the firmware for the RTS5411 chip (in HEX notation marked with the year 2015 - available on the Internet is marked as 2014).
ATTENTION! I do not recommend using update programs, because they are designed to update only one chip at a time (the second one will remain outdated, which can lead to numerous errors in the operation of the device). The only way is to desolder both bones and program them with a memory programmer (e.g. CH341A).
If I forgot something or made a mistake - write.
Greetings to all readers!
Attachments:
RTS5411_dump_2015.zip(17.1 KB)
You must be logged in to download this attachment.
tps2513a-q1.pdf(1.18 MB)
You must be logged in to download this attachment.
RTS5411_REALTEK.pdf(1.09 MB)
You must be logged in to download this attachment.
AZ1117C.pdf(833.46 KB)
You must be logged in to download this attachment.
CET_CEU3172.PDF(653.45 KB)
You must be logged in to download this attachment.
APW8720B_ANPEC.pdf(660.49 KB)
You must be logged in to download this attachment.
About Author
Marcinolak xD wrote 378 posts with
rating 176 , helped 9 times.
Live in city Jutrosin.
Been with us since 2015 year.
Replacing the socket may void the warranty of the device. Can't you just replace the plug itself or use an adapter? [Read more]
Marcinolak xD
29 May 2020 12:58
Of course it's simpler. :) I am writing about my experience here. As for the warranty, mine has already expired...
I did not want to interfere with the original plug of the power supply, because... [Read more]
Anonymous
29 May 2020 22:22
If you want to make some summary of the results, insert the data from all tests into the table so that anything can be seen. No one will look at dozens of small images for results. [Read more]
phrozen
29 May 2020 22:37
Thanks for the nice teardown and honest article. For some time I have been thinking about buying this hub because I always miss USB 3.0 sockets - you made my task much easier :) [Read more]
I support. BRAVO GIRL with its "photo stories" died a long time ago. Technical articles should have tabulations, and when it comes to graphics, charts are OK. Screenshots and other photographs are good... [Read more]
Marcinolak xD
30 May 2020 00:17
As I wrote. This is my first article, but that doesn't mean it has to be unreadable. Improved version coming soon!
Added after 39 [minutes]:
@zgierzman @baseemitercollector
Ready.... [Read more]
Anonymous
30 May 2020 00:28
It looks much better! I would never have thought that a hub would run faster with storage with additional power. [Read more]
Marcinolak xD
30 May 2020 00:49
I've already thought about it. Speeds look like when connected via USB 2.0...
This may be a deliberate procedure aimed, for example, at reducing power consumption. It seems to me that it would not... [Read more]
K3
30 May 2020 16:08
I've had this hub for some time, generally it works as it should.
What does the update do? [Read more]
Marcinolak xD
30 May 2020 21:01
These are fixes and microcodes from the chip manufacturer (Realtek). As a rule, it does not affect the speed. [Read more]
RokitaDiabel
24 Jun 2021 10:39
Good morning sz.p. x
I have a usb hub/hub, which you described in a very accessible way in the article. It worked without any problems for two years (warranty period). A month after the warranty expired,... [Read more]
Marcinolak xD
27 Jun 2021 11:40
@RokitaDiabel
Perhaps it is a problem with the firmware. The problem is that the program I attached in the post is most likely able to update only one controller (In the above-mentioned hub, the controllers... [Read more]
RokitaDiabel
20 Jul 2021 21:28
Thank you very much for your answer. After checking the RST5411 controllers, it turned out that after desoldering one, four ports stop working at all, but the others work properly. So only one controller... [Read more]
ivanoffbobi
30 Jul 2024 08:39
Hey guys, I have the exact same hub (which I love), but mine got a defect. Long story short - I blew an SMD element, which I can't identify. Can somebody help me identify that element? Thanks in advance!... [Read more]
Marcinolak xD
16 Aug 2024 23:21
.
Sorry I haven't replied for so long. This is "E2" coded Zener Diode. I attached it's datasheet below. [Read more]
rpecha2021
03 Jan 2026 10:02
Wow, what a great post! Are you still using the same hub? I wanted to ask you, as an expert, how you'd recommend using this device on macOS or PCs that only have the dreaded USB-C port. - 1) Original cable... [Read more]
FAQ
TL;DR: With external power, read speed hits 125 MB/s—over 4× faster than bus-powered mode [Elektroda, 18724780]; “It is a really good device” [Elektroda, Marcinolak xD, post #18724780] Dual RTS5411 controllers, 7 fused USB-3.0 ports and 2×2.4 A chargers make TP-Link UH720 a solid hub.
Why it matters: Choosing the right power setup unlocks full USB 3.0 performance and device safety.
Quick Facts
• 7 downstream USB 3.0 ports, each protected by an individual resettable fuse [Elektroda, 18724780]
• 2 dedicated 2.4 A fast-charge ports, isolated from the data bus [Elektroda, 18724780]
• External supply: 12 V ⎓ 2 A included; author used 12 V ⎓ 5 A replacement for silent running [Elektroda, post #18724780]
• Max measured read speed: 125 MB/s powered vs 30 MB/s bus-powered [Elektroda, 18724780]
• Controller: dual Realtek RTS5411, firmware stored in two SPI flashes [Elektroda, 18724780]
How fast is the UH720 with and without its power adapter?
Powered by its 12 V adapter, a flash drive reached 125 MB/s read and 61.9 MB/s write. Running bus-powered, speed fell to 30 MB/s read and 16.5 MB/s write—roughly a 4× hit [Elektroda, 18724780]
Why do transfers slow down when the hub is bus-powered?
USB 3.0 devices need up to 900 mA. The PC port cannot supply enough current for seven devices, so the hub throttles the link to avoid brown-outs. The author saw all devices reset when load exceeded the port budget [Elektroda, 18724780]
Is the factory power adapter noisy, and what can replace it?
Yes. The bundled 12 V ⎓ 2 A wall wart was described as “EXTREMELY loud” [Elektroda, 18724780] Swapping to a silent 12 V ⎓ 5 A brick cured the noise; ensure the plug’s inner pin matches 2.1 mm or replace the jack as the author did [Elektroda, post #18724780]
Can I update the UH720 firmware myself?
Only with caution. Each RTS5411 has its own flash. Standard utilities flash one chip, leaving the second outdated and causing errors. Safest route: 1. Desolder both SPI flashes, 2. Program them in an external programmer, 3. Resolder and test [Elektroda, 18724780]
How do I open the casing without leaving marks?
Unplug power and USB.
Insert a plastic pry card into the bottom snaps and lift gently.
Work around the perimeter until the shell separates. Avoid metal tools that scar the glossy lid [Elektroda, 18724780]
Which component detects USB devices, and what if ports stop working?
Each RTS5411 hub controller handles four ports and device detection. If four ports fail, suspect one controller or its firmware. A user restored operation by replacing the faulty RTS5411 after confirming the other chip worked [Elektroda, 19529550]
What is the tiny "E2" SMD part near the DC jack?
It is a Zener diode used for input surge protection; blowing it can cut power. Replace with the same voltage rating (datasheet linked by author) [Elektroda, 21193527]
Does swapping the DC socket or cable void warranty?
Yes. Manufacturer warranties exclude user soldering. One poster advised using an adapter plug instead, but the author performed the mod after warranty expired [Elektroda, #18725760; #18725821].
Will the charging ports work when the PC is off?
Yes. The two 2.4 A ports connect only to the power rail via a 3004 identification IC, so they source 5 V whenever the external adapter is plugged in, independent of the host [Elektroda, 18724780]
What overcurrent protection does the hub provide?
Each USB 3.0 port has its own polyfuse, and the main 5 V rail comes from an APW8720B step-down converter with dual CED3172 MOSFETs. An overload triggers the polyfuse and the PC shows a power-draw warning [Elektroda, 18724780]
After two years, one user’s hub detected devices only if plugged in before power-up; firmware corruption was suspected [Elektroda, 19492495]
Why does Windows list two hubs after connecting the UH720?
One RTS5411 port links internally to the second controller, so the OS enumerates two cascaded four-port hubs—yielding seven external ports and one hidden interconnect [Elektroda, 18724780]


Comments
Replacing the socket may void the warranty of the device. Can't you just replace the plug itself or use an adapter? [Read more]
Of course it's simpler. :) I am writing about my experience here. As for the warranty, mine has already expired... I did not want to interfere with the original plug of the power supply, because... [Read more]
If you want to make some summary of the results, insert the data from all tests into the table so that anything can be seen. No one will look at dozens of small images for results. [Read more]
Thanks for the nice teardown and honest article. For some time I have been thinking about buying this hub because I always miss USB 3.0 sockets - you made my task much easier :) [Read more]
Cool! I am glad that I can help! :D [Read more]
I support. BRAVO GIRL with its "photo stories" died a long time ago. Technical articles should have tabulations, and when it comes to graphics, charts are OK. Screenshots and other photographs are good... [Read more]
As I wrote. This is my first article, but that doesn't mean it has to be unreadable. Improved version coming soon! Added after 39 [minutes]: @zgierzman @baseemitercollector Ready.... [Read more]
It looks much better! I would never have thought that a hub would run faster with storage with additional power. [Read more]
I've already thought about it. Speeds look like when connected via USB 2.0... This may be a deliberate procedure aimed, for example, at reducing power consumption. It seems to me that it would not... [Read more]
I've had this hub for some time, generally it works as it should. What does the update do? [Read more]
These are fixes and microcodes from the chip manufacturer (Realtek). As a rule, it does not affect the speed. [Read more]
Good morning sz.p. x I have a usb hub/hub, which you described in a very accessible way in the article. It worked without any problems for two years (warranty period). A month after the warranty expired,... [Read more]
@RokitaDiabel Perhaps it is a problem with the firmware. The problem is that the program I attached in the post is most likely able to update only one controller (In the above-mentioned hub, the controllers... [Read more]
Thank you very much for your answer. After checking the RST5411 controllers, it turned out that after desoldering one, four ports stop working at all, but the others work properly. So only one controller... [Read more]
Hey guys, I have the exact same hub (which I love), but mine got a defect. Long story short - I blew an SMD element, which I can't identify. Can somebody help me identify that element? Thanks in advance!... [Read more]
. Sorry I haven't replied for so long. This is "E2" coded Zener Diode. I attached it's datasheet below. [Read more]
Wow, what a great post! Are you still using the same hub? I wanted to ask you, as an expert, how you'd recommend using this device on macOS or PCs that only have the dreaded USB-C port. - 1) Original cable... [Read more]