What hardware is inside the QIACHIP KLCW fan controller?
The board carries a CB2S module with a BK7231N Wi-Fi SoC, a TuyaMCU handling fan/light logic, and a 433 MHz RF receiver[Elektroda, echojjj, post #20031489]
Czy wolisz polską wersję strony elektroda?
Nie, dziękuję Przekieruj mnie tam


// start MCU driver
startDriver TuyaMCU
// let's say that channel 1 is dpid1 - fan on/off
setChannelType 1 toggle
// map dpid1 to channel1, var type 1 (boolean)
linkTuyaMCUOutputToChannel 1 1 1
// let's say that channel 2 is dpid9 - light on/off
setChannelType 2 toggle
// map dpid9 to channel2, var type 1 (boolean)
linkTuyaMCUOutputToChannel 9 1 2
//channel 3 is dpid3 - fan speed
setChannelType 3 LowMidHigh
// map dpid3 to channel3, var type 4 (enum)
linkTuyaMCUOutputToChannel 3 4 3
//dpId 17 = beep on/off
setChannelType 4 toggle
linkTuyaMCUOutputToChannel 17 1 4
//
//
//dpId 6, dataType 4-DP_TYPE_ENUM = set timer
setChannelType 5 TextField
linkTuyaMCUOutputToChannel 6 4 5
//
//
//dpId 7, dataType 2-DP_TYPE_VALUE = timer remaining
setChannelType 6 ReadOnly
linkTuyaMCUOutputToChannel 7 2 6
fan:

  - platform: mqtt
    name: "Living Room Fan"
    state_topic: "living-room-fan/1/get"
    command_topic: "living-room-fan/1/set"
    payload_on: '1'
    payload_off: '0'
    percentage_state_topic: "living-room-fan/3/get"
    percentage_value_template: >-
      {% if value == '0' %}
      33
      {% elif value == '1' %}
      67
      {% elif value == '2' %}
      100
      {% else %}
      0
      {% endif %}
    percentage_command_topic: "living-room-fan/3/set"
    percentage_command_template: >-
      {% if value > 0 and value <= 33 %}
      0
      {% elif value > 33 and value <= 67 %}
      1
      {% elif value > 67 and value <= 100 %}
      2
      {% endif %}
    availability_topic: "living-room-fan/connected"
    payload_available: "online"
    payload_not_available: "offline"
    unique_id: "living-room-fan"
    qos: 1
    retain: true

light:

  - platform: mqtt
    name: "Living Room Light"
    state_topic: "living-room-fan/2/get"
    command_topic: "living-room-fan/2/set"
    payload_on: '1'
    payload_off: '0'
    availability_topic: "living-room-fan/connected"
    payload_available: "online"
    payload_not_available: "offline"
    qos: 1
    retain: true

sensor:

  - platform: mqtt
    name: "Living Room Fan Timer"
    state_topic: "living-room-fan/5/get"
    availability_topic: "living-room-fan/connected"
    payload_available: "online"
    payload_not_available: "offline"
    qos: 1

  - platform: mqtt
    name: "Living Room Fan Timer Remaining"
    state_topic: "living-room-fan/6/get"
    availability_topic: "living-room-fan/connected"
    payload_available: "online"
    payload_not_available: "offline"
    qos: 1

switch:

  - platform: mqtt
    name: "Living Room Fan Beep"
    state_topic: "living-room-fan/4/get"
    command_topic: "living-room-fan/4/set"
    payload_on: '1'
    payload_off: '0'
    availability_topic: "living-room-fan/connected"
    payload_available: "online"
    payload_not_available: "offline"
    qos: 1
    retain: true
    icon: mdi:volume-high

  - platform: template
    switches:
      living_room_fan_speed_low:
        friendly_name: Living Room Fan Speed Low
        value_template: "{{ is_state('input_number.living_room_fan_speed', '0.0') and is_state('fan.living_room_fan', 'on') }}"
        turn_on:
          - service: fan.turn_on
            target:
              entity_id: fan.living_room_fan
          - service: fan.set_percentage
            data:
              percentage: 33
            target:
              entity_id: fan.living_room_fan
        turn_off:
          - service: fan.turn_off
            target:
              entity_id: fan.living_room_fan

      living_room_fan_speed_med:
        friendly_name: Living Room Fan Speed Med
        value_template: "{{ is_state('input_number.living_room_fan_speed', '1.0') and is_state('fan.living_room_fan', 'on') }}"
        turn_on:
          - service: fan.turn_on
            target:
              entity_id: fan.living_room_fan
          - service: fan.set_percentage
            data:
              percentage: 67
            target:
              entity_id: fan.living_room_fan
        turn_off:
          - service: fan.turn_off
            target:
              entity_id: fan.living_room_fan

      living_room_fan_speed_high:
        friendly_name: Living Room Fan Speed High
        value_template: "{{ is_state('input_number.living_room_fan_speed', '2.0') and is_state('fan.living_room_fan', 'on') }}"
        turn_on:
          - service: fan.turn_on
            target:
              entity_id: fan.living_room_fan
          - service: fan.set_percentage
            data:
              percentage: 100
            target:
              entity_id: fan.living_room_fan
        turn_off:
          - service: fan.turn_off
            target:
              entity_id: fan.living_room_fan
alias: Track Living Room Fan Speed
description: ''
trigger:
  - platform: mqtt
    topic: living-room-fan/3/get
condition:
  - condition: template
    value_template: '{{ trigger.payload | int > -1 }}'
action:
  - service: input_number.set_value
    data:
      value: '{{ trigger.payload | int }}'
    target:
      entity_id: input_number.living_room_fan_speed
mode: single
alias: Set Living Room Fan Timer
description: ''
trigger:
  - platform: state
    entity_id:
      - input_number.set_living_room_fan_timer
condition:
  - condition: state
    entity_id: fan.living_room_fan
    state: 'on'
  - condition: template
    value_template: '{{ trigger.to_state.state | int > 0 }}'
action:
  - service: mqtt.publish
    data:
      topic: ceiling-fan/5/set
      qos: '1'
      payload_template: '{{ trigger.to_state.state | int }}'
mode: restart
alias: Cancel Living Room Fan Timer
description: ''
trigger:
  - platform: state
    entity_id:
      - input_number.set_living_room_fan_timer
    to: '0.0'
condition:
  - condition: state
    entity_id: fan.living_room_fan
    state: 'on'
  - condition: template
    value_template: '{{ states(''sensor.living_room_fan_timer_remaining'') > 0 }}'
action:
  - service: fan.turn_off
    data: {}
    target:
      entity_id: fan.living_room_fan
  - wait_for_trigger:
      - platform: mqtt
        topic: ceiling-fan/1/get
        payload: '0'
  - delay:
      hours: 0
      minutes: 0
      seconds: 1
      milliseconds: 0
  - service: fan.turn_on
    data:
      percentage: >-
        {% if is_state('input_number.living_room_fan_speed','0') %} 33 {% elif
        is_state('input_number.living_room_fan_speed','1') %} 67 {% elif
        is_state('input_number.living_room_fan_speed','2') %} 100 {% else %} 33
        {% endif %}
    target:
      entity_id: fan.living_room_fan
mode: single


square: false
columns: 1
type: grid
cards:
  - square: false
    columns: 5
    type: grid
    cards:
      - show_name: true
        show_icon: true
        type: button
        tap_action:
          action: toggle
        entity: light.living_room_light
        show_state: false
        icon: mdi:ceiling-fan-light
      - show_name: true
        show_icon: true
        type: button
        tap_action:
          action: toggle
        icon: mdi:fan-speed-1
        entity: switch.living_room_fan_speed_low
        name: Fan - Low
      - show_name: true
        show_icon: true
        type: button
        tap_action:
          action: toggle
        icon: mdi:fan-speed-2
        entity: switch.living_room_fan_speed_med
        name: Fan - Medium
      - show_name: true
        show_icon: true
        type: button
        tap_action:
          action: toggle
        icon: mdi:fan-speed-3
        entity: switch.living_room_fan_speed_high
        name: Fan - High
      - show_name: true
        show_icon: true
        type: button
        tap_action:
          action: toggle
        entity: switch.living_room_fan_beep
        icon: ''
        name: Controller Beep
  - type: horizontal-stack
    cards:
      - type: entities
        entities:
          - entity: input_number.set_living_room_fan_timer
            icon: ' '
        show_header_toggle: false
      - type: conditional
        conditions:
          - entity: sensor.living_room_fan_timer_remaining
            state_not: '0'
        card:
          type: entity
          entity: sensor.living_room_fan_timer_remaining
          unit: minutes
          name: Fan Timer Remaining
          icon: mdi:timer
      - type: conditional
        conditions:
          - entity: sensor.living_room_fan_timer_remaining
            state_not: '0'
        card:
          show_name: true
          show_icon: false
          type: button
          tap_action:
            action: call-service
            service: input_number.set_value
            service_data:
              value: 0
            target:
              entity_id: input_number.set_living_room_fan_timer
          icon: ''
          name: Cancel Timer
      - type: conditional
        conditions:
          - entity: sensor.living_room_fan_timer_remaining
            state: '0'
        card:
          type: markdown
          content: ' '
      - type: conditional
        conditions:
          - entity: sensor.living_room_fan_timer_remaining
            state: '0'
        card:
          type: markdown
          content: ' '


TL;DR: “RF keeps working 100 % after reflashing”[Elektroda, p.kaczmarek2, post #20466783]; “OffLowMidHigh makes configuration simpler,” says p.kaczmarek2[Elektroda, 20043142] Flashing the BK7231N-based CB2S takes ≈90 s with HID_download_py[Elektroda, echojjj, post #20031489] Why it matters: Local firmware removes Tuya cloud calls while retaining every fan and light feature.
• Voltage: 110 V AC or 220 V AC selectable[Elektroda, echojjj, post #20031489] • Wi-Fi SoC: Beken BK7231N, 2.4 GHz 802.11 b/g/n[Beken Datasheet] • Firmware: OpenBeken v1.x supports BK7231N/T, XR809, BL602[OpenBeken Docs] • OTA: Tuya Cloudcutter works only on pre-patched builds[Elektroda, p.kaczmarek2, post #20985170] • RF remote operates independently of Wi-Fi code[Elektroda, p.kaczmarek2, post #20466783]
resetWiFi in firmware; OpenBeken currently ignores that custom code path[Elektroda, divadiow, post #21187171]hid_download_py and select OpenBeken binary.
Comments
Very good job! I am happy to hear that your fan finally works. It is worth mentioning that I also added an "OffLowMidHigh" option, so instead of this: //channel 3 is dpid3 - fan speed setChannelType... [Read more]
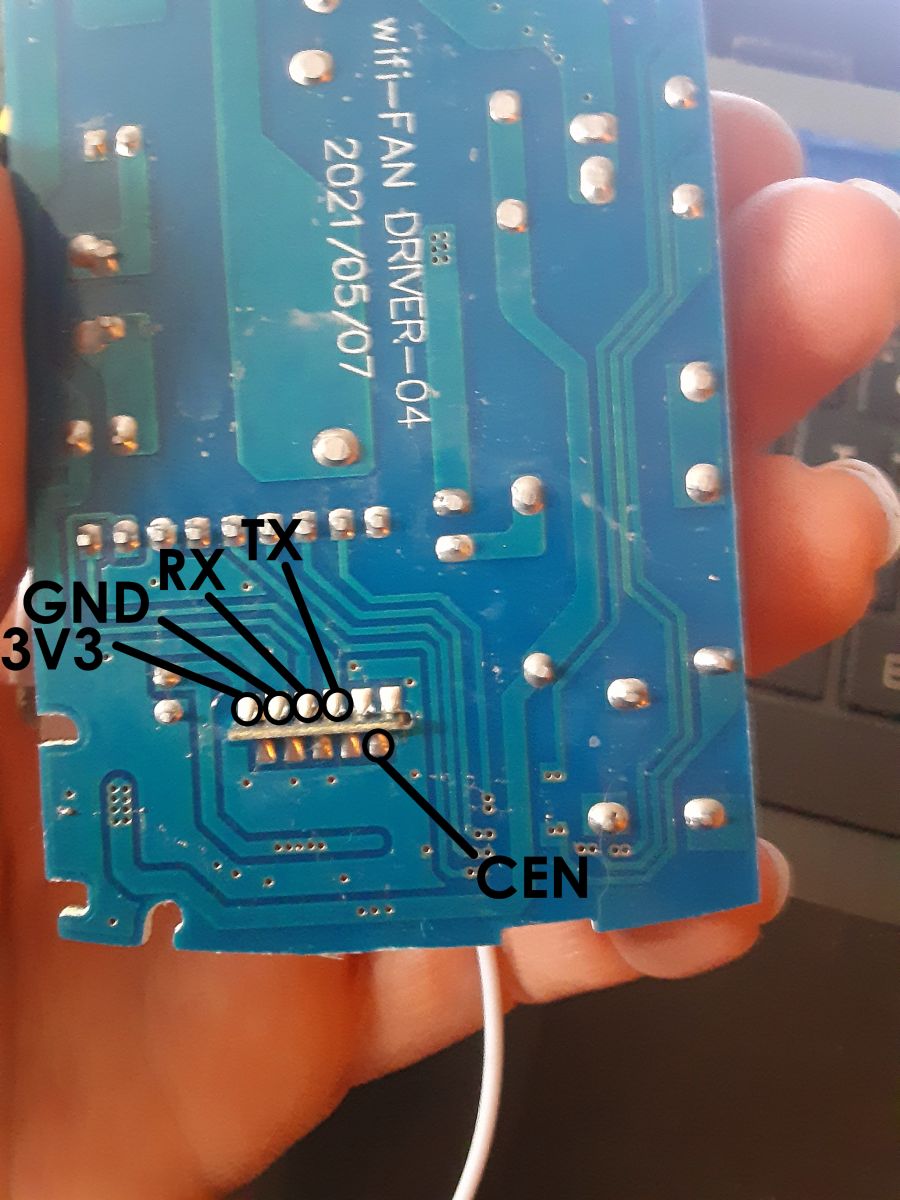
Thank you for this write up! Do you have a picture of where you did this on the board? Or could point me to the location. Thx. 'cut the RX and TX traces between the CB2S module and TuyaMCU' [Read more]
Hey @daveproffer , on this image you can see which traces are RX and TX: You can also take a look at CB2S pinout to determine which signals are RX/TX: https://obrazki.elektroda.pl/5708941200_1665509282_thumb.jpg... [Read more]
Did you manage to get the RF control working? [Read more]
In this device RF receiver is connected directly to MCU so it's always working, it's not affected by the firmware change of the WiFi module. [Read more]
I realized I have a few of these in my house - I can't seem to get flashing to work manually probably due to my own inabilities, however I can have it output a random Wifi Network in pairing mode. I see... [Read more]
Which version is shown in the Tuya app? Newer builds may be already patched. [Read more]
I just picked up one of these and am preparing to reflash it. One thing I noticed in the manual is that there is supposed to be a way to put it into WiFi pairing mode by holding down a button combination... [Read more]
I guess you'd need to sniff out what that message the MCU sends to the WiFi module is when you perform the remote button reset combination. OpenBeken won't know what to do with that message though.... [Read more]