QIACHIP Universal WIFI Ceiling Fan Light Remote Control Kit
model: KLCW-110v/220v
buy: amazon.com, aliexpress.com
It transforms your traditional ceiling fan and its light into a "smart" fan and light!

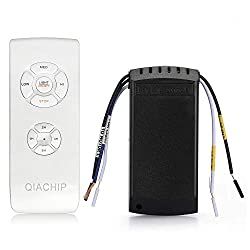
This controller has the following functions:
Turn the fan on or off.
Turn the light on or off.
Set the speed of the fan to low, medium or high.
Set a timer to automatically turn the fan off after a number of hours.
Display how much time is remaining after the timer has been set.
Turn the controller's signal beep on or off.
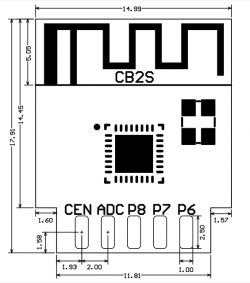
I first bought this ceiling fan/light controller after seeing it listed as a Tasmota supported device. Out of the box, this device can be controlled by its RF remote control or the Smart Life (cloud) app. Smart Life is compatible with Alexa for voice control. But, it's always my goal to keep my smart home devices out of the cloud and have local control. Tasmota is the answer for ESP-based devices. This fan controller has the CB2S module with Beken BK7231N so I would need an ESP drop-in replacement like TYWE2S (ESP-02S) in order to flash Tasmota. So, I ordered the TYWE2S from aliexpress and knew it would take quite a long time for it to arrive.
But, wait...
In the meantime, I discovered OpenBeken firmware supporting the BK7231N (also BK7231T, XR809 and BL602). Wow!
Connections and flashing the firmware:
When OTA programming method becomes available in the near future, you will not have to do this!

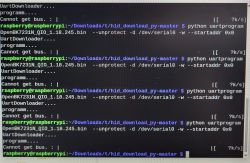
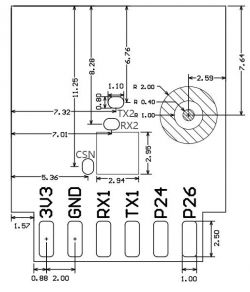
First, I had to cut the RX and TX traces between the CB2S module and TuyaMCU. I connected RX and TX on the module to TX and RX of my CH340 USB to TTL HW597 Converter. I powered the module with an external USB cable (phone charger wires). I connected 5V(+) wire to the AMS1117 input and (-) to GND. The (-) wire has to also be connected to the HW597's GND. I used a breadboard to make the connections. Using the breadboard makes it simple to disconnect and reconnect power which is part of the programming process.
To flash the OpenBeken firmware I used hid_download_py. But first, I saved the original firmware for tuya-cloudcutter, so that this fan controller will be programmable OTA (over-the-air) and you will not have to do any wire connections or soldering!

After flashing the firmware, I soldered wires to reconnect the RX and TX from CB2S to the TuyaMCU. The RF remote control continues to work. Now it's time to do the OpenBeken config.
Mapping TuyaMCU to OpenBeken channels:
TuyaMCU is a little tricky if you have to figure out for yourself the different dpId's, functions and data types. Fortunately for me, this had already been mostly done and available online in Tasmota's template page for this fan controller. One was missing which I found belongs to the controller's beep.
This is the autoexec.bat script which maps the functions of the controller.
Home Assistant [version 2022.5.5] setup for reference:
There are really many ways to set up the fan controller in Home Assistant. I have a ceiling fan that has three speeds (low, medium, high) and a light. The controller has a built-in countdown timer to automatically turn the fan off after a number of hours. Instead of using the built-in timer function like I did, you could easily create an automation using a Home Assistant timer.
My Home Assistant config:
Home Assistant automation to capture the fan speed:
Home Assistant automation to set the fan timer:
Home Assistant automation to cancel the fan timer:
Two Home Assistant helpers:

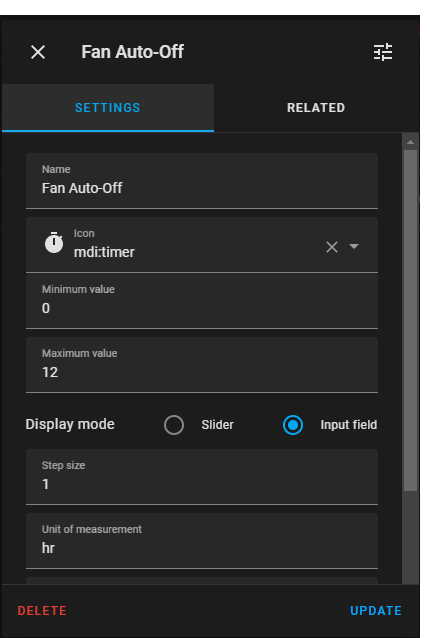

My lovelace cards in Home Assistant:
When the fan timer is set:

When the fan timer is not set:

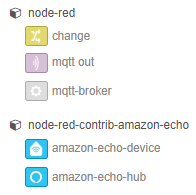
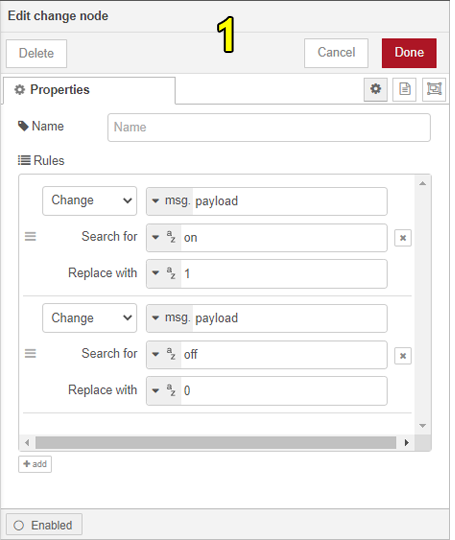
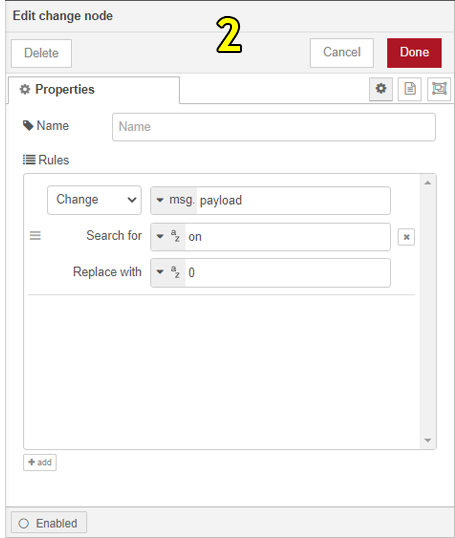
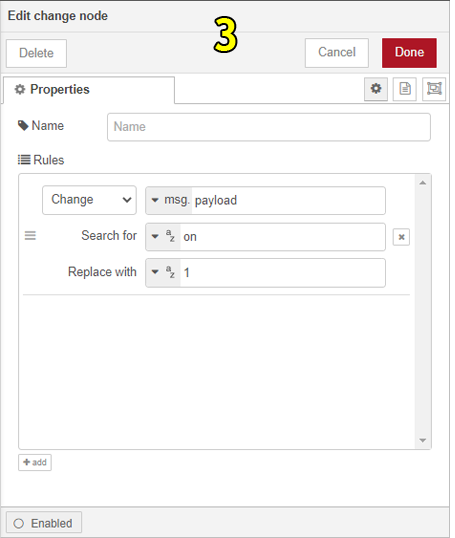
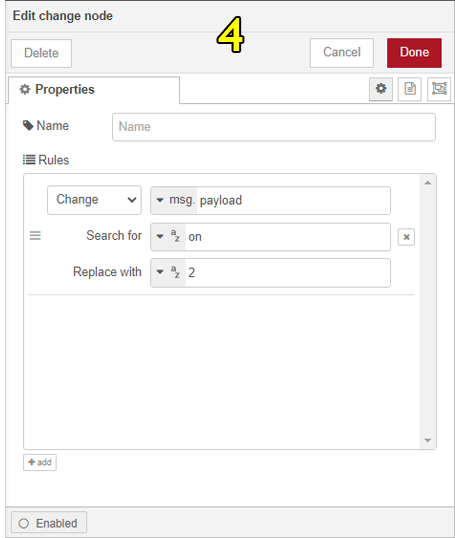
Alexa voice control via Node-RED [v2.2.2] for reference:

model: KLCW-110v/220v
buy: amazon.com, aliexpress.com
It transforms your traditional ceiling fan and its light into a "smart" fan and light!


This controller has the following functions:
Turn the fan on or off.
Turn the light on or off.
Set the speed of the fan to low, medium or high.
Set a timer to automatically turn the fan off after a number of hours.
Display how much time is remaining after the timer has been set.
Turn the controller's signal beep on or off.
I first bought this ceiling fan/light controller after seeing it listed as a Tasmota supported device. Out of the box, this device can be controlled by its RF remote control or the Smart Life (cloud) app. Smart Life is compatible with Alexa for voice control. But, it's always my goal to keep my smart home devices out of the cloud and have local control. Tasmota is the answer for ESP-based devices. This fan controller has the CB2S module with Beken BK7231N so I would need an ESP drop-in replacement like TYWE2S (ESP-02S) in order to flash Tasmota. So, I ordered the TYWE2S from aliexpress and knew it would take quite a long time for it to arrive.
But, wait...
In the meantime, I discovered OpenBeken firmware supporting the BK7231N (also BK7231T, XR809 and BL602). Wow!
Connections and flashing the firmware:
When OTA programming method becomes available in the near future, you will not have to do this!

First, I had to cut the RX and TX traces between the CB2S module and TuyaMCU. I connected RX and TX on the module to TX and RX of my CH340 USB to TTL HW597 Converter. I powered the module with an external USB cable (phone charger wires). I connected 5V(+) wire to the AMS1117 input and (-) to GND. The (-) wire has to also be connected to the HW597's GND. I used a breadboard to make the connections. Using the breadboard makes it simple to disconnect and reconnect power which is part of the programming process.
To flash the OpenBeken firmware I used hid_download_py. But first, I saved the original firmware for tuya-cloudcutter, so that this fan controller will be programmable OTA (over-the-air) and you will not have to do any wire connections or soldering!

After flashing the firmware, I soldered wires to reconnect the RX and TX from CB2S to the TuyaMCU. The RF remote control continues to work. Now it's time to do the OpenBeken config.
Mapping TuyaMCU to OpenBeken channels:
TuyaMCU is a little tricky if you have to figure out for yourself the different dpId's, functions and data types. Fortunately for me, this had already been mostly done and available online in Tasmota's template page for this fan controller. One was missing which I found belongs to the controller's beep.
This is the autoexec.bat script which maps the functions of the controller.
// start MCU driver
startDriver TuyaMCU
// let's say that channel 1 is dpid1 - fan on/off
setChannelType 1 toggle
// map dpid1 to channel1, var type 1 (boolean)
linkTuyaMCUOutputToChannel 1 1 1
// let's say that channel 2 is dpid9 - light on/off
setChannelType 2 toggle
// map dpid9 to channel2, var type 1 (boolean)
linkTuyaMCUOutputToChannel 9 1 2
//channel 3 is dpid3 - fan speed
setChannelType 3 LowMidHigh
// map dpid3 to channel3, var type 4 (enum)
linkTuyaMCUOutputToChannel 3 4 3
//dpId 17 = beep on/off
setChannelType 4 toggle
linkTuyaMCUOutputToChannel 17 1 4
//
//
//dpId 6, dataType 4-DP_TYPE_ENUM = set timer
setChannelType 5 TextField
linkTuyaMCUOutputToChannel 6 4 5
//
//
//dpId 7, dataType 2-DP_TYPE_VALUE = timer remaining
setChannelType 6 ReadOnly
linkTuyaMCUOutputToChannel 7 2 6
Home Assistant [version 2022.5.5] setup for reference:
There are really many ways to set up the fan controller in Home Assistant. I have a ceiling fan that has three speeds (low, medium, high) and a light. The controller has a built-in countdown timer to automatically turn the fan off after a number of hours. Instead of using the built-in timer function like I did, you could easily create an automation using a Home Assistant timer.
My Home Assistant config:
fan:

  - platform: mqtt
    name: "Living Room Fan"
    state_topic: "living-room-fan/1/get"
    command_topic: "living-room-fan/1/set"
    payload_on: '1'
    payload_off: '0'
    percentage_state_topic: "living-room-fan/3/get"
    percentage_value_template: >-
      {% if value == '0' %}
      33
      {% elif value == '1' %}
      67
      {% elif value == '2' %}
      100
      {% else %}
      0
      {% endif %}
    percentage_command_topic: "living-room-fan/3/set"
    percentage_command_template: >-
      {% if value > 0 and value <= 33 %}
      0
      {% elif value > 33 and value <= 67 %}
      1
      {% elif value > 67 and value <= 100 %}
      2
      {% endif %}
    availability_topic: "living-room-fan/connected"
    payload_available: "online"
    payload_not_available: "offline"
    unique_id: "living-room-fan"
    qos: 1
    retain: true

light:

  - platform: mqtt
    name: "Living Room Light"
    state_topic: "living-room-fan/2/get"
    command_topic: "living-room-fan/2/set"
    payload_on: '1'
    payload_off: '0'
    availability_topic: "living-room-fan/connected"
    payload_available: "online"
    payload_not_available: "offline"
    qos: 1
    retain: true

sensor:

  - platform: mqtt
    name: "Living Room Fan Timer"
    state_topic: "living-room-fan/5/get"
    availability_topic: "living-room-fan/connected"
    payload_available: "online"
    payload_not_available: "offline"
    qos: 1

  - platform: mqtt
    name: "Living Room Fan Timer Remaining"
    state_topic: "living-room-fan/6/get"
    availability_topic: "living-room-fan/connected"
    payload_available: "online"
    payload_not_available: "offline"
    qos: 1

switch:

  - platform: mqtt
    name: "Living Room Fan Beep"
    state_topic: "living-room-fan/4/get"
    command_topic: "living-room-fan/4/set"
    payload_on: '1'
    payload_off: '0'
    availability_topic: "living-room-fan/connected"
    payload_available: "online"
    payload_not_available: "offline"
    qos: 1
    retain: true
    icon: mdi:volume-high

  - platform: template
    switches:
      living_room_fan_speed_low:
        friendly_name: Living Room Fan Speed Low
        value_template: "{{ is_state('input_number.living_room_fan_speed', '0.0') and is_state('fan.living_room_fan', 'on') }}"
        turn_on:
          - service: fan.turn_on
            target:
              entity_id: fan.living_room_fan
          - service: fan.set_percentage
            data:
              percentage: 33
            target:
              entity_id: fan.living_room_fan
        turn_off:
          - service: fan.turn_off
            target:
              entity_id: fan.living_room_fan

      living_room_fan_speed_med:
        friendly_name: Living Room Fan Speed Med
        value_template: "{{ is_state('input_number.living_room_fan_speed', '1.0') and is_state('fan.living_room_fan', 'on') }}"
        turn_on:
          - service: fan.turn_on
            target:
              entity_id: fan.living_room_fan
          - service: fan.set_percentage
            data:
              percentage: 67
            target:
              entity_id: fan.living_room_fan
        turn_off:
          - service: fan.turn_off
            target:
              entity_id: fan.living_room_fan

      living_room_fan_speed_high:
        friendly_name: Living Room Fan Speed High
        value_template: "{{ is_state('input_number.living_room_fan_speed', '2.0') and is_state('fan.living_room_fan', 'on') }}"
        turn_on:
          - service: fan.turn_on
            target:
              entity_id: fan.living_room_fan
          - service: fan.set_percentage
            data:
              percentage: 100
            target:
              entity_id: fan.living_room_fan
        turn_off:
          - service: fan.turn_off
            target:
              entity_id: fan.living_room_fan
Home Assistant automation to capture the fan speed:
alias: Track Living Room Fan Speed
description: ''
trigger:
  - platform: mqtt
    topic: living-room-fan/3/get
condition:
  - condition: template
    value_template: '{{ trigger.payload | int > -1 }}'
action:
  - service: input_number.set_value
    data:
      value: '{{ trigger.payload | int }}'
    target:
      entity_id: input_number.living_room_fan_speed
mode: single
Home Assistant automation to set the fan timer:
alias: Set Living Room Fan Timer
description: ''
trigger:
  - platform: state
    entity_id:
      - input_number.set_living_room_fan_timer
condition:
  - condition: state
    entity_id: fan.living_room_fan
    state: 'on'
  - condition: template
    value_template: '{{ trigger.to_state.state | int > 0 }}'
action:
  - service: mqtt.publish
    data:
      topic: ceiling-fan/5/set
      qos: '1'
      payload_template: '{{ trigger.to_state.state | int }}'
mode: restart
Home Assistant automation to cancel the fan timer:
alias: Cancel Living Room Fan Timer
description: ''
trigger:
  - platform: state
    entity_id:
      - input_number.set_living_room_fan_timer
    to: '0.0'
condition:
  - condition: state
    entity_id: fan.living_room_fan
    state: 'on'
  - condition: template
    value_template: '{{ states(''sensor.living_room_fan_timer_remaining'') > 0 }}'
action:
  - service: fan.turn_off
    data: {}
    target:
      entity_id: fan.living_room_fan
  - wait_for_trigger:
      - platform: mqtt
        topic: ceiling-fan/1/get
        payload: '0'
  - delay:
      hours: 0
      minutes: 0
      seconds: 1
      milliseconds: 0
  - service: fan.turn_on
    data:
      percentage: >-
        {% if is_state('input_number.living_room_fan_speed','0') %} 33 {% elif
        is_state('input_number.living_room_fan_speed','1') %} 67 {% elif
        is_state('input_number.living_room_fan_speed','2') %} 100 {% else %} 33
        {% endif %}
    target:
      entity_id: fan.living_room_fan
mode: single
Two Home Assistant helpers:


My lovelace cards in Home Assistant:
When the fan timer is set:

When the fan timer is not set:

square: false
columns: 1
type: grid
cards:
  - square: false
    columns: 5
    type: grid
    cards:
      - show_name: true
        show_icon: true
        type: button
        tap_action:
          action: toggle
        entity: light.living_room_light
        show_state: false
        icon: mdi:ceiling-fan-light
      - show_name: true
        show_icon: true
        type: button
        tap_action:
          action: toggle
        icon: mdi:fan-speed-1
        entity: switch.living_room_fan_speed_low
        name: Fan - Low
      - show_name: true
        show_icon: true
        type: button
        tap_action:
          action: toggle
        icon: mdi:fan-speed-2
        entity: switch.living_room_fan_speed_med
        name: Fan - Medium
      - show_name: true
        show_icon: true
        type: button
        tap_action:
          action: toggle
        icon: mdi:fan-speed-3
        entity: switch.living_room_fan_speed_high
        name: Fan - High
      - show_name: true
        show_icon: true
        type: button
        tap_action:
          action: toggle
        entity: switch.living_room_fan_beep
        icon: ''
        name: Controller Beep
  - type: horizontal-stack
    cards:
      - type: entities
        entities:
          - entity: input_number.set_living_room_fan_timer
            icon: ' '
        show_header_toggle: false
      - type: conditional
        conditions:
          - entity: sensor.living_room_fan_timer_remaining
            state_not: '0'
        card:
          type: entity
          entity: sensor.living_room_fan_timer_remaining
          unit: minutes
          name: Fan Timer Remaining
          icon: mdi:timer
      - type: conditional
        conditions:
          - entity: sensor.living_room_fan_timer_remaining
            state_not: '0'
        card:
          show_name: true
          show_icon: false
          type: button
          tap_action:
            action: call-service
            service: input_number.set_value
            service_data:
              value: 0
            target:
              entity_id: input_number.set_living_room_fan_timer
          icon: ''
          name: Cancel Timer
      - type: conditional
        conditions:
          - entity: sensor.living_room_fan_timer_remaining
            state: '0'
        card:
          type: markdown
          content: ' '
      - type: conditional
        conditions:
          - entity: sensor.living_room_fan_timer_remaining
            state: '0'
        card:
          type: markdown
          content: ' '
Alexa voice control via Node-RED [v2.2.2] for reference:


Cool? Ranking DIY


