Today, together with my assistant, I will present you a RGBCW bulb flashing guide, including WiFi SMD module with a cheap soldering iron. We will flash
OpenBeken to WB2L_M1 from BK7231N (i.e. equivalent to older
WB2L with BK7231T) so that you can free the LED lamp from the cloud and connect it to Home Assistant. Everything will be shown step by step so that you can repeat our actions:
I recommend watching the whole movie, but here's a short teaser showing the most interesting part:

This film is somewhat complementary to the topics:
-
'Bulb' LED WiFi RGBCW Tuya - interior, programming, BK7231N
-
Nous Smart WiFi Bulb P3 RGBCW - CB2L + BP5758 - firmware change
Also, check out other topics about related products:
-
Light switch from USA - Gosund Smart Switch SW5-A-V2.1 - BK7231T
-
Garden double relay Tuya CCWFIO232PK - BK7231T - programming
and many other topics, not only mine, from the department
"Insides of Devices" .
It's worth getting to know the Home Assistant tutorial:
Tutorial Home Assistant - configuration, WiFi, MQTT, Zigbee, Tasmota
Let's not forget about Tasmota - this firmware is my inspiration when creating OpenBeken, as well as e.g. OpenBeken is compatible with Tasmota through Tasmota Device Groups:
ESP8266 and Tasmota - controlling the WiFi relay step by step
As a supplement to the video, I will add that:
- pairing with Home Assistant can be done either by our HA Discovery, or by hand (with autogenerated Yaml code)
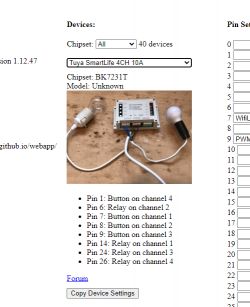
- you do not need to manually set the pins anymore, on the javascript web panel (Launch Web Application button - the second web panel) there is an online database of devices that is always downloaded from the network, so if you already know the device, you just select the name from the list and you can automatically set its configuration:
- OBK already supports the base protocol
DDP - that is, you can run RGB animations on these lamps
Links mentioned in the video:
- OpenBeken
https://github.com/openshwprojects/OpenBK7231T_App
- hid_download_py:
https://github.com/OpenBekenIOT/hid_download_py
- bkWriter 1.60:
https://github.com/openshwprojects/OpenBK7231T/blob/master/bk_writer1.60.zip
- ready builds for various platforms (BK7231T, BK7231N, XR809, W800, W801, T34, BL602) to download:
https://github.com/openshwprojects/OpenBK7231T_App/releases
Tuya-cloudcutter, an alternative way to upload firmware without soldering wires, but only for supported devices:
https://github.com/tuya-cloudcutter/tuya-cloudcutter
And remember that the contest:
Present your own construction or send an article and receive a 64GB SD card
It also applies to topics placed in "
IoT devices ", section.
This is our first video on YT. I apologize in advance for the shortcomings, I am aware of them. It was really hard to manipulate the soldering iron with the stand in front of me, so I'm glad something came out of it anyway. Also, the way to remove the LED board was unfortunate. Normally I grab the base to the vice and pry with two hands / two screwdrivers, but how to do it in front of the camera?
Do you like this form of presentation? Accelerated video + commentary + subtitles on the video? Let me know, and maybe we'll record something else for you.
Finally, thanks: to my assistant for the audio, small help with processing, corrections and testing and to @TechEkspert for technical support with the video, noise reduction, etc.


Comments
It's nice to listen to a female voiceover :D . However, "ArGeeBee" sounds a bit strange as a term for RGB LEDs, it would sound better in our RGB. The movie is very cool, it shows that you don't... [Read more]
Cheap soldering equipment will do the trick, you just need to remember about the hygiene of the soldering tip, and flux and braid are also necessary. And a lead binder for the method from the movie ...... [Read more]
I myself use not the highest-flying equipment and even with one efficient hand I can do it. "Hygiene" of the tip is the basis and additionally matching the tip to the activities performed. Pb solder is... [Read more]
In the comments on YT, there was a question about the purpose of such a modification, it seems that the topic of freeing the equipment from the application and ecosystem provided by the manufacturer is... [Read more]
That's why I didn't even mention it :D . [Read more]
In the sense, the user asks why we are making a backup of the batch in the video? I understand correctly? It is not necessary, you can upload new firmware without it, but we do it for two reasons: 1.... [Read more]
Thanks for explaining the topic, it was about the possibility of copying the original software and protection against writing / reading the module memory. This puzzles me, as this may be the weakest... [Read more]
In the case of a "bulb" built on ESP8266 with Tuya firmware (I haven't tested the others personally), it is enough to rip its memory (a regular UART to USB converter and esptool.py is enough, or directly... [Read more]
It's not that bad at all. It only comes down to choosing the right SoC and framework. Hardware Security By Design How to Secure ESP32 Flash Encryption [Read more]
All in all, a valid comment with this bold, I will emphasize there that it was mainly about Tuya "light bulbs" (or I would extend it to Tuya products in general) on ESP8266 and BK7231. Tuya (and any smaller... [Read more]
A huge plus for all the work, and for the film documentation. Accelerated video is cool :) One minor caveat - the instruction in the video from 3:11 to 3:22 is a bit risky, especially for the inexperienced,... [Read more]
Nice material, but useful for someone whose hands don't shake. By the way, I'm not convinced by these bulbs with Wi-Fi. How's the life of it? Because it's kind of fun to remake it. Personally,... [Read more]