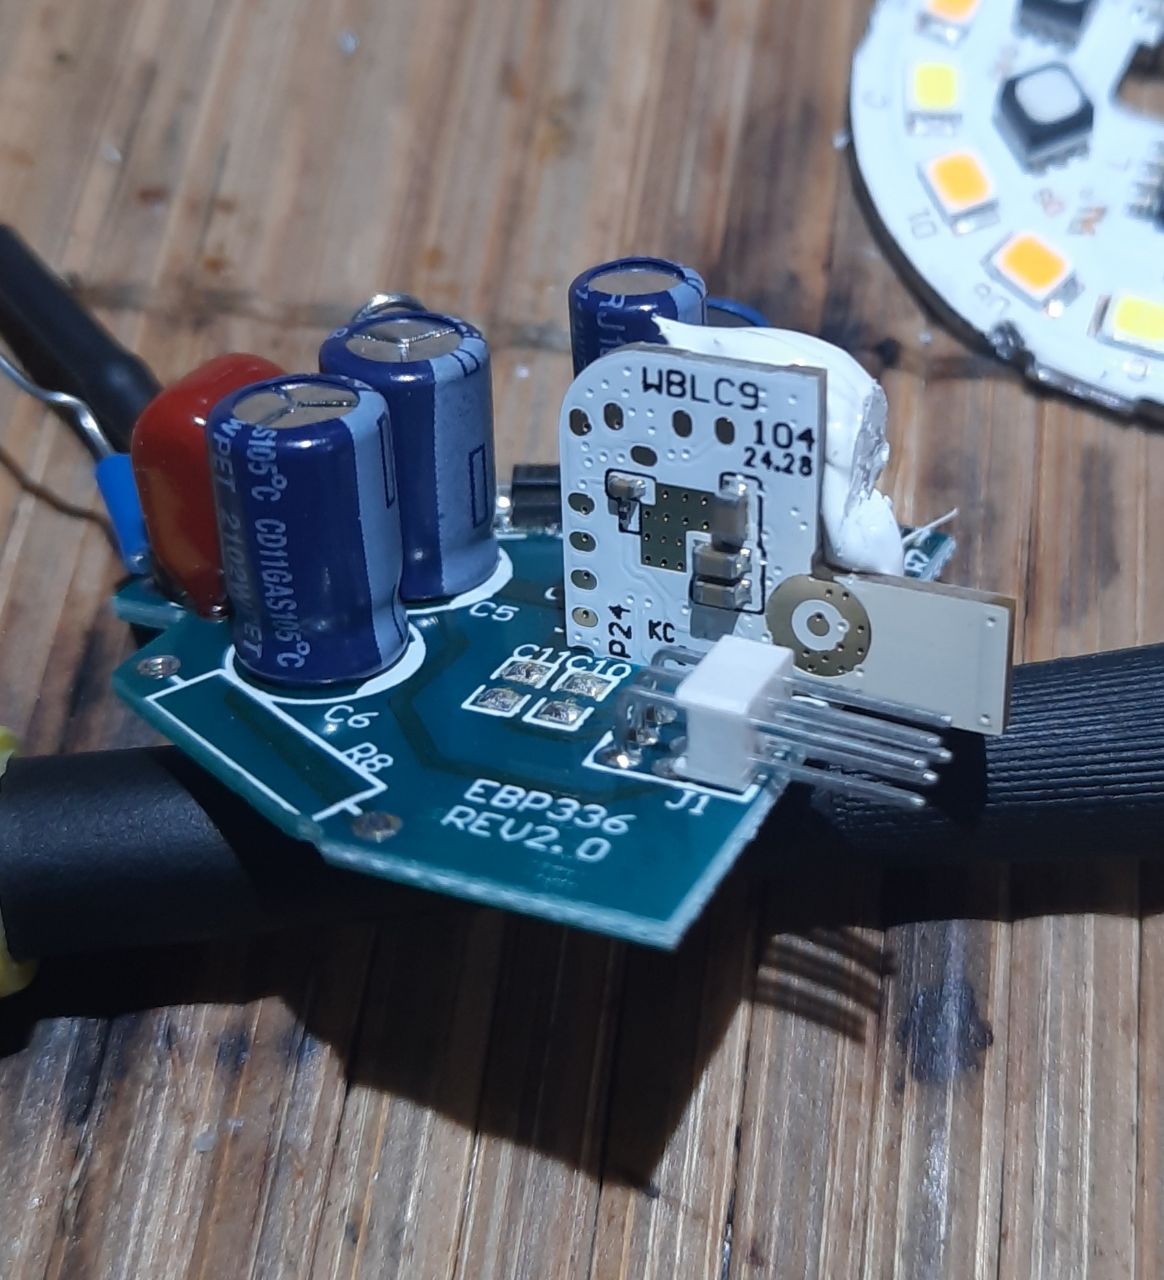
Which electronics sit inside the Tuya WBLC9 RGB+CW bulb?
The board carries a WBLC9 module built around a Beken BK7231T Wi-Fi MCU and drives the LEDs with a BP1658CJ constant-current chip [Elektroda, skrc1, post #20232263]
Czy wolisz polską wersję strony elektroda?
Nie, dziękuję Przekieruj mnie tam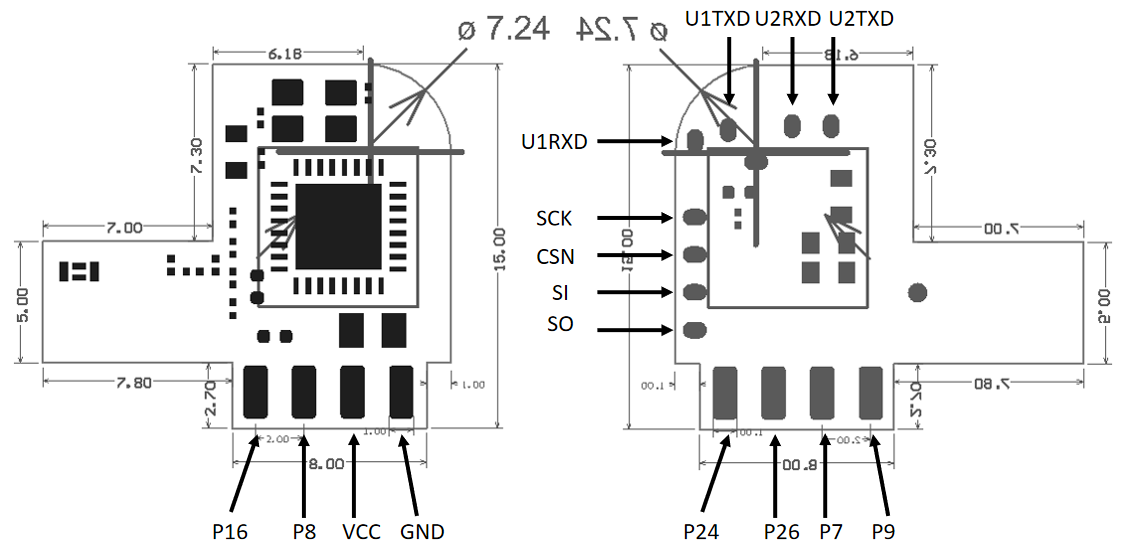
 msg1652874...-36669.jpg (98.89 kB)You must be logged in to download this attachment.
 msg1652874...-36670.jpg (94.52 kB)You must be logged in to download this attachment.
 msg1652874...-36671.jpg (137.91 kB)You must be logged in to download this attachment.
  msg1652874...-36673.jpg (94.07 kB)You must be logged in to download this attachment.
 msg1652874...-36675.jpg (182.66 kB)You must be logged in to download this attachment.
 msg1652874...-36676.jpg (67.17 kB)You must be logged in to download this attachment.
 msg1652874...-36677.jpg (193.79 kB)You must be logged in to download this attachment.
  msg1652874...-36678.jpg (123.03 kB)You must be logged in to download this attachment.
 msg1652874...-36680.jpg (123.36 kB)You must be logged in to download this attachment.
 msg1652874...-36679.jpg (143.45 kB)You must be logged in to download this attachment.
 msg1652874...-36681.jpg (174.15 kB)You must be logged in to download this attachment.
 msg1652874...-36682.jpg (71.34 kB)You must be logged in to download this attachment.
 msg1652874...-36685.jpg (31.28 kB)You must be logged in to download this attachment.
 ??????..PNG (104.41 kB)You must be logged in to download this attachment.
  msg1652874...-36683.jpg (129.17 kB)You must be logged in to download this attachment.
 msg1652874...-36684.jpg (257.65 kB)You must be logged in to download this attachment.
{$ INIT_AND_READ_FLASH_ID}
begin
  ID:= CreateByteArray(4);
  RESP:= CreateByteArray(250);
  if not SPIEnterProgMode(_SPI_SPEED_MAX) then LogPrint('Error setting SPI speed');
  LogPrint ('Read JEDEC ID');
    // init SPI
  for i:=0 to 250 do
  begin
    SPIWrite (0, 1, $D2);
    ProgressBar(1);
  end;
    // read response
  SPIRead(1, 3, ID);
    // logprint('RESP: ' + inttohex((GetArrayItem(RESP, 0)),2)+ inttohex((GetArrayItem(RESP, 1)),2));
    // read ID to test installation
  SPIWrite (0, 4, $9F, $00, $00, $00);
  SPIRead(1, 4, ID);
  logprint('CHIP ID: ' + inttohex((GetArrayItem(ID, 2)),2) + inttohex((GetArrayItem(ID, 1)),2)+ inttohex((GetArrayItem(ID, 0)),2));
  LogPrint ('End read JEDEC ID');
  SPIExitProgMode ();
end
python uartprogram С:\test\OpenBK7231T_UA_1.12.103.bin -d com8 -w
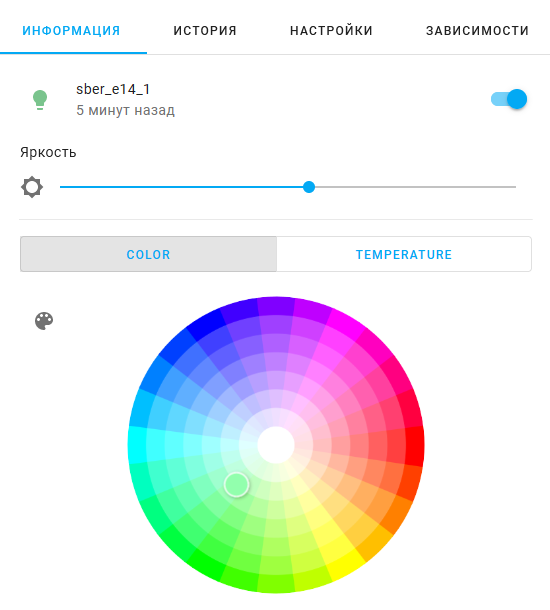
mqtt:
  light:
  - unique_id: "Name_Id"
    name: "Name"
    rgb_command_template: "{{ '%02x%02x%02x' | format(red, green, blue)}}"
    rgb_state_topic: "obkMAC/led_basecolor_rgb/get"
    rgb_command_topic: "cmnd/obkMAC/led_basecolor_rgb"
    rgb_value_template: "{{ value[0:2]|int(base=16) }},{{ value[2:4]|int(base=16) }},{{ value[4:6]|int(base=16) }}"
    command_topic: "cmnd/obkMAC/led_enableAll"
    state_topic: "obkMAC/led_enableAll/get"
    availability_topic: "obkMAC/connected"
    payload_on: "1"
    payload_off: "0"
    brightness_command_topic: "cmnd/obkMAC/led_dimmer"
    brightness_scale: 100
    brightness_state_topic: "obkMAC/led_dimmer/get"
    brightness_value_template: "{{value}}"
    color_temp_command_topic: "cmnd/obkMAC/led_temperature"
    color_temp_state_topic: "obkMAC/led_temperature/get"
    retain: true

 msg1652874704-36681.jpg
(174.15 KB)
You must be logged in to download this attachment.
msg1652874704-36681.jpg
(174.15 KB)
You must be logged in to download this attachment.
TL;DR: 95 % of WBLC9 bulbs flash successfully when a 2 MB SPI backup is made first; "always save the dump before you hack" [Elektroda, skrc1, post #20232263] Follow the UART method, set BP1658CJ_DAT/CLK, and update BP1658CJ_Map for correct color order.
Why it matters: One mis-step can brick the lamp, so having a concise, cited guide saves time and hardware.
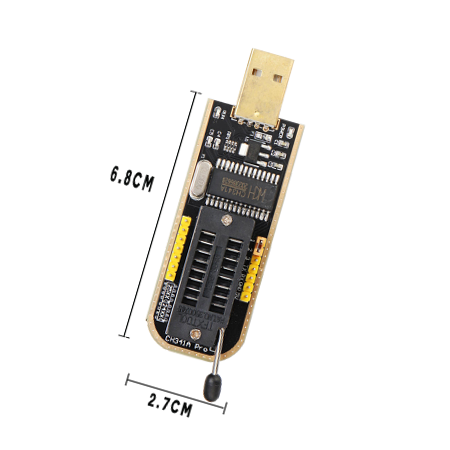
• MCU/Module: Beken BK7231T on WBLC9, 32-bit 120 MHz, 1 MB RAM, 2 MB flash [Tuya, 2022] • Flash chip: EN25QH16, full dump size = 2 MB [Elektroda, skrc1, post #20232263] • Backup read time: 17 s with CH341A at 3.3 V [Elektroda, skrc1, post #20232263] • Typical CH341A programmer price: ≈ US$4 [AliExpress, 2024] • Default OpenBeken color map: 2 1 0 4 3 → B R G W C [Elektroda, skrc1, post #20500306]
python uartprogram C:\test\OpenBK7231T_UA_xxx.bin -d COM8 -w [Elektroda, skrc1, post #20232263]BP1658CJ_Map 2 1 0 4 3; this reorders channels to B R G W C [Elektroda, skrc1, post #20500306]BP1658CJ_Map 1 0 2 3 4 gave the correct palette on another batch [Elektroda, pogadaevalecsey, post #20500725]obkMAC/led_basecolor_rgb/get and expects commands on cmnd/obkMAC/led_basecolor_rgb plus led_dimmer, led_temperature, and led_enableAll topics [Elektroda, skrc1, post #20232263]board_build.bkcrypt_coeffs 7d1ff9b3…; others still refuse, showing vendor-specific protection [Elektroda, insmod, post #21003726] "Support for locked variants is under investigation" [Elektroda, divadiow, post #21001743]
Comments
Как узнать правильный порядок цветов , у меня аналогичная лампа, но цвета не соответствуют выбранным. [Read more]
Change Startup command text:: BP1658CJ_Map 2 1 0 4 3 2 1 0 4 3 - > BRGWC [Read more]
спасибо ! разобрался сам, получилось BP1658CJ_Map 1 0 2 3 4 [Read more]
I just recieved the same bulb, board is the same, only module is different. It has CBLC9, and it doesn't work with custom firmware (neither openbeken, or libretiny has worked). If flashed with openbeken,... [Read more]
interesting. I wonder if it's uses new keys like https://www.elektroda.com/rtvforum/topic4032988.html @pkaczmarek2 knows about this. I think I've seen other posts with similar boot output and non-working... [Read more]
https://github.com/Brokly/ESPHOME_SBER_SBDV-00115 @divadiow Only: board_build.bkcrypt_coeffs: 79bffed7a3fbeafd5dd3abffdfbfff5b board_build.bkota.key: BDB4CE110F4787C2F539BF50E30A14E0 board_build.bkota.iv:... [Read more]
That one has not worked for me, it seems it has different encryption keys. Besides, it's a different device, E27 + CB2L + BP5758D. Edit: installed with these platformio_options: board_build.bkcrypt_coeffs:... [Read more]