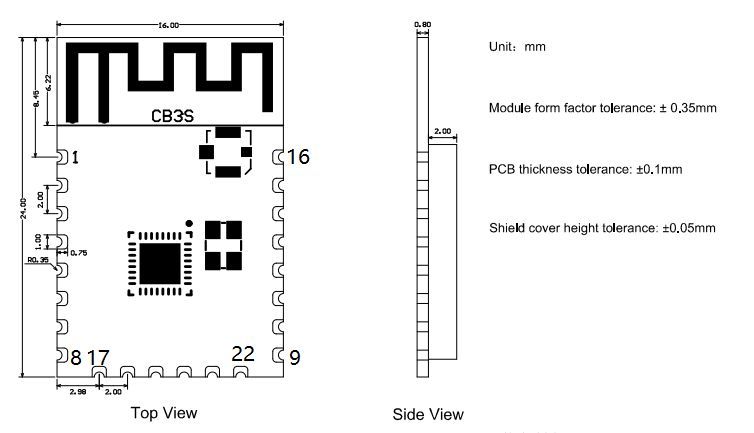
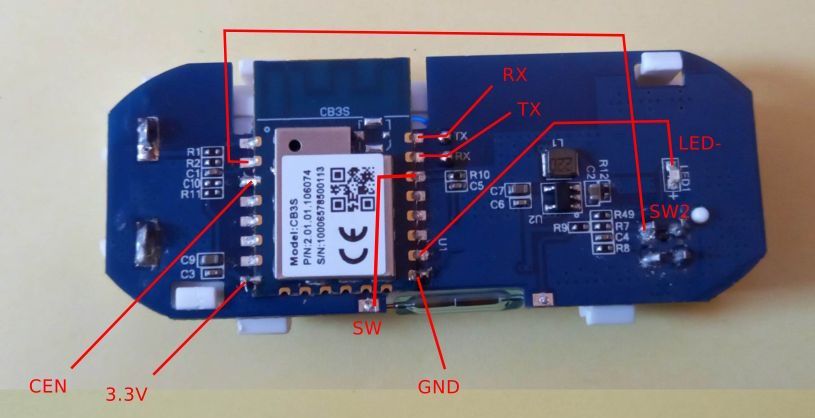
Heckermann Wifi Door Window Sensor PB69 uses a CB3S (BK7231N) module on PB-69W VER 1.3 20211112, with separate RXD1 and TXD1 pads on the PCB.
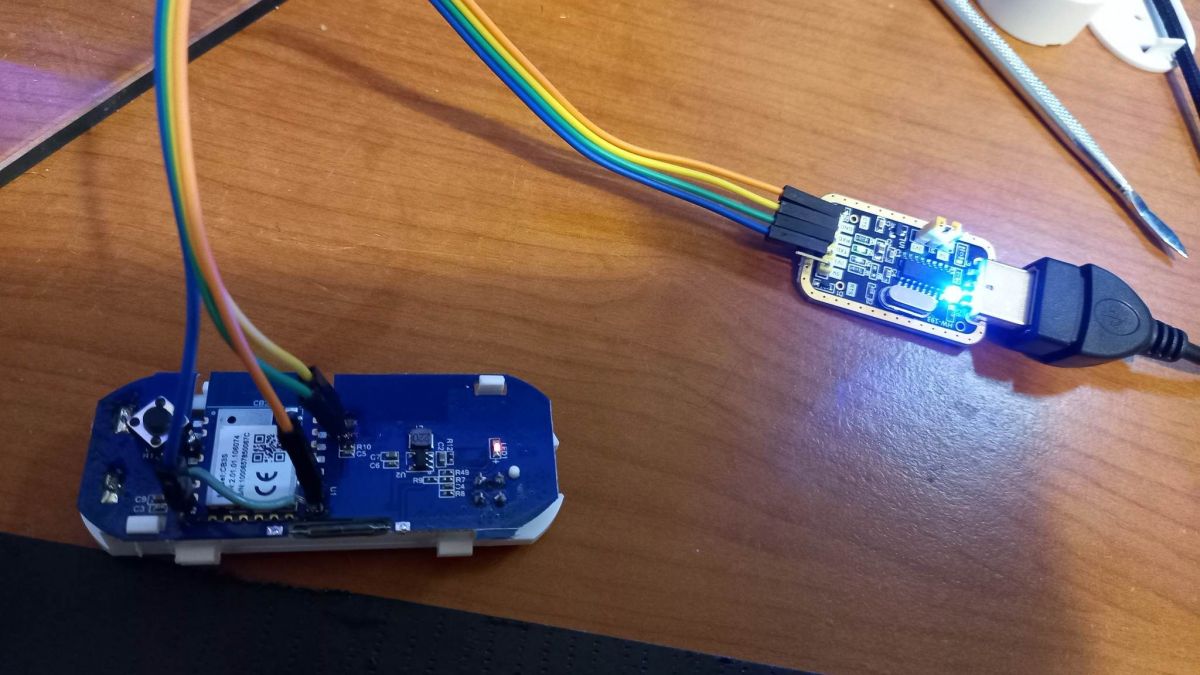
Firmware replacement works through a CH340 adapter by wiring 3.3V, GND, TX, and RX, then briefly shorting CEN to GND to enter programming mode.
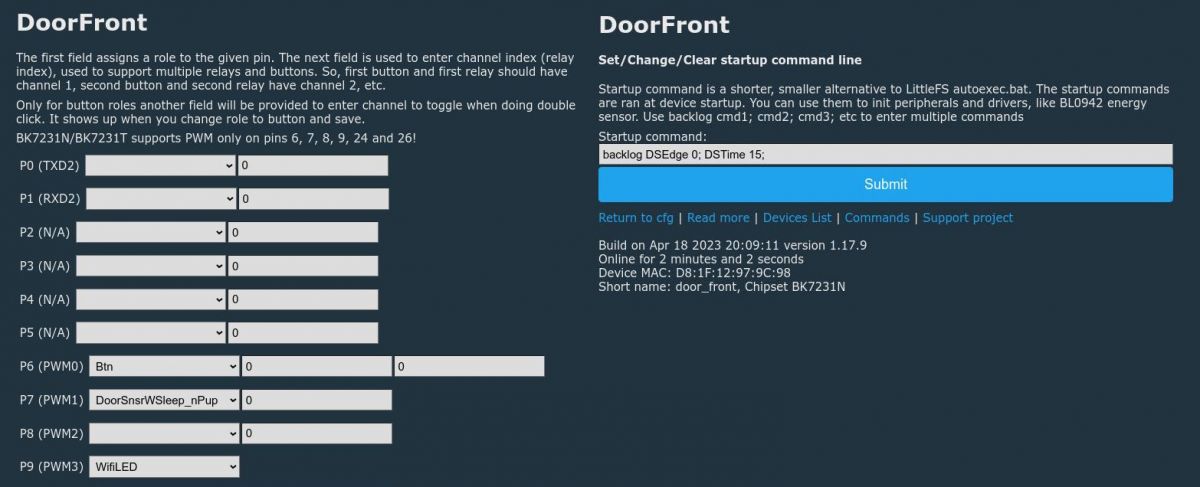
OpenBK7231T_App firmware needs version 1.17.10 or newer, and the module is configured as P6 Btn, P7 DoorSnsrWSleep_nPup, and P9 LED.
Home Assistant setup uses MQTT and discovery, but the sensor values are swapped by default, so a manual YAML sensor and door entity class are recommended.
Generated by the language model.
Name on sale: Autonomous Tuya window door opening sensor Label name: Heckermann, Product: Wifi Door Window Sensor, Model: PB69
Device photos:
Disassembly photos:
Microcontroller: CB3S (BK7231N) PCB: PB-69W VER 1.3 20211112
Pin description:
PIN
GPIOs
PWM
Function
Description
3
PRICE
PRICE
shorting to GND enables programming
7
GPIO6
0
BTN
switchna obudowie
8
Vcc
3.3V
zasilanie +
9
GND
GND
masa -
10
GPIO9
3
WifiLED
dioda
14
GPIO7
1
DoorSnsrWSleep_nPup
kontaktron
15
RXD1
RX
Posada osobne wyprowadzenie na PCB
16
TXD1
TX
has a separate output on the PCB
Firmware change:
CH340 converter is enough to change FW. We connect Vcc 3.3V, GND and TX and RX interchangeably. I didn't need an additional power source during development. A switch should be connected to the CEN and GND pins, which, when pressed, will enable downloading or uploading the FW.
After running the command, you need to briefly press the button connected to the CEN to start programming. After all, just unplug the device, insert the batteries, connect to the new Wifi AP and start configuration via www.
Necessary settings:
We connect to the Access Point of the device via Wifi and enter the configuration page: http://192.168.4.1
We set in turn:
1. Wi-Fi → Configure WiFi ( after confirming, we need to reconnect via the address taken from DHCP )
2. Static IP address to speed up connection → Configure IP
3. Sensors → Configure module :
P6
Btn
P7
DoorSnsrWSleep_nPup
P9
LED
4. Flags → Configure general/flags :
x
35 [HASS] Deactivate avty_t flag for sensor when publishing to HASS (permit to keep value). You must restart HASS discovery for change to take effect.
x
37 [WiFi] Quick connect to WiFi on reboot (TODO: check if it works for you and report on github)
5. Start commands → Change startup command text : (we set the same wake-up state for each position and shorten the time to fall asleep)
Very good material, at the beginning I will only add that disabling the addition availability can also be implemented through a flag, according to:
https://github.com/openshwprojects/OpenBK7231T_App/blob/main/docs/flags.md
... [Read more]
gulson
19 Apr 2023 13:42
Great, thanks for the presentations, if you write me a PM with a parcel locker, I'll send a gift :) [Read more]
Hello ,
I was able to successfully change the software, unfortunately I entered the MQTT data incorrectly and I can't change it, I still have old data, re-uploading does not help, it does not open... [Read more]
p.kaczmarek2
25 May 2023 12:49
Turning the power on and off five times will force open the configuration AP, where you can change the settings, according to the FAQ: https://github.com/openshwprojects/OpenBK7231T_App/blob/main/docs/faq.md
... [Read more]
kasa
25 May 2023 20:22
Thanks, it helped
Ultimately, I would like to have it in IOBROKER, maybe some other config? [Read more]
I'm all about that PB69,
I admit it's my first contact with OBeken, I work with various "sonofs" and Tasmota all the time, Iobroker is running on Proxmox in a "container"
I have different door... [Read more]
Jagis
23 Jun 2023 13:05
Hi,
I have a problem with the door/window open/close sensor. The manufacturer is Melink, on the PCB I found only such information as MC400D-A002 and the production date 20210910. The sensor has a CB3S... [Read more]
p.kaczmarek2
23 Jun 2023 14:44
Hello @jagis, this issue was discussed with @nihildiximus in this thread:
https://www.elektroda.pl/rtvforum/topic3971140-0.html
But in short, you just probably need to change the DSEdge setting to something... [Read more]
andrewishy2
26 Sep 2023 19:56
I have the same device, this is what I did to make the purple board work...
Set the I/O to the following
https://obrazki.elektroda.pl/8823864500_1695755390_thumb.jpg
And the following in the... [Read more]
jnoam
01 Oct 2023 10:44
Hi,
I have what seems to be the same board (purple one). I configured as suggested by @andrewishy2 and want to ask if you see the same behavior (which might be OK for you?):
1. The module wakes up... [Read more]
andrewishy2
01 Oct 2023 22:08
2. Mine has some delay while it gets on the wifi network. However, I have set a static IP address so that it should not be waiting for DHCP.
4. I have some zigbee door sensors, they are more expensive... [Read more]
FAQ
TL;DR: Deep-sleep current is only 6 µA [BK7231N Datasheet, 2022]. "Turning the power on and off five times will force open the configuration AP" [Elektroda, p.kaczmarek2, post #20593887] Flash OpenBK7231 ≥1.17.10, set pins P6/P7/P9, and use DSEdge to fine-tune wake-up.
Why it matters: These tweaks cut setup time, save battery life, and keep the €8 sensor fully local.
What hardware sits inside the Heckermann PB69 door/window sensor?
The board carries a CB3S module with a 32-bit BK7231N Wi-Fi SoC, on-board PCB antenna, a magnetic-hall door sensor, tactile push-button on GPIO6, red status LED on GPIO9, and a 3 V battery holder [Elektroda, nihildiximus, post #20546781]
How do I flash OpenBK7231 firmware onto the CB3S?
Wire Vcc 3.3 V, GND, TXD1↔RX, RXD1↔TX, and short CEN to GND.
Run ./uartprogram -d /dev/ttyUSB0 -b 128000 -u -w OpenBK7231T_UA_1.17.10.bin.
Which exact pins must I connect for UART flashing?
Pin 8 (Vcc 3.3 V), Pin 9 (GND), Pin 15 (RXD1), Pin 16 (TXD1); keep Pin 3 shorted to GND while flashing to enter bootloader mode [Elektroda, nihildiximus, post #20546781]
How can I back up the original Tuya firmware before modding?
Use the same UART link and execute ./uartprogram -d /dev/ttyUSB0 -b 115200 -s 0x00 -u -r backup-fw.bin to read out the full flash image [Elektroda, nihildiximus, post #20546781]
I entered wrong MQTT credentials—how do I reset Wi-Fi/MQTT settings?
The sensor sleeps closed and never wakes—what fixes it?
Adjust the wake edge: set DSEdge 1 or DSEdge 2 in autoexec.bat, then reboot. Users report restored wake-ups from both open and closed states after the change [Elektroda, p.kaczmarek2, post #20628332]
How can I shorten the 9-10 s MQTT delay after wake-up?
BAT_ADC only reports with a real battery connected. Insert the cell and map GPIO23 (or 14 on some boards) to BAT_ADC; the value then appears on MQTT channel 5 [Elektroda, andrewishy2, post #20754824]
Should the LED flash on door activity?
Yes. Assign GPIO9 to LED or WifiLED_n; the diode blinks during Wi-Fi join and on state changes. No flash indicates a wrong role or damaged LED [Elektroda, nihildiximus, post #20546781]
Can I use the PB69 with ioBroker instead of Home Assistant?
Absolutely. Expose the same MQTT topics (doors_front/0/get, etc.) and add a state object in ioBroker’s MQTT adapter. No firmware change is required; only topic mapping differs [ioBroker Docs, 2024].
What power draw should I expect?
OpenBK deep-sleep averages 6 µA; active Wi-Fi peaks near 40 mA [BK7231N Datasheet, 2022]. At two events per hour, a 1000 mAh cell can last over one year.
What can go wrong during flashing and how do I recover?
Edge-case: feeding 5 V to Vcc can permanently damage the MCU. Mis-swapped TX/RX or forgetting to ground CEN only blocks flashing; the bootloader remains intact—rewire and retry at 3.3 V [Elektroda, nihildiximus, post #20546781]


Comments
Very good material, at the beginning I will only add that disabling the addition availability can also be implemented through a flag, according to: https://github.com/openshwprojects/OpenBK7231T_App/blob/main/docs/flags.md ... [Read more]
Great, thanks for the presentations, if you write me a PM with a parcel locker, I'll send a gift :) [Read more]
Entry completed :) [Read more]
Hello , I was able to successfully change the software, unfortunately I entered the MQTT data incorrectly and I can't change it, I still have old data, re-uploading does not help, it does not open... [Read more]
Turning the power on and off five times will force open the configuration AP, where you can change the settings, according to the FAQ: https://github.com/openshwprojects/OpenBK7231T_App/blob/main/docs/faq.md ... [Read more]
Thanks, it helped Ultimately, I would like to have it in IOBROKER, maybe some other config? [Read more]
And what device do you have? [Read more]
I'm all about that PB69, I admit it's my first contact with OBeken, I work with various "sonofs" and Tasmota all the time, Iobroker is running on Proxmox in a "container" I have different door... [Read more]
Hi, I have a problem with the door/window open/close sensor. The manufacturer is Melink, on the PCB I found only such information as MC400D-A002 and the production date 20210910. The sensor has a CB3S... [Read more]
Hello @jagis, this issue was discussed with @nihildiximus in this thread: https://www.elektroda.pl/rtvforum/topic3971140-0.html But in short, you just probably need to change the DSEdge setting to something... [Read more]
I have the same device, this is what I did to make the purple board work... Set the I/O to the following https://obrazki.elektroda.pl/8823864500_1695755390_thumb.jpg And the following in the... [Read more]
Hi, I have what seems to be the same board (purple one). I configured as suggested by @andrewishy2 and want to ask if you see the same behavior (which might be OK for you?): 1. The module wakes up... [Read more]
2. Mine has some delay while it gets on the wifi network. However, I have set a static IP address so that it should not be waiting for DHCP. 4. I have some zigbee door sensors, they are more expensive... [Read more]