Name on sale: Autonomous Tuya window door opening sensor
Label name: Heckermann, Product: Wifi Door Window Sensor, Model: PB69
Device photos:
![[CB3S/BK7231N] Heckermann Wifi Door Window Sensor, Model: PB69 - teardown, chang [CB3S/BK7231N] Heckermann Wifi Door Window Sensor, Model: PB69 - teardown, chang](https://obrazki.elektroda.pl/1828874300_1681893835_thumb.jpg)
![[CB3S/BK7231N] Heckermann Wifi Door Window Sensor, Model: PB69 - teardown, chang [CB3S/BK7231N] Heckermann Wifi Door Window Sensor, Model: PB69 - teardown, chang](https://obrazki.elektroda.pl/8625367800_1681894146_thumb.jpg)
Disassembly photos:
![[CB3S/BK7231N] Heckermann Wifi Door Window Sensor, Model: PB69 - teardown, chang [CB3S/BK7231N] Heckermann Wifi Door Window Sensor, Model: PB69 - teardown, chang](https://obrazki.elektroda.pl/7299330200_1681894409_thumb.jpg)
Microcontroller: CB3S (BK7231N)
PCB: PB-69W VER 1.3 20211112
![[CB3S/BK7231N] Heckermann Wifi Door Window Sensor, Model: PB69 - teardown, chang [CB3S/BK7231N] Heckermann Wifi Door Window Sensor, Model: PB69 - teardown, chang](https://obrazki.elektroda.pl/8093917900_1681894599_thumb.jpg)
![[CB3S/BK7231N] Heckermann Wifi Door Window Sensor, Model: PB69 - teardown, chang [CB3S/BK7231N] Heckermann Wifi Door Window Sensor, Model: PB69 - teardown, chang](https://obrazki.elektroda.pl/7187755700_1681894744_thumb.jpg)
Pin description:
| PIN | GPIOs | PWM | Function | Description |
| 3 | PRICE | PRICE | shorting to GND enables programming | |
| 7 | GPIO6 | 0 | BTN | switchna obudowie |
| 8 | Vcc | 3.3V | zasilanie + | |
| 9 | GND | GND | masa - | |
| 10 | GPIO9 | 3 | WifiLED | dioda |
| 14 | GPIO7 | 1 | DoorSnsrWSleep_nPup | kontaktron |
| 15 | RXD1 | RX | Posada osobne wyprowadzenie na PCB | |
| 16 | TXD1 | TX | has a separate output on the PCB |
Firmware change:
CH340 converter is enough to change FW. We connect Vcc 3.3V, GND and TX and RX interchangeably. I didn't need an additional power source during development. A switch should be connected to the CEN and GND pins, which, when pressed, will enable downloading or uploading the FW.
![[CB3S/BK7231N] Heckermann Wifi Door Window Sensor, Model: PB69 - teardown, chang [CB3S/BK7231N] Heckermann Wifi Door Window Sensor, Model: PB69 - teardown, chang](https://obrazki.elektroda.pl/9931344500_1681896507_thumb.jpg)
Download the firmware from the address: https://github.com/openshwprojects/OpenBK7231T_App/releases
Minimum version required. 1.17.10
I had problems with BK7231GUIFlashTool under linux via mono so I took advantage of hid_downloader_py .
1. To make a firmware backup :
Code: Bash
ADVERTISEMENT
2. To upload new firmware :
Code: Bash
After running the command, you need to briefly press the button connected to the CEN to start programming. After all, just unplug the device, insert the batteries, connect to the new Wifi AP and start configuration via www.
Necessary settings:
We connect to the Access Point of the device via Wifi and enter the configuration page: http://192.168.4.1
We set in turn:
1. Wi-Fi → Configure WiFi ( after confirming, we need to reconnect via the address taken from DHCP )
2. Static IP address to speed up connection → Configure IP
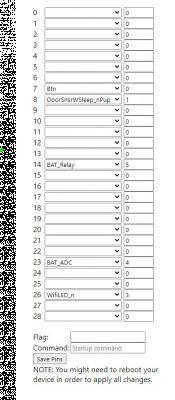
3. Sensors → Configure module :
| P6 | Btn |
| P7 | DoorSnsrWSleep_nPup |
| P9 | LED |
4. Flags → Configure general/flags :
| x | 35 [HASS] Deactivate avty_t flag for sensor when publishing to HASS (permit to keep value). You must restart HASS discovery for change to take effect. |
| x | 37 [WiFi] Quick connect to WiFi on reboot (TODO: check if it works for you and report on github) |
5. Start commands → Change startup command text : (we set the same wake-up state for each position and shorten the time to fall asleep)
backlog DSEdge 0; DSTime 15;6. Device name → Configure names
7. Connection to MQTT → Configure MQTT
8. Home Assistant settings→ Home Assistant Configuration
You can use Home Assistant Discovery to automatically add a sensor to the MQTT service, but by default the sensor values are swapped:
Code: YAML
Instead, we create a file with the sensor ourselves and add it manually to the HA configuration:
Code: YAML
And in HA itself, we change the entity class to "door" to improve the way it is displayed.
Cool? Ranking DIY


![[CB3S/BK7231N] Heckermann Wifi Door Window Sensor, Model: PB69 - teardown, chang [CB3S/BK7231N] Heckermann Wifi Door Window Sensor, Model: PB69 - teardown, chang](https://obrazki.elektroda.pl/9809215600_1681895853_thumb.jpg)
![[CB3S/BK7231N] Heckermann Wifi Door Window Sensor, Model: PB69 - teardown, chang [CB3S/BK7231N] Heckermann Wifi Door Window Sensor, Model: PB69 - teardown, chang](https://obrazki.elektroda.pl/6128977900_1685011746_thumb.jpg)
![[CB3S/BK7231N] Heckermann Wifi Door Window Sensor, Model: PB69 - teardown, chang [CB3S/BK7231N] Heckermann Wifi Door Window Sensor, Model: PB69 - teardown, chang](https://obrazki.elektroda.pl/5475643500_1687518042_thumb.jpg)
