BK7231N and CB3S: Detailed Guide on LoraTap SC400W-EU Switch Board Desoldering and Flashing

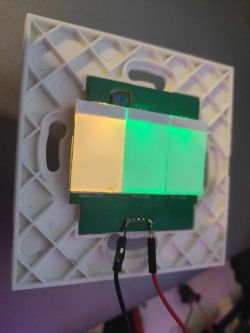
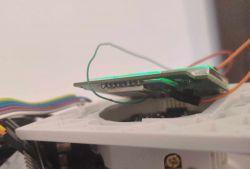
It is difficult to open the whole switch because the pins going to the board are not plugged in, but soldered. I wasn't able to desolder them. I lifted the board and soldered only RX and TX (according to the CB3S module documentation), and connected the power supply to the extreme pins on the board (see photo), where GND is on the left - the same as the OPEN button.
VCC and GND:

RX and TX:

I started the flashing mode by shorting GND to CEN.
The flashing application is not able to read the settings automatically. I had to find all the exits myself. Here they are:
P6 (PWM0) "WifiLED_n;0"
P7 (PWM1) "Btn;2"
P8 (PWM2) "LED_n;2"
P9 (PWM3) "Btn;1"
P14 (N/A) "Rel;3"
P23 (ADC3) "Btn;3"
P24 (PWM4) "LED;3"
P26 (PWM5) "Rel;1"
Here is the json that will make it easier to save the settings:
{
  "vendor": "LoraTap",
  "bDetailed": "0",
  "name": "Full Device Name Here",
  "model": "SC400W-EU",
  "chip": "BK7231N",
  "board": "TODO",
  "flags": "0",
  "keywords": [
    "LoraTap",
    "SC400W-EU",
    "Curtains",
    "Blinds",
    "Switch",
    "Roller",
    "Shutters",
  ],
  "pins": {
    "6": "WifiLED_n;0",
    "7": "Btn;2",
    "8": "LED_n;2",
    "9": "Btn;1",
    "14": "Rel;3",
    "23": "Btn;3",
    "24": "LED;3",
    "26": "Rel;1"
  },
  "command": "",
  "image": "https://obrazki.elektroda.pl/8913814600_1698850663.webp",
  "wiki": "https://www.elektroda.com/rtvforum/viewtopic.php?p=20795168"
}
It is also necessary to add a button management script to replicate the previous logic. I slightly improved it, i.e. the button deactivates itself after 60 and not 120 seconds, and the reset button lights up for one second instead of two, and the OPEN and CLOSE buttons can be turned off not only by pressing the RESET button, but by pressing it again.
Add new file `/autoexec.bat`:
// P26 - Relay 1 Close
// P7 - Btn 2 Stop
// P14 - Relay 3 Open
// P6 - Led backlight

// description
SetChannelLabel 1 Close
SetChannelLabel 2 Stop
SetChannelLabel 3 Open

// logic
alias Reset_Stop_Close backlog SetChannel 2 0; SetChannel 1 0
alias Reset_Stop_Open backlog SetChannel 2 0; SetChannel 3 0
alias Reset_Close_Open backlog SetChannel 1 0; SetChannel 3 0

addChangeHandler Channel1 == 1 Reset_Stop_Open
addChangeHandler Channel1 == 1 backlog startScript autoexec.bat resetCloseAfterMinute
addChangeHandler Channel2 == 1 Reset_Close_Open
addChangeHandler Channel2 == 1 backlog startScript autoexec.bat resetStopAfterSecond
addChangeHandler Channel3 == 1 Reset_Stop_Close
addChangeHandler Channel3 == 1 backlog startScript autoexec.bat resetOpenAfterMinute

// do not proceed
return

// Scripts

resetCloseAfterMinute:
// wait 60 seconds
delay_s 60
// stop opening
SetChannel 1 0
// done
return

resetStopAfterSecond:
// wait 1 second
delay_s 1
// disable button
SetChannel 2 0
// reset all scripts
stopAllScripts
// done
return

resetOpenAfterMinute:
// wait 60 seconds
delay_s 60
// stop opening
SetChannel 3 0
// done
return
Enjoy!


Comments
Thank you, that's a very detailed guide. I've added this device to our teardowns list. Regarding shutters, I am planning to make dedicated driver for that soon, but I dont know when I will get enough... [Read more]
It would be great to have roller blind controller logic that can be run on the cheapest buttons you can get for a few dollars at AliExpress Choice. For example, this LoraTap device costs about $17 at the... [Read more]
Hi, Thank you for a detailed instructions. I've used these instructions and succeeded to operate the switch with my blinds. I was wondering if there is an option to control the switch LEDs. Currently,... [Read more]
It depends on how LEDs are connected. The template was mentioned in the first post: P6 (PWM0) "WifiLED_n;0" P7 (PWM1) "Btn;2" P8 (PWM2) "LED_n;2" P9... [Read more]
Thanks for your reply. I actually don't know the difference between all these LEDs types that you mentioned (LED, LED_n, and WifiLED_n). Where can I read what it means? My LoraTap switch has 3 touch... [Read more]
IO docs: https://github.com/openshwprojects/OpenBK7231T_App/blob/main/docs/ioRoles.md LED is on when linked channel is on, LED_n has inverted state (it's on when channel is off), WiFILED shows WiFi state,... [Read more]
I managed to switch the LED color by playing with it in GPIO finder. The correct configuration for me is: "pins": { "6": "Rel_n;0", "7":... [Read more]
I have noticed that the switch supports running time parameter which configures how much time the switch will be opened/closed. I understand that we can imitate this field using the autoexec.bat file... [Read more]
Any help would be appreciated!!! [Read more]
Which channel stores this value in autoexec.bat ? You can set any channel via MQTT with set topic: https://obrazki.elektroda.pl/2778138100_1709458059_thumb.jpg [Read more]
Hi, The autoexec.bat does not contain channel which stores the value. This is the autoexec.bat: // P26 - Relay 1 Close // P7 - Btn 2 Stop // P14 - Relay 3 Open // P6 - Led backlight // description SetChannelLabel... [Read more]
So, to which delay from this script are you referring to? Are you referring to this one minute delay: // wait 60 seconds delay_s 60 The following delay appears twice in the code. If that's the... [Read more]
Yes this is the delay I was referring to. The desired solution is to have and `input_number` in home assistant that will control this value. When the user changes the `input_number` in home assistant... [Read more]
If you want to have this as an input number, then you need to do the following. 1. change all: // wait 60 seconds delay_s 60 to // wait $CH4 seconds delay_s $CH4 so it uses value of... [Read more]
This worked!!! I linked this field to home assistant using automation on any change to an input number I defined which eventually calls MQTT publish with the input number value. This works perfectly. Here... [Read more]
Well, the LEDs are defined in the "Configure module" tab and there is a field to enter a linked channel number, see an example below: https://obrazki.elektroda.pl/7489322900_1709491903_thumb.jpg ... [Read more]
Yes the LED is on P6. OK now I understand how to set a channel. I managed as you showed me to add channel for the LED and called it light. Now I have a button in Home Assistant to toggle the switch LEDs.... [Read more]
There are two ways to control LEDs. - first way is to assign a LED (or a LED_n, which is inversed LED) role and a channel, then LED will follow the channel and will be scriptable and controllable by user -... [Read more]
That worked (setting it as LED_n), assigning a channel and adding the channel to the autoexec.bat script. The perfect solution for me is to have both the wifi indication and to be able to control it. How... [Read more]