Sipeed M1S Dock module with 2MP MIPI CSI camera and 1.69-inch 280x240 capacitive touchscreen for AIoT applications is put through first hands-on tests.
The board boots from the OTG port, exposes a USB flash device for firmware upload, and provides two serial ports over the second USB-C connector.
The author tests LVGL, image_processing_demo, tinymaix_mnist_demo, and PikaScript, including touchscreen interaction and line-by-line UART scripting.
The display and camera run smoothly, with no noticeable lag, and the SDK examples compile successfully on Ubuntu in a virtual machine.
TinyMaix digit recognition is unreliable, and WSL compilation has not yet been made to work.
Generated by the language model.
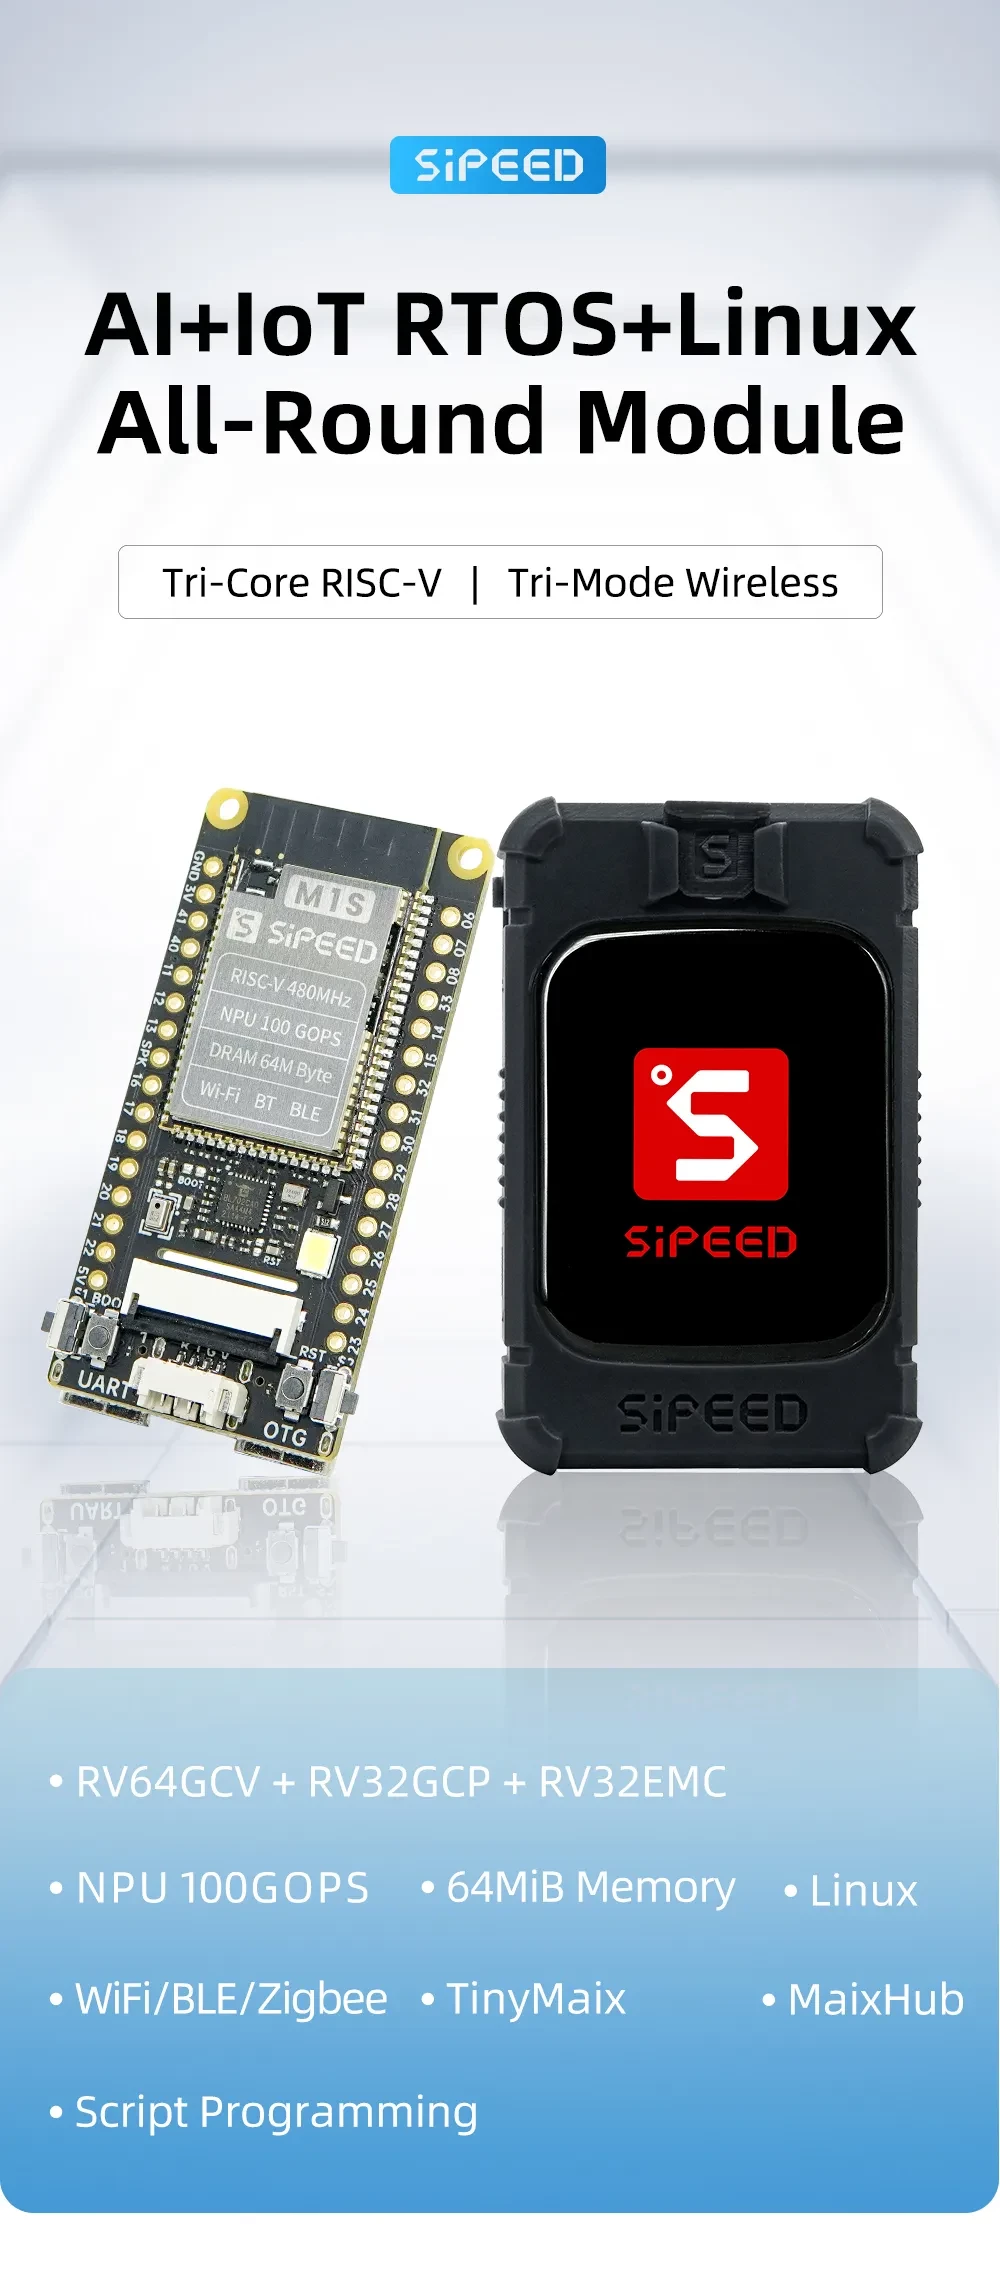
I'd like to invite you to a hands-on demonstration and first steps with the Sipeed M1s Dock module with a 2MP camera with MIPI CSI interface and a 1.69-inch 280x240 capacitive touchscreen display for AIoT applications. The module was already briefly presented in the topic: Sipeed M1s and M0sense - inexpensive AI modules based on BL808 and BL702 so here I will focus on showing how it looks in practice.
The board can be purchased for a little more than PLN 100:
First, make sure that you choose a kit with a camera and a screen. It is easy to be fooled by a lower price, where in fact you buy, for example, the module or the case alone. It is necessary to check well what you order.
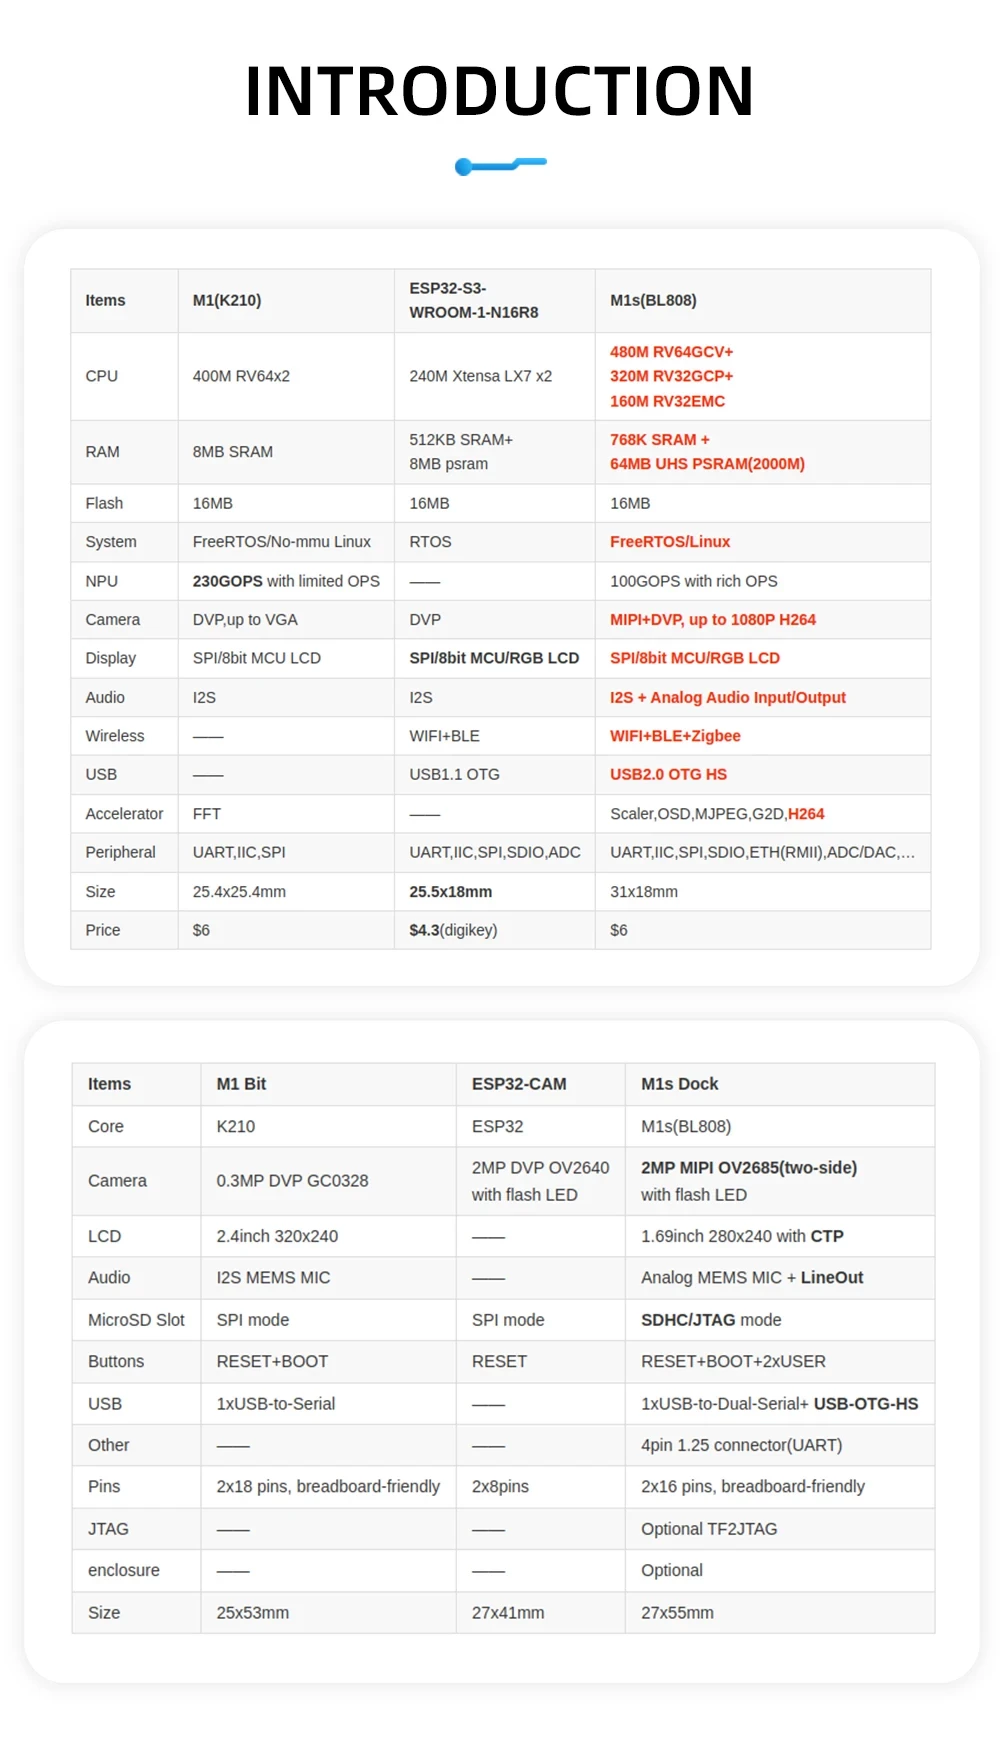
What does the M1S offer?
Let's give voice to the specifications from the seller:
Inputs:
A housing can also be purchased, although mounting it requires moving the camera to the other side of the module:
The basis of our work with this module will probably be the documentation from sipeed com:
https://wiki.sipeed.com/hardware/en/maix/m1s/m1s_dock.html I also based my work on this material myself. Below is a description of my steps, along with my comments and experiences.
First boot Put power to the OTG port and press the RESET button. The board should wake up, the screen and camera will boot up.
The delay from the camera is not noticeable, everything runs very smoothly:
The screen also shows the status of the buttons, as a demonstration, they can change the value of the number in the upper right corner:
Additionally, our computer will recognize the new USB device. This can be used to upload firmware for us.
In the manufacturer's documentation, the USB drive shown here is 3.73MB, in mine the size is slightly larger. Do I have a newer version with more memory?
The second USB C slot offers access to the serial port. You need to select baud 2000000:
And actually - to the serial ports, because there are two:
The first is the already shown log, the second is the command line.
You can send commands there, for example help :
Demo lvgl_demo [/size]
Let's now take a look at some examples from M1s_BL808_example. First, a graphics demo.
LVGL (Light and Versatile Graphics Library) is a free open source library for drawing graphics.
A compiled example is available here:
https://dl.sipeed.com/shareURL/MAIX/M1s/M1s_Dock/7_Firmware/demo_bin/lvgl_demo To upload the batch, you need first put the board into the upload state .
Really - just because the board is also visible as a flash device/memory while the demo is running, doesn't mean it will succeed in uploading something.
Hold both side buttons and then press RESET, then release RESET and only then release the side buttons .
Then drag the downloaded (or compiled by us) batch onto the mobile device:
After a while, the board should boot itself. Here's the LVGL demo in action:
At the end, a menu will be displayed where you can also test the touchscreen:
Front-facing camera After purchase, you will receive the module received in such a way, that the camera "looks" in the same direction as the display. This makes testing difficult to some extent.
The camera can be switched to the other side, as its ribbon goes through a slot in the PCB:
First you need to unfasten the ribbon (on the other side of the connector you unfasten it):
Removed camera:
The camera can be plugged in so that it will be on the other side of the module, but we can not reverse the ribbon, pins first (marked 1) of the ribbon must match pin 1 on the connector:
. Image processing demo Another demo, image_processing_demo, demonstrates the ability to process images. The processing itself is quite simple, we use the buttons to select one of the predefined masks and so we can observe the effects:
[size=18] Character recognition demo? Now let's run the tinymaix_mnist_demo demo.
TinyMaix is a small neural network inference library designed specifically for microcontrollers (TinyML), allowing you to run lightweight machine learning models on any single-chip microcomputer. I didn't have much luck with this demo. In theory, it's supposed to recognize numbers, but in my case it often limped to 8 or recognized incorrectly. I can show a screenshot from the manufacturer's documentation here for comparison:
Unlike me, on the other hand, it was.... hard, only perfect digits under perfect lighting are recognized:
With my painter's handwriting, the program confuses 1 with 7 and with 5 it does not cope at all:
PikaScript language There is also a demo PikaScript . PikaScript is a cross-platform, powerful Python-based scripting language.
After uploading the PikaScript demo, we can send this script to the board via the UART, line by line. Here's an example:
Result:
I also tried to write a click event handler for the button in this language, but I haven't gotten it to work yet.
Compiling source examples [/size] Compiling source examples[/b] 6fbd5ec
On the main documentation page of the board there are also instructions for compiling example sources and full links to the SDK. I managed to compile them on a virtual machine with Ubuntu, there were no problems, therefore I do not describe it.
I also made an attempt to compile them on WSL, which is a "Linux environment on Windows", but I have not yet managed to get it working.
Summary This was just a first look at this board. So far I like it.
It is easy to upload programs, and the display and camera have satisfactory performance for me. I also didn't feel any image lag, and this also bodes well for future projects.
In the next topic I'll try to compile, test and discuss other examples of it from the SDK, maybe I can also modify it a bit, such as making a simple watch on a touchscreen display.
In addition, I plan to run an example of streaming video from a webcam to a PC (it is practically ready in the SDK) and experiment with TinyML.
Meanwhile I will ask - do you have any experience with this board, do you see a potential use for it? Or do you think it is an unnecessary gadget and it is better to just reach for Raspberry? Feel free to discuss.
About Author
p.kaczmarek2 wrote 14408 posts with
rating 12347 , helped 650 times.
Been with us since 2014 year.
Application - to read energy meters :) ESP and the like do not cope with OCR, this may have some chance. You have to catch the screen sequence change and then parse each one in turn. Only ofc it's too... [Read more]
p.kaczmarek2
07 Nov 2023 08:36
OCR counter may be a good idea here. My test of their text detection demo was pretty rough. In a situation where we have one fixed font, it could probably work better. I'll have to try how much their demo... [Read more]
PiotrekD
07 Nov 2023 08:55
Hello my dears :)
application - maybe wearable jewelry and an early warning module for stepping in dog turds which are now everywhere, or alternatively as a module that triggers the flush in the toilet... [Read more]
p.kaczmarek2
07 Nov 2023 10:27
A discussion of TinyML themes is planned, I don't know how much yet, but I intend to do that as well. For the moment, I am familiarizing myself with this board. [Read more]
maestro16s
07 Nov 2023 18:14
Try, out of curiosity, to draw the digits more in the "American" way, i.e. one is a straight line, 6 and 9 just as the Brda, mn.in., has lit up [Read more]
p.kaczmarek2
09 Nov 2023 09:45
There will be a moment then I will check it.
Meanwhile I continue to struggle with the board - I already want to flash both cores, and for this you need a BLDevCube.
For now I have the following observations:... [Read more]
p.kaczmarek2
11 Nov 2023 11:24
The problem previously described I did not solve, I still do not know why on one of my W10 machines it is impossible to flash this BL808, and on the other it is possible....
But I have progress with... [Read more]
gulson
11 Nov 2023 19:32
All in all, I wonder if it would be possible to teach these boards to read various indicators in plants or at nodes:
https://obrazki.elektroda.pl/7274756600_1699727487_thumb.jpg
All in all, these... [Read more]
gulson
13 Nov 2023 08:47
How about adding Vision ChatGPT to read the indication of industrial equipment? A bit of overkill, but not sure if you can learn any other way at this point.
@ElektrodaBot write what indication you see... [Read more]
ElektrodaBot
13 Nov 2023 08:50
The indication on the pressure gauge is between 1 and 2 bar, closer to 2 bar to be exact. The pointer appears to have reached around 1.75 bar. Pressure gauges such as this are often used to measure pressure... [Read more]
gulson
13 Nov 2023 08:51
OK I take back the idea, you need to create something custom and dedicated to the given sensors, sensors or meters. How about this very board? [Read more]
chemik_16
13 Nov 2023 09:39
@gulson
such a clock you and on esp32 will embrace. The problem is how you have to recognize with 50 digits at once :)
https://github.com/jomjol/AI-on-the-edge-device
https://pysource.com/2022/04/... [Read more]
p.kaczmarek2
13 Nov 2023 11:18
@chemik16 good suggestion, I will try it out and maybe one day on the forum I will describe it [Read more]
arti4-92
15 Nov 2023 12:10
Ever since I found out about this chip I was wondering how is the issue of HW documetance, i.e. dma and audio codecs. Could you tell me if getting the documentation is a big problem? And does it even allow... [Read more]
What is the Sipeed M1s Dock and why use it instead of ESP32 or Raspberry Pi Zero?
It is a BL808-based AIoT module with built-in Wi-Fi 6, BLE 5, 64-bit RISC-V CPU, 2 MP camera and touchscreen. It boots demos from on-board flash without SD cards and runs TinyML frameworks such as TinyMaix and PikaScript. Compared with ESP32 it handles on-device CNN inference; compared with RPi Zero it uses one-tenth the power and no Linux setup. Price is similar to RPi0 2W (~PLN 110) when bought with camera and screen [Elektroda, p.kaczmarek2, #20802860; chemik_16, #20803152].
OTG port supplies power and exposes the 3.73 MB USB mass-storage device for firmware copy. The second port, labelled PROG/UART, opens two virtual COM ports: one shows boot logs, the other offers an interactive CLI at 2 000 000 bps [Elektroda, p.kaczmarek2, post #20802860]
Why does flashing sometimes fail on Windows 10?
Long USB-C cables, certain USB chipsets or missing drivers can break the PLL handshake; DevCube returns “BFLB SET CLOCK PLL FAIL”. Using a short shielded cable or a different PC resolves it [Elektroda, p.kaczmarek2, post #20806420]
What demos are pre-built and how fast do they run?
Sipeed hosts LVGL, image-processing, TinyMaix-MNIST and PikaScript demos. LVGL demo starts in under 3 s and renders 60 fps graphics on the 280 × 240 panel [Elektroda, p.kaczmarek2, post #20802860]
Can I stream live video from the camera?
Yes. The supplied TCP streaming example sends MJPEG to a PC. The author modified it to host an HTTP server on the board and view the stream in any browser [Elektroda, p.kaczmarek2, post #20809413]
Is the board good for OCR and utility-meter reading?
Single-font meters work; TinyMaix MNIST demo mis-classifies messy handwriting but recognises clean digits. Users plan to adapt open-source meter-reader models for BL808 [Elektroda, chemik_16, #20803152; p.kaczmarek2, #20803391].
How do I flip the camera to face outward?
Unlatch the MIPI ribbon, route it through the PCB slot, plug it back with pin-1 aligned, then secure the latch. No ribbon twist allowed [Elektroda, p.kaczmarek2, post #20802860]
What TinyML performance can I expect?
TinyMaix runs 28 k-parameter MNIST CNN at ~30 FPS and <6 mA extra current, according to Sipeed benchmarks; edge-case: complex models need quantisation due to 8 MB flash partition limit [“TinyMaix README”].
Does PikaScript really work over UART?
Yes. Send Python-like commands line-by-line on the CLI port. Widgets draw immediately; for example, arc.set_end_angle(380) rotates the dial in real time [Elektroda, p.kaczmarek2, post #20802860]
Where is the SDK and how hard is it to compile?
Full BL808 SDK links sit on Sipeed’s wiki. Examples build on Ubuntu in one pass with ‘make’; WSL needed extra USB permissions. Compilation time for all demos is ≈2 minutes on a 4-core VM [Elektroda, p.kaczmarek2, post #20802860]
Is detailed hardware documentation (DMA, audio codecs) available?
Bouffalo Lab released BL808 Reference Manual v1.5 covering DMA channels and I2S/Audio ADC. It is sufficient to write custom drivers; no NDA required. “The docs are public but scattered,” notes one developer [arti4-92, #20816134; “BL808 RM v1.5”].
How much memory does the board expose to users?
You get 64 MB LPDDR2 mapped at 0x5000 0000 and 16 MB XIP flash; USB disk shows 3.73 MB reserved for drag-and-drop firmware [Elektroda, p.kaczmarek2, #20802860; “BL808 datasheet”].
What’s a known hardware quirk?
RESET button sometimes fails to reboot after flashing Hello-World; power-cycle fixes it. Quirk appears with certain long USB cables [Elektroda, p.kaczmarek2, post #20806420]
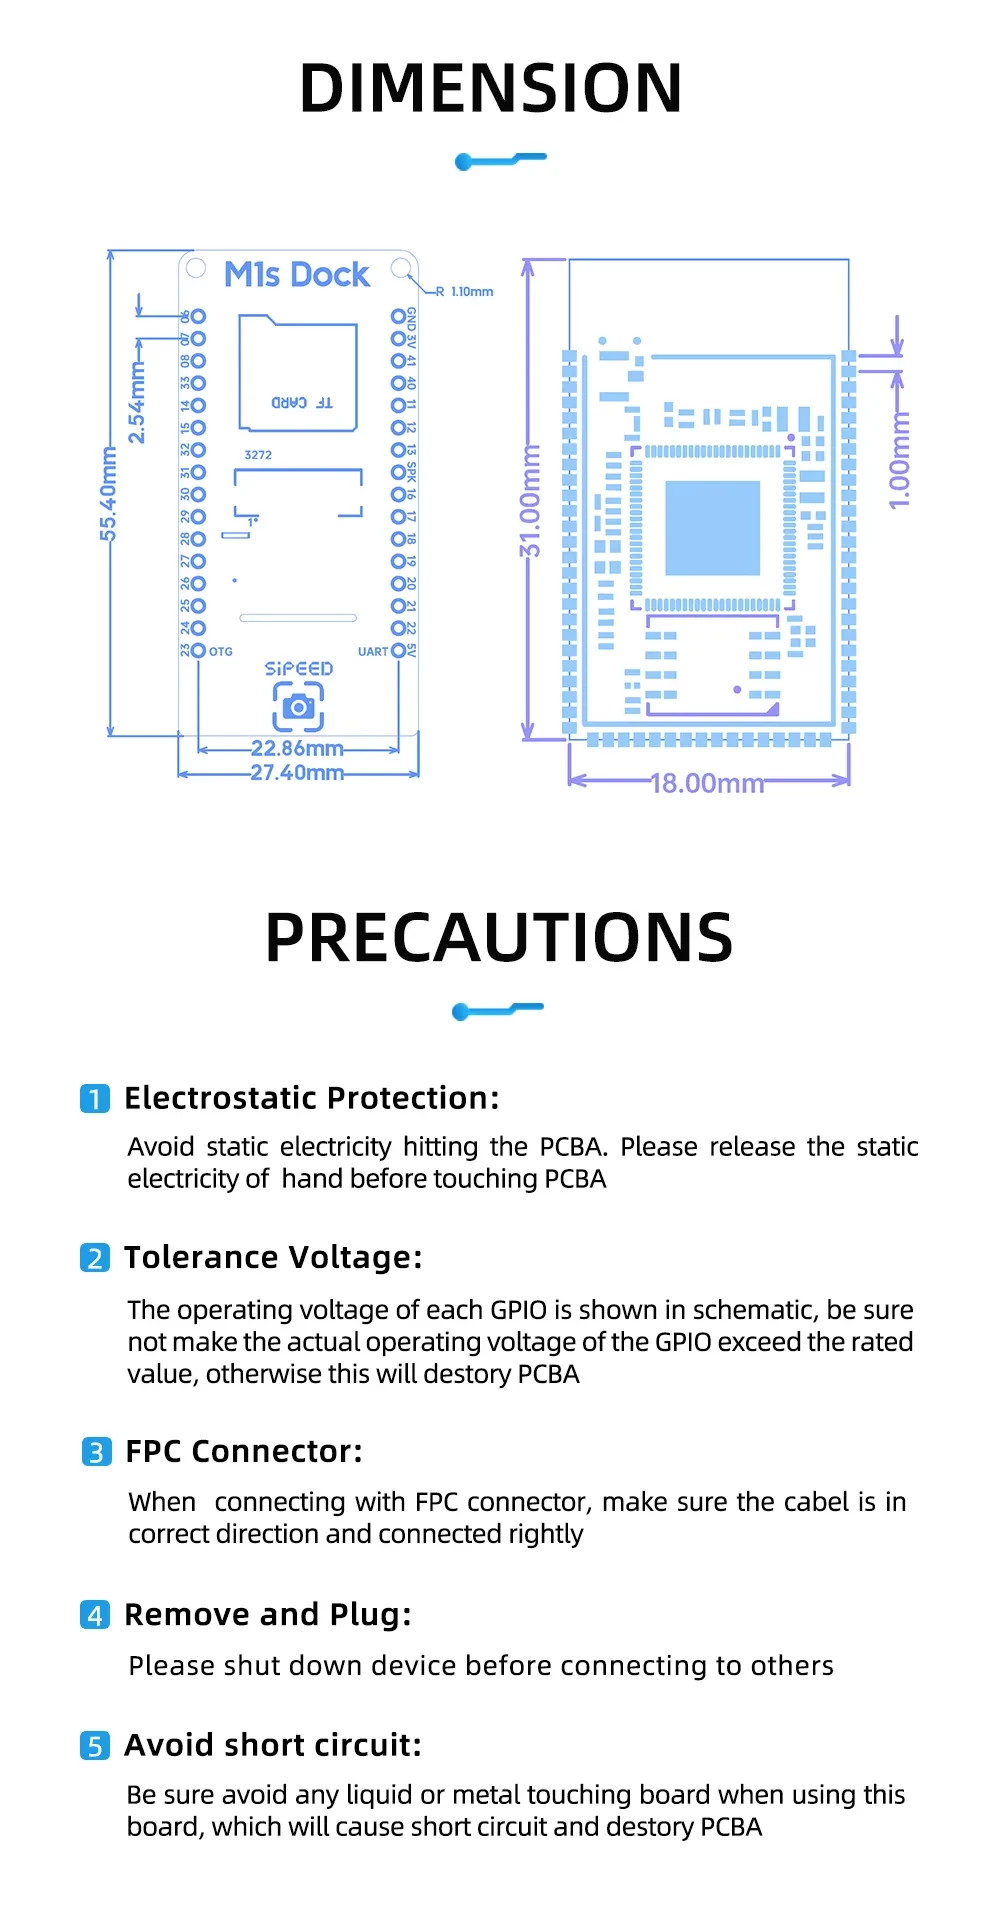
Can I attach external sensors?
Yes. Breakout headers expose UART, SPI, I2C and 12-bit ADC pins. LVGL touch UI lets you overlay readings on screen [“M1s Dock Pinout”].
Is this overkill for analogue gauge reading?
ESP32 can read a single gauge, but BL808 scales to dozens thanks to on-chip CNN accelerator and 60 fps capture. “Problem is when you must recognise 50 digits at once,” remarks chemik_16 [Elektroda, 20812695]


Comments
Application - to read energy meters :) ESP and the like do not cope with OCR, this may have some chance. You have to catch the screen sequence change and then parse each one in turn. Only ofc it's too... [Read more]
OCR counter may be a good idea here. My test of their text detection demo was pretty rough. In a situation where we have one fixed font, it could probably work better. I'll have to try how much their demo... [Read more]
Hello my dears :) application - maybe wearable jewelry and an early warning module for stepping in dog turds which are now everywhere, or alternatively as a module that triggers the flush in the toilet... [Read more]
A discussion of TinyML themes is planned, I don't know how much yet, but I intend to do that as well. For the moment, I am familiarizing myself with this board. [Read more]
Try, out of curiosity, to draw the digits more in the "American" way, i.e. one is a straight line, 6 and 9 just as the Brda, mn.in., has lit up [Read more]
There will be a moment then I will check it. Meanwhile I continue to struggle with the board - I already want to flash both cores, and for this you need a BLDevCube. For now I have the following observations:... [Read more]
The problem previously described I did not solve, I still do not know why on one of my W10 machines it is impossible to flash this BL808, and on the other it is possible.... But I have progress with... [Read more]
All in all, I wonder if it would be possible to teach these boards to read various indicators in plants or at nodes: https://obrazki.elektroda.pl/7274756600_1699727487_thumb.jpg All in all, these... [Read more]
How about adding Vision ChatGPT to read the indication of industrial equipment? A bit of overkill, but not sure if you can learn any other way at this point. @ElektrodaBot write what indication you see... [Read more]
The indication on the pressure gauge is between 1 and 2 bar, closer to 2 bar to be exact. The pointer appears to have reached around 1.75 bar. Pressure gauges such as this are often used to measure pressure... [Read more]
OK I take back the idea, you need to create something custom and dedicated to the given sensors, sensors or meters. How about this very board? [Read more]
@gulson such a clock you and on esp32 will embrace. The problem is how you have to recognize with 50 digits at once :) https://github.com/jomjol/AI-on-the-edge-device https://pysource.com/2022/04/... [Read more]
@chemik16 good suggestion, I will try it out and maybe one day on the forum I will describe it [Read more]
Ever since I found out about this chip I was wondering how is the issue of HW documetance, i.e. dma and audio codecs. Could you tell me if getting the documentation is a big problem? And does it even allow... [Read more]