[BK7231N/CB2S] Ceiling Fan Controller with Dimmer and RF Remote
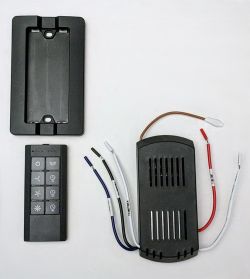
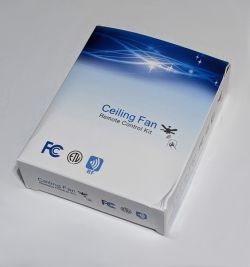
Universal Smart Ceiling Fan Remote Control and Dimmer Light Switch
Functions: 3-Speed Ceiling Fan Remote, Off-timer, Dimming
buy: amazon.com
Quick Start:
-desolder, flash, reinstall
-No pins need configured, OpenBeken takes care of the TuyaTX/RX automagically.
-Place the 'autoexec.bat' on the device file-system and reboot.
-Grab the 'HA MQTT yaml' near the bottom of this post.
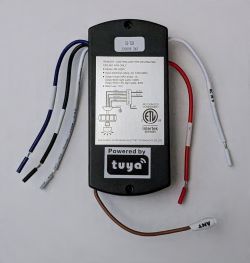
Manufacturer: San Sheng (Zhongshan), but it is branded [or unbranded] under various names.
Model: RE-028W
Chipset: CB2S
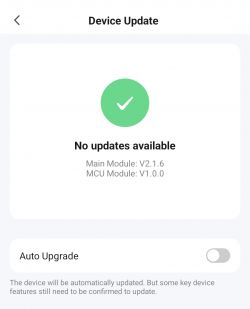
Module Firmware: V2.1.6
MCU Firmware: V1.0.0
Replacement: ESP8685-WROOM-03-H4
Notes: The unit connects electrically to load and neutral without a ground.
Primary distributors:
ParrotUncle (Subsidiary of Eileen Grays Network Technology)
Model: GA030
FEKOTS
Model: SS-T28
Potential FCC-ID: 2AX7R-RE021
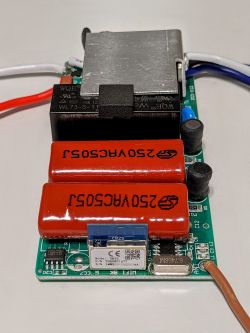
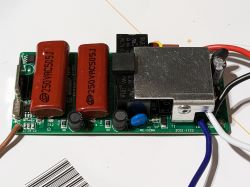
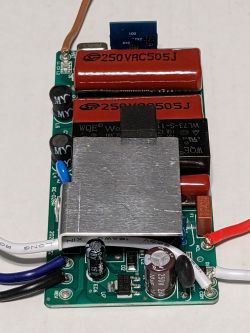
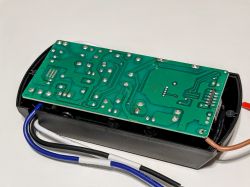
About the board
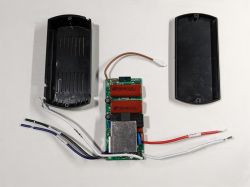
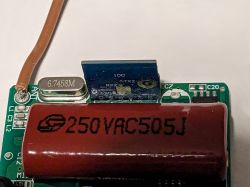
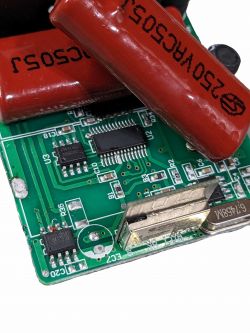
The unit ships with a Beken BK7231N on a CB2S:
On the front of the chip, only CEN pin was soldered to the board.
On the back of the chip, all pins were soldered to the board.
However, the only important pins seem to be Tuya_Rx and Tuya_Tx.
ESP8685-WROOM-03 is a direct drop-in replacement just with different pin names.
CB2S : CEN || 3v3 | GND | RX1 | TX1 | P24 | P26
ESP-x : _EN || 3V3 | GND | RX_ | TX_ | IO5 | IO4


Tuya Cloud Controls and Device Info:
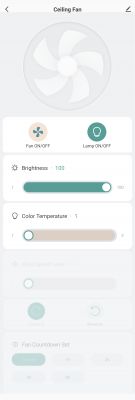
Prior to flashing the device, I tried to gather as much information I could regarding the stock functionality.
Below are the features available in the Tuya Cloud app and Version Info provided.
In the Tuya Dev Project, below are the Tuya JSON and Standard Instruction Set:
JSON EDITOR
STANDARD INSTRUCTION SET
Home Assistant Debug Info for Tuya Cloud Integration
Tuya Data Points for DpId assignment
Flashing and Configuring
Once I acquired all of the data I believed to be available, I desoldered the CB2S from the unit and flashed it using bk7231flasher_1.1.2.
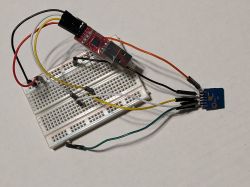
Getting the module into flash mode was easy; simply tap the CEN pin to ground while bk-flasher is first attempting to read the bus.
Reading the output for the Template/GPIO config had me concerned.
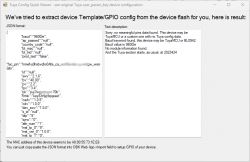
Dumping the config from ltchiptool yielded similar concerns.
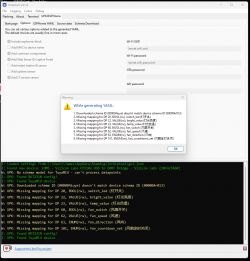
I proceeded with the flash.
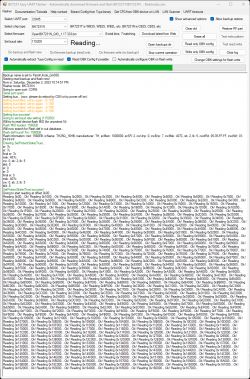
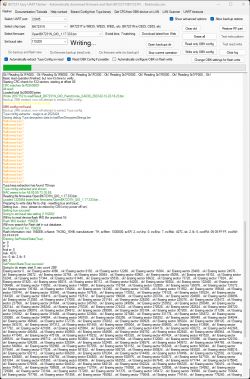
Once complete, I soldered the chip back into the unit and reassembled everything. For testing, I hooked it up to mains power and used alligator clips to attach a lamp for testing.
I connected to the OpenBeken WebApp at 192.168.4.1 on its default broadcasting SSID and reconfigured it to connect to my IoT network.
I thought GPIO5 / GPIO4 were going to be my magic pins with GPIO20 / GPIO21 (RX / TX) for TuyaMCU comms.
This is when the fun started.
It turns out that OpenBeken communicated with the TuyaMCU out of the box without needing to configure any pins. The rest of the pins do nothing and all of the configuration is Channel based using the autoexec.bat.
After much debugging and button-presses on the RF remote, I was able to develop the below autoexec.bat
autoexec.bat should contain the below content and be uploaded to the file-system of the OpenBeken flashed device.
This should provide all the necessary functionality with a few things to note:
-temp_value DpId23 is marked ReadOnly. Either I don't have any bulbs that use this feature or the feature doesn't work. LowMidHigh should enable the feature.
-fan_direction DpId63 is also marked ReadOnly. The unit has a solder point and the feature shows up in Tuya Cloud, however it was not mentioned in the product description nor manual and the wiring is not included with the device It's probably also risky to potentially flip and reverse it while the fan is running. I assume bad things would happen.
-I was unable to figure out how to rename the function labels on the OpenBeken WebApp for better usability (such as the timer selection is listed as fan speed). If someone knows how, I'll update the script.
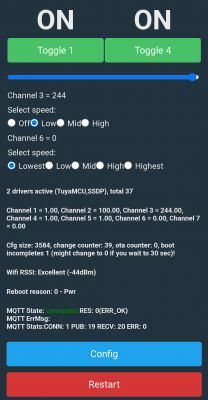
Home Assistant
So far, I only have a minimally viable HA integration and was only able to read the Timer setting. If anyone more experienced can create a better UI and get the timer configurable, that would be great!
I also need to figure out how to get MQTT to push more often. I found an edge-case where sometimes when power-cycled and HA's MQTT cache is cleared the fan speed will be set to 0 and Toggling Fan On/Off in UI won't cause any spinning action.
In the OpenBeken WebApp, navigate to Config > Configure MQTT and enter your Home Assistant MQTT information.
HA MQTT yaml
Firmware Dump and JSON attached
I hope my efforts help others who encounter this device. If anyone comes up with improvements, I'll gladly accept them. I would also like to Tasmota-fy the config for use on my ESP module.
Functions: 3-Speed Ceiling Fan Remote, Off-timer, Dimming
buy: amazon.com


Quick Start:
-desolder, flash, reinstall
-No pins need configured, OpenBeken takes care of the TuyaTX/RX automagically.
-Place the 'autoexec.bat' on the device file-system and reboot.
-Grab the 'HA MQTT yaml' near the bottom of this post.
Manufacturer: San Sheng (Zhongshan), but it is branded [or unbranded] under various names.
Model: RE-028W
Chipset: CB2S
Module Firmware: V2.1.6
MCU Firmware: V1.0.0
Replacement: ESP8685-WROOM-03-H4
Notes: The unit connects electrically to load and neutral without a ground.
Primary distributors:
ParrotUncle (Subsidiary of Eileen Grays Network Technology)
Model: GA030
FEKOTS
Model: SS-T28
Potential FCC-ID: 2AX7R-RE021
About the board
The unit ships with a Beken BK7231N on a CB2S:
On the front of the chip, only CEN pin was soldered to the board.
On the back of the chip, all pins were soldered to the board.
However, the only important pins seem to be Tuya_Rx and Tuya_Tx.
ESP8685-WROOM-03 is a direct drop-in replacement just with different pin names.
CB2S : CEN || 3v3 | GND | RX1 | TX1 | P24 | P26
ESP-x : _EN || 3V3 | GND | RX_ | TX_ | IO5 | IO4


Tuya Cloud Controls and Device Info:
Prior to flashing the device, I tried to gather as much information I could regarding the stock functionality.
Below are the features available in the Tuya Cloud app and Version Info provided.


In the Tuya Dev Project, below are the Tuya JSON and Standard Instruction Set:
JSON EDITOR
[
  {
    "code": "switch_led",
    "value": true
  },
  {
    "code": "bright_value",
    "value": 100
  },
  {
    "code": "temp_value",
    "value": 1
  },
  {
    "code": "fan_switch",
    "value": false
  },
  {
    "code": "fan_speed",
    "value": 1
  },
  {
    "code": "fan_direction",
    "value": "forward"
  },
  {
    "code": "fan_countdown_set",
    "value": "cancel"
  }
]
STANDARD INSTRUCTION SET
Code	Type	Values
switch_led	Boolean
"{true,false}"
bright_value	Integer
{
  "unit": "",
  "min": 1,
  "max": 100,
  "scale": 0,
  "step": 1
}
temp_value	Integer
{
  "unit": "",
  "min": 1,
  "max": 3,
  "scale": 0,
  "step": 1
}
fan_switch	Boolean
"{true,false}"
fan_speed	Integer
{
  "unit": "",
  "min": 1,
  "max": 3,
  "scale": 0,
  "step": 1
}
fan_direction	Enum
{
  "range": [
    "forward",
    "reverse"
  ]
}
fan_countdown_set	Enum
{
  "range": [
    "cancel",
    "1h",
    "2h",
    "4h",
    "8h"
  ]
}
Home Assistant Debug Info for Tuya Cloud Integration
{
  "home_assistant": {
[...]
  },
  "integration_manifest": {
    "domain": "tuya",
    "name": "Tuya",
    "codeowners": [
      "@Tuya",
      "@zlinoliver",
      "@frenck"
    ],
    "config_flow": true,
    "dependencies": [
      "ffmpeg"
    ],
    "dhcp": [
      {
        "macaddress": "REDACTED*"
      }
      }
    ],
    "documentation": "https://www.home-assistant.io/integrations/tuya",
    "integration_type": "hub",
    "iot_class": "cloud_push",
    "loggers": [
      "tuya_iot"
    ],
    "requirements": [
      "tuya-iot-py-sdk==0.6.6"
    ],
    "is_built_in": true
  },
  "data": {
    "endpoint": "https://openapi.tuyaus.com",
    "auth_type": 0,
    "country_code": "1",
    "app_type": "smartlife",
    "mqtt_connected": null,
    "disabled_by": null,
    "disabled_polling": false,
    "name": "Ceiling Fan",
    "model": "AC 02",
    "category": "fsd",
    "product_id": "puj7wgpctcgpn70b",
    "product_name": "Ceiling Fan",
    "online": true,
    "sub": false,
    "time_zone": "-05:00",
    "active_time": "2023-11-16T00:51:32+00:00",
    "create_time": "2023-11-15T04:02:47+00:00",
    "update_time": "2023-11-16T00:51:32+00:00",
    "function": {
      "switch_led": {
        "type": "Boolean",
        "value": {}
      },
      "bright_value": {
        "type": "Integer",
        "value": {
          "unit": "",
          "min": 1,
          "max": 100,
          "scale": 0,
          "step": 1
        }
      },
      "temp_value": {
        "type": "Integer",
        "value": {
          "unit": "",
          "min": 1,
          "max": 3,
          "scale": 0,
          "step": 1
        }
      },
      "fan_switch": {
        "type": "Boolean",
        "value": {}
      },
      "fan_speed": {
        "type": "Integer",
        "value": {
          "unit": "",
          "min": 1,
          "max": 3,
          "scale": 0,
          "step": 1
        }
      },
      "fan_direction": {
        "type": "Enum",
        "value": {
          "range": [
            "forward",
            "reverse"
          ]
        }
      },
      "fan_countdown_set": {
        "type": "Enum",
        "value": {
          "range": [
            "cancel",
            "1h",
            "2h",
            "4h",
            "8h"
          ]
        }
      }
    },
    "status_range": {
      "switch_led": {
        "type": "Boolean",
        "value": {}
      },
      "bright_value": {
        "type": "Integer",
        "value": {
          "unit": "",
          "min": 1,
          "max": 100,
          "scale": 0,
          "step": 1
        }
      },
      "temp_value": {
        "type": "Integer",
        "value": {
          "unit": "",
          "min": 1,
          "max": 3,
          "scale": 0,
          "step": 1
        }
      },
      "fan_switch": {
        "type": "Boolean",
        "value": {}
      },
      "fan_speed": {
        "type": "Integer",
        "value": {
          "unit": "",
          "min": 1,
          "max": 3,
          "scale": 0,
          "step": 1
        }
      },
      "fan_direction": {
        "type": "Enum",
        "value": {
          "range": [
            "forward",
            "reverse"
          ]
        }
      },
      "fan_countdown_set": {
        "type": "Enum",
        "value": {
          "range": [
            "cancel",
            "1h",
            "2h",
            "4h",
            "8h"
          ]
        }
      }
    },
    "status": {
      "switch_led": true,
      "bright_value": 100,
      "temp_value": 1,
      "fan_switch": false,
      "fan_speed": 1,
      "fan_direction": "forward",
      "fan_countdown_set": "cancel"
    },
    "home_assistant": {
      "name": "Ceiling Fan",
      "name_by_user": null,
      "disabled": false,
      "disabled_by": null,
      "entities": [
        {
          "disabled": false,
          "disabled_by": null,
          "entity_category": null,
          "device_class": null,
          "original_device_class": null,
          "icon": null,
          "original_icon": null,
          "unit_of_measurement": null,
          "state": {
            "entity_id": "fan.ceiling_fan",
            "state": "off",
            "attributes": {
              "preset_modes": [],
              "direction": "forward",
              "percentage": 1,
              "percentage_step": 1.0,
              "preset_mode": null,
              "friendly_name": "Ceiling Fan",
              "supported_features": 5
            },
            "last_changed": "2023-11-16T01:54:03.463633+00:00",
            "last_updated": "2023-11-16T01:54:03.463633+00:00"
          }
        },
        {
          "disabled": false,
          "disabled_by": null,
          "entity_category": null,
          "device_class": null,
          "original_device_class": null,
          "icon": null,
          "original_icon": null,
          "unit_of_measurement": null,
          "state": {
            "entity_id": "light.ceiling_fan",
            "state": "on",
            "attributes": {
              "min_color_temp_kelvin": 2000,
              "max_color_temp_kelvin": 6535,
              "min_mireds": 153,
              "max_mireds": 500,
              "supported_color_modes": [
                "brightness",
                "color_temp"
              ],
              "color_mode": "color_temp",
              "brightness": 255,
              "color_temp_kelvin": 2000,
              "color_temp": 500,
              "hs_color": [
                30.601,
                94.547
              ],
              "rgb_color": [
                255,
                136,
                13
              ],
              "xy_color": [
                0.599,
                0.382
              ],
              "friendly_name": "Ceiling Fan",
              "supported_features": 0
            },
            "last_changed": "2023-11-16T01:54:03.464796+00:00",
            "last_updated": "2023-11-16T01:54:03.464796+00:00"
          }
        }
      ]
    }
  }
}
Tuya Data Points for DpId assignment
{"20":"Lamp ON/OFF","22":"Brightness","23":"Color Temperature","60":"Fan ON/OFF","62":"Wind Speed Level","63":"Direction Fan","101":"Fan Countdown Set"}Flashing and Configuring
Once I acquired all of the data I believed to be available, I desoldered the CB2S from the unit and flashed it using bk7231flasher_1.1.2.

Getting the module into flash mode was easy; simply tap the CEN pin to ground while bk-flasher is first attempting to read the bus.
Reading the output for the Template/GPIO config had me concerned.

Dumping the config from ltchiptool yielded similar concerns.

I proceeded with the flash.


Once complete, I soldered the chip back into the unit and reassembled everything. For testing, I hooked it up to mains power and used alligator clips to attach a lamp for testing.
I connected to the OpenBeken WebApp at 192.168.4.1 on its default broadcasting SSID and reconfigured it to connect to my IoT network.
I thought GPIO5 / GPIO4 were going to be my magic pins with GPIO20 / GPIO21 (RX / TX) for TuyaMCU comms.
This is when the fun started.
Spoiler:
I was unable to determine the proper pin configuration and tried to hook it up to my Oscilloscope. POP! The unit doesn't have a ground and fried the CB2S. I had a backup, but wanted to keep it mint until I figured things out and knew I could get it working.
I swapped the cooked CB2S for the ESP8685 I had available and loaded up the full Tasmota firmware.
Fun fact, the ESP8685-WROOM-03-H4 is not nearly as simple to flash. GPIO8 [EN?] needs pulled to 3V3 while GPIO9 needs pulled to GND and it's only available as a pad on the back of the board.
I continued to play with Tasmota settings, but had no success. Discussion on the forum lead me to take a leap and try once more to OBK my untouched unit and hope I could get it working.
It turns out that OpenBeken communicated with the TuyaMCU out of the box without needing to configure any pins. The rest of the pins do nothing and all of the configuration is Channel based using the autoexec.bat.
After much debugging and button-presses on the RF remote, I was able to develop the below autoexec.bat
autoexec.bat should contain the below content and be uploaded to the file-system of the OpenBeken flashed device.
startDriver TuyaMCU

//setChannelType [ChannelIndex][TypeString]
//linkTuyaMCUOutputToChannel [dpId][varType][channelID][bDPCache-Optional]

//{"TuyaReceived":{"Data":"55AA03070005140100010125","Cmnd":7,"CmndData":"1401000101","DpType1Id20":1,"20":{"DpId":20,"DpIdType":1,"DpIdData":"01"}}}
//Map DpID20 to channel1, type1 (Boolean) - Lamp On/Off
setChannelType 1 Toggle
linkTuyaMCUOutputToChannel 20 1 1

//{"TuyaReceived":{"Data":"55AA03070008160200040000006491","Cmnd":7,"CmndData":"1602000400000064","DpType2Id22":100,"22":{"DpId":22,"DpIdType":2,"DpIdData":"00000064"}}}
//Map DpID22 to channel2, type2 (Integer) - bright_value - {1-100,step1}
setChannelType 2 Dimmer
linkTuyaMCUOutputToChannel 22 2 2

//{"TuyaReceived":{"Data":"55AA0307000817020004000000012F","Cmnd":7,"CmndData":"1702000400000001","DpType2Id23":1,"23":{"DpId":23,"DpIdType":2,"DpIdData":"00000001"}}}
//Map DpID23 to channel3, type2 (Integer) - [color] temp_value - {1-3,step1}
//Note: This feature is not on the remote, but shows up in Tuya Cloud and I cannot find appropriate bulbs to test. If used, field should be: LowMidHigh
setChannelType 3 ReadOnly
linkTuyaMCUOutputToChannel 23 2 3

//{"TuyaReceived":{"Data":"55AA030700053C010001004C","Cmnd":7,"CmndData":"3C01000100","DpType1Id60":0,"60":{"DpId":60,"DpIdType":1,"DpIdData":"00"}}}
//Map DpID20 to channel4, type1 (Boolean) - Fan On/Off (On=1)
setChannelType 4 Toggle
linkTuyaMCUOutputToChannel 60 1 4

//{"TuyaReceived":{"Data":"55AA030700083E0200040000000358","Cmnd":7,"CmndData":"3E02000400000003","DpType2Id62":3,"62":{"DpId":62,"DpIdType":2,"DpIdData":"00000003"}}}
//Map DpID20 to channel5, type2 (Integer) - Fan Speed - {Off,Low,Med,High} (0,1,2,3)
setChannelType 5 OffLowMidHigh
linkTuyaMCUOutputToChannel 62 2 5


//{"TuyaReceived":{"Data":"55AA030700053F0400010052","Cmnd":7,"CmndData":"3F04000100","DpType4Id63":0,"63":{"DpId":63,"DpIdType":4,"DpIdData":"00"}}}
//Map DpID63 to channel6, type4 (Enum) - fan_direction - {"range": ["forward","reverse"]}
//Note: This model does not include wiring for the fan-reverse function. However, the solder-pad is labeled on the board and the toggle displays in Tuya Cloud. Feature Untested.
setChannelType 6 ReadOnly
linkTuyaMCUOutputToChannel 63 4 6

//{"TuyaReceived":{"Data":"55AA03070005650400010078","Cmnd":7,"CmndData":"6504000100","DpType4Id101":0,"101":{"DpId":101,"DpIdType":4,"DpIdData":"00"}}}
//Map DpID101 to channel7, type4 (Enum) - fan_countdown_set - {"range": ["cancel","1h","2h","4h","8h"]} (0,1,2,3,4)
setChannelType 7 LowestLowMidHighHighest
linkTuyaMCUOutputToChannel 101 4 7


//enable powersave mode
//seems to be default enabled
startDriver SSDP
PowerSave 1
This should provide all the necessary functionality with a few things to note:
-temp_value DpId23 is marked ReadOnly. Either I don't have any bulbs that use this feature or the feature doesn't work. LowMidHigh should enable the feature.
-fan_direction DpId63 is also marked ReadOnly. The unit has a solder point and the feature shows up in Tuya Cloud, however it was not mentioned in the product description nor manual and the wiring is not included with the device It's probably also risky to potentially flip and reverse it while the fan is running. I assume bad things would happen.
-I was unable to figure out how to rename the function labels on the OpenBeken WebApp for better usability (such as the timer selection is listed as fan speed). If someone knows how, I'll update the script.

Home Assistant
So far, I only have a minimally viable HA integration and was only able to read the Timer setting. If anyone more experienced can create a better UI and get the timer configurable, that would be great!
I also need to figure out how to get MQTT to push more often. I found an edge-case where sometimes when power-cycled and HA's MQTT cache is cleared the fan speed will be set to 0 and Toggling Fan On/Off in UI won't cause any spinning action.
In the OpenBeken WebApp, navigate to Config > Configure MQTT and enter your Home Assistant MQTT information.
HA MQTT yaml
light:
    name: "Bedroom Fan Light"
    unique_id: "re028w.bedroom_fan_light"
    state_topic: "re028w/cfan_br/1/get"
    command_topic: "re028w/cfan_br/1/set"
    payload_on: "1"
    payload_off: "0"
    brightness_state_topic: "re028w/cfan_br/2/get"
    brightness_command_topic: "re028w/cfan_br/2/set"
    brightness_scale: 100
    color_temp_state_topic: "re028w/cfan_br/3/get"
    color_temp_command_topic: "re028w/cfan_br/3/set"
    color_temp_value_template: >-
      {% if value == '1' %}
      Warm
      {% elif value == '2' %}
      Neutral
      {% elif value == '3' %}
      Cool
      {% else %}
      Invalid
      {% endif %}
    availability_topic: "re028w/cfan_br/connected"
    payload_available: "online"
    payload_not_available: "offline"
    qos: 1
    retain: true
    device:
        configuration_url: http://192.168.4.1/cfg
        manufacturer: Parrot Uncle
        model: RE-028W
        name: Bedroom Fan Light
        identifiers: [ 're028w.bedroom_fan_light' ]

fan:
    name: "Bedroom Fan"
    unique_id: "re028w.bedroom_fan"
    state_topic: "re028w/cfan_br/4/get"
    command_topic: "re028w/cfan_br/4/set"
    payload_on: '1'
    payload_off: '0'
    preset_modes:
      - 'Low'
      - 'Med'
      - 'Hi'
    preset_mode_state_topic: "re028w/cfan_br/5/get"
    preset_mode_value_template: >
      {% if value_json.FanSpeed == '1' %}
        Low
      {% elif value_json.FanSpeed == '2' %}
        Med
      {% elif value_json.FanSpeed == '3' %}
        Hi
      {% else %}
        Off
      {% endif %}
    preset_mode_command_topic: "re028w/cfan_br/5/set"
    preset_mode_command_template: >
      {% if value == 'Low' %}
        1
      {% elif value == 'Med' %}
        2
      {% elif value == 'Hi' %}
        3
      {% else %}
        Invalid
      {% endif %}
    direction_state_topic: "re028w/cfan_br/6/get"
    direction_value_template: >
      {% if value == '1' %}
      Reverse
      {% else %}
      Forward
      {% endif %}
    direction_command_topic: "re028w/cfan_br/6/set"
    direction_command_template: >
      {% if value_json.FanSpeed == '1' %}
        Reverse
      {% else %}
        Forward
      {% endif %}
    availability_topic: "re028w/cfan_br/connected"
    payload_available: "online"
    payload_not_available: "offline"
    qos: 1
    retain: true
    device:
        configuration_url: http://192.168.4.1/cfg
        manufacturer: Parrot Uncle
        model: RE-028W
        name: Bedroom Fan
        identifiers: [ 're028w.bedroom_fan' ]

sensor:
    name: "Bedroom Fan Timer"
    unique_id: "re028w.bedroom_fan_timer"
    icon: mdi:fan-clock
    state_topic: "re028w/cfan_br/7/get"
    value_template: >
      {% if value == '1' %}
      1Hr
      {% elif value == '2' %}
      2Hr
      {% elif value == '3' %}
      4Hr
      {% elif value == '4' %}
      8Hr
      {% else %}
      Disabled
      {% endif %}
    availability_topic: "re028w/cfan_br/connected"
    payload_available: "online"
    payload_not_available: "offline"
    qos: 1
    device:
        configuration_url: http://192.168.4.1/cfg
        manufacturer: Parrot Uncle
        model: RE-028W
        name: Bedroom Fan Timer
        identifiers: [ 're028w.bedroom_fan_timer' ]
Firmware Dump and JSON attached
{
  "vendor": "Parrot Uncle",
  "bDetailed": "1",
  "name": "Universal Smart Ceiling Fan Remote Control and Dimmer Light Switch",
  "model": "RE-028W",
  "chip": "BK7231N",
  "board": "CB2S",
  "flags": "1024",
  "keywords": [
    "Eileen Grays",
    "Parrot Uncle",
	"ParrotUncle",
	"RE-028W",
	"GA030",
	"San Sheng",
	"2AX7R-RE021"
	"FEKOTS",
    "SS-T28",
	"Fan",
	"Dimmer"
  ],
  "pins": {},
  "command": "",
  "image": "https://obrazki.elektroda.pl/4797170800_1702090627_thumb.jpg",
  "wiki": "https://www.elektroda.com/rtvforum/viewtopic.php?p=20853026"
}
I hope my efforts help others who encounter this device. If anyone comes up with improvements, I'll gladly accept them. I would also like to Tasmota-fy the config for use on my ESP module.


Comments
That's a very informative guide, let's start with this point: According to our docks, here: https://github.com/openshwprojects/OpenBK7231T_App/blob/main/docs/commands.md You can use mqtt_broadcastInterval... [Read more]
Thanks. I added it to my working config and will need to decide if I should keep it. It turns out this 'edge-case' was an issue of my own creation. I was thinking that deleting items in MQTT Explorer... [Read more]