Cable cutting machine
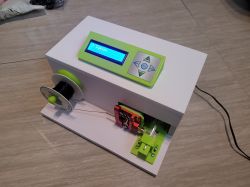
For my own purposes, I made a wire cutting machine to complement the electronic boards I offer for model railways. The premise was to cut the wires to a set length and quantity.
Electronics .
To speed up the build, instead of making a PCB I used off-the-shelf solutions: a CNC shield for an Arduino nano with two stepper motor controllers. To this attached after I2 a 16x2 display and a membrane keyboard (ready-made from Alliexpress).
Mechanics .
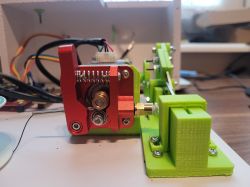
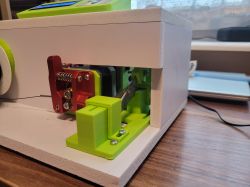
After reviewing similar solutions, I decided to feed the wire with the mechanics of an extruder from a 3D printer. As the kynar is thin and quite delicate, the drive had to be modified: the toothed roller has grinded teeth, and instead of a concave roller I put a bearing. To prevent the kynar from slipping off the rollers, I glued a truncated meat injection needle onto the input. On the exit, instead of a piece of bowden - a piece of pen nib. The last two modifications ensured stable guidance of the flexible cable.
I carried out the cutting with scissors - a very important advantage of this solution is that after cutting you can continue with the closing movement of the pliers, unlike with typical clippers. There are Stanley clippers available, or replacement clippers that work with scissors, but I don't need to cut thicker wires, plus the scissors were easy to attach. Scissors without handles mounted in a 3D printed mount, the movable arm has a handle instead of a handle, which is articulated to a wheel attached to a stepper motor. The motor is arranged so that it can perform a full rotation freely. The whole, unlike the solution based on clippers, is not sensitive to the wear of the mechanism, its play, etc. (the scissors do not close at zero, they make a further movement, which will always eliminate tolerances, the influence of wear, etc.).
Motor mounts from 3D print, Roller on kynar - 3D print reinforced with M3 pin. Display and keyboard in canopy 3D print, all encased in foamed PVC.
Firmware .
The display shows a menu where you select the variant to be cut, then the number of wires or sets per board. In the next step, the program moves the wire according to the preset length and then the stepper motor responsible for cutting performs a full rotation. The cycle repeats itself a pre-programmed number of times, and the start of the programme always begins by cutting the excess wire so that the first section is exactly the set length.
The last menu item allows the length of the sections to be cut to be specified manually.
What I would change .
I would reverse the cutting motion - so that the movable arm cuts downwards rather than upwards - here I needed to eliminate the scattering of cut fragments by the canopy tray catching the tossed fragments.
At the back of the case I would have given space for the power supply, so as to store the whole thing in a compact form.
BOM
Arduino Nano 10 zł
CNC Shield 12 zł
2x stepper motor controller 18 zł
display 1602 with I2C expander 10 zł
membrane keyboard 5 zł
2x ENema17 stepper motor with cables 22 zł
12 V power supply from demobilu
scissors from demobilu
M3 screws, washers, nuts from drawer
2 sheets of foamed PVC 60 zł
(prices from alliexpress, allegro)
A video of how the device works:
.
Assembled device:
 .
.
Kynar feed drive:
 .
.
Cutting drive:
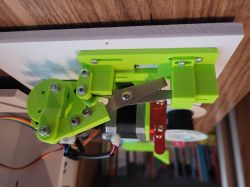 Cutting drive.
Entire mechanism:
 .
.
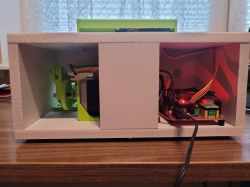
Back of case
Electronics .
To speed up the build, instead of making a PCB I used off-the-shelf solutions: a CNC shield for an Arduino nano with two stepper motor controllers. To this attached after I2 a 16x2 display and a membrane keyboard (ready-made from Alliexpress).
Mechanics .
After reviewing similar solutions, I decided to feed the wire with the mechanics of an extruder from a 3D printer. As the kynar is thin and quite delicate, the drive had to be modified: the toothed roller has grinded teeth, and instead of a concave roller I put a bearing. To prevent the kynar from slipping off the rollers, I glued a truncated meat injection needle onto the input. On the exit, instead of a piece of bowden - a piece of pen nib. The last two modifications ensured stable guidance of the flexible cable.
I carried out the cutting with scissors - a very important advantage of this solution is that after cutting you can continue with the closing movement of the pliers, unlike with typical clippers. There are Stanley clippers available, or replacement clippers that work with scissors, but I don't need to cut thicker wires, plus the scissors were easy to attach. Scissors without handles mounted in a 3D printed mount, the movable arm has a handle instead of a handle, which is articulated to a wheel attached to a stepper motor. The motor is arranged so that it can perform a full rotation freely. The whole, unlike the solution based on clippers, is not sensitive to the wear of the mechanism, its play, etc. (the scissors do not close at zero, they make a further movement, which will always eliminate tolerances, the influence of wear, etc.).
Motor mounts from 3D print, Roller on kynar - 3D print reinforced with M3 pin. Display and keyboard in canopy 3D print, all encased in foamed PVC.
Firmware .
The display shows a menu where you select the variant to be cut, then the number of wires or sets per board. In the next step, the program moves the wire according to the preset length and then the stepper motor responsible for cutting performs a full rotation. The cycle repeats itself a pre-programmed number of times, and the start of the programme always begins by cutting the excess wire so that the first section is exactly the set length.
The last menu item allows the length of the sections to be cut to be specified manually.
What I would change .
I would reverse the cutting motion - so that the movable arm cuts downwards rather than upwards - here I needed to eliminate the scattering of cut fragments by the canopy tray catching the tossed fragments.
At the back of the case I would have given space for the power supply, so as to store the whole thing in a compact form.
BOM
Arduino Nano 10 zł
CNC Shield 12 zł
2x stepper motor controller 18 zł
display 1602 with I2C expander 10 zł
membrane keyboard 5 zł
2x ENema17 stepper motor with cables 22 zł
12 V power supply from demobilu
scissors from demobilu
M3 screws, washers, nuts from drawer
2 sheets of foamed PVC 60 zł
(prices from alliexpress, allegro)
A video of how the device works:
Assembled device:
 .
.Kynar feed drive:
 .
.Cutting drive:
 Cutting drive.
Entire mechanism:
 .
.Back of case


Comments
Thank you for sharing an interesting design! Are you using the cut wires in any way more wholesale? Or is it more of a machine for the purpose of testing yourself and your capabilities? Has there been... [Read more]
Very interesting! A lot of experience can be gained from such practical realisations, and in the future you can think, for example, about miniaturising solutions and increasing their durability when, after... [Read more]
Doesn't this feeder imprint teeth on the cable? [Read more]
. I cut about 100 pcs a week - the amount I use for my semi hobbyist production of electronics for models. This is perhaps not a prototype, but rather a one-off pilot series. As something comes out in... [Read more]
Hey. Super project and cool that you are sharing your knowledge with the rest of your colleagues. Thanks. Have a healthy and peaceful Christmas. Hi. Michael. [Read more]
. Your build is beautiful, carefully crafted and impressively worked. I like it very much. But somehow I don't see the practical sense of e.g. saving time or increasing production efficiency, with such... [Read more]
. Well, and I can see - as far as my case is concerned, it's quite a convenience for me, it takes me off a laborious, boring job that I simply don't like. And this is where the greatest added value lies... [Read more]
Hello. . And this is where I see the first (quite serious) wear and tear in this razor - the cutting surfaces will quickly dull/chip in this one spot. I suggest using a guillotine-style cutting mechanism... [Read more]
. Nothing like this is occurring at the moment, and I used the scissors deliberately: - The kynar is thin, I don't cut anything thicker than that. - Typical knives for cutting in this type of machine:... [Read more]
And see, now I know you haven't explored the subject of cutting. I was writing about the guillotine mechanism, where nothing is clamped (it doesn't work like a sheet metal or paper cutter) just cooperates... [Read more]
And you see, now I know that after 12 years the electrode does not fail. :D . I know perfectly well what you wrote about and I referred in the second dash to it. [Read more]
OK, in that case you used scissors because typical guillotine mechanisms were too expensive. But. In your scissors drive solution, a guillotine made of two stainless steel plates with a notch to match... [Read more]
Here https://www.elektroda.pl/rtvforum/topic4077229.html I have had the opportunity to test and pass on for testing wire cutting scissors, they have a serrated surface and I suspect are suitably hardened.... [Read more]
. I considered this, even drew the mechanism (prototypically I wanted to use blades from trapezoidal knives), but more time, complication of the system (ensuring free movement while pressing the blades... [Read more]
. With this cable cross section, the current solution (free arm on the wheel) would calmly suffice. One guillotine blade fixed, the other movable, on guides, coupled to the arm or to a scissor mechanism... [Read more]
. I understand this aspect of weariness perfectly. But I still feel a serious dissonance between the number of cut episodes you write about and the reported tedium. I simply don't understand how one can... [Read more]
. Propulsion is not a problem, some issue (as I wrote) would be to build the mechanism so that the blades rub against each other to pick up the slack in between, while at the same time not providing much... [Read more]
In the manual wire preparation machine for mini-winding by O.K. Industries scissors were just used to cut the kynar. https://obrazki.elektroda.pl/6319229100_1735120175_thumb.jpg . [Read more]
I'll be honest, it's much more convenient to do it the traditional way. [Read more]