[BK7321N] How to change the firmware on the LTC LXU407 smart plug with BK7321N chip?
Good morning.
As I've been using a dozen or so smart sockets of one type for over two years, I've finally matured into trying to make them cloud free.
I use them for Home Assistant with LocalTuya integration (which in itself no longer requires the cloud), but I wanted to change the firmware completely.
The socket is quite compact (that's what I was looking for), with tuya-cloudcutter it is unfortunately impossible to sflash it (soft 1.1.8).
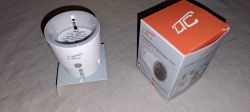
But to the edge. It looks like this:
 .
.
Once I found the right way to open the case it went quite straightforward.
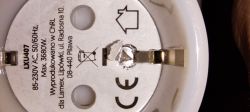
Under the sticker is a screw with an unusual head (triangular keyway).
 .
.
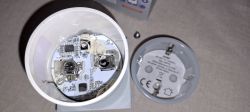
After unscrewing it and gently removing the top, the interior with the stick-on antenna begins to be visible.
 .
.
You can already find the Beken chip, but I couldn't imagine flashing by touching the chip feet directly (but I was prepared to do so).
However, after gently peeling off the antenna
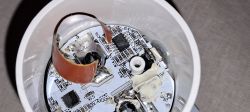
and placing the socket upside down with the pins and DELICIOUSLY treating them with a hammer, everything comes out nicely.
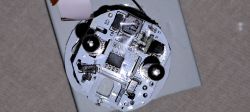 .
.
It remains to be seen what this has on board - BK7231N and BL0942.
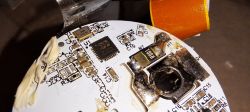 .
.
The best hides on the opposite side of the board where the chip is.
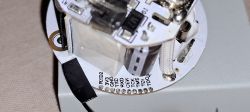
This is where simple flashing remains. It is possible to solder, but I, due to the large number of devices to be reworked, went for spring-loaded pins (pogo-pin) type P50-B1, available on a large Polish shopping portal.
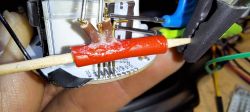 .
.
Pin configuration:
pin 6 - LED_n 1 / WifiLED_n
pin 9 - Btn 1
pin 26 - Rel 1
Startup script:
backlog PowerSave 1; startDriver B0942
I still use
alias mode_wifi setPinRole 6 WifiLED_n
alias mode_relay backlog setPinRole 6 LED_n; SetPinChannel 6 1;
mode_wifi
addChangeHandler WiFiState == 4 mode_wifi
addChangeHandler WiFiState != 4 mode_relay
I noticed that the voltage indication is not very accurate (usually overestimated), so calibration is rather advisable.
As I've been using a dozen or so smart sockets of one type for over two years, I've finally matured into trying to make them cloud free.
I use them for Home Assistant with LocalTuya integration (which in itself no longer requires the cloud), but I wanted to change the firmware completely.
The socket is quite compact (that's what I was looking for), with tuya-cloudcutter it is unfortunately impossible to sflash it (soft 1.1.8).
But to the edge. It looks like this:
 .
.
Once I found the right way to open the case it went quite straightforward.
Under the sticker is a screw with an unusual head (triangular keyway).
 .
.
After unscrewing it and gently removing the top, the interior with the stick-on antenna begins to be visible.
 .
.
You can already find the Beken chip, but I couldn't imagine flashing by touching the chip feet directly (but I was prepared to do so).
However, after gently peeling off the antenna

and placing the socket upside down with the pins and DELICIOUSLY treating them with a hammer, everything comes out nicely.
 .
.
It remains to be seen what this has on board - BK7231N and BL0942.
 .
.
The best hides on the opposite side of the board where the chip is.

This is where simple flashing remains. It is possible to solder, but I, due to the large number of devices to be reworked, went for spring-loaded pins (pogo-pin) type P50-B1, available on a large Polish shopping portal.
 .
.
Pin configuration:
pin 6 - LED_n 1 / WifiLED_n
pin 9 - Btn 1
pin 26 - Rel 1
Startup script:
backlog PowerSave 1; startDriver B0942
I still use
alias mode_wifi setPinRole 6 WifiLED_n
alias mode_relay backlog setPinRole 6 LED_n; SetPinChannel 6 1;
mode_wifi
addChangeHandler WiFiState == 4 mode_wifi
addChangeHandler WiFiState != 4 mode_relay
I noticed that the voltage indication is not very accurate (usually overestimated), so calibration is rather advisable.


Comments
Do you perhaps have backups of the socket charge? We are collecting them for analysis. Calibration is always a must, this can be done via WebApp: https://obrazki.elektroda.pl/9806170900_1741682879_bigthumb.jpg... [Read more]
. Hi. Yes, of course I have a copy of the batch, in fact I still have about 12 such slots not converted. I will send on pw (?). As for calibration, of course - I know how to do it, I've already done... [Read more]
If searching by name/chip/manufacturer does not work, or more specifically if something is missing from our list: https://openbekeniot.github.io/webapp/devicesList.html Then please report to me, or even... [Read more]
. I am already correcting myself - template attached. . Here I also accept criticism :-) I made a new dump on the test AP - it does not contain sensitive data. [Read more]
Thanks for sharing the batch (for publication with the test SSID), it is now here: https://github.com/openshwprojects/FlashDumps/commit/b9c617c581f88e5ad4f883716009c67a473addd1 Config Tuya: ... [Read more]
. I bought all of them on our Polish auction portal. I think they were even from the same seller. Over an extended interval (roughly over the course of 1.5 years) [Read more]
I have yet to test such products from them: RF remote controlled relay socket - LXU200 - short test, interior... . Simple timer LXU09 - instructions, interior, cell from inside (holding) But... [Read more]
I have read that there is something like this. But in my case, due to the large number of different types of sensors (in total it will add up to more than 50 of various types - temperature, humidity, power,... [Read more]
And you will have these 50 devices connected via WiFi? After changing the firmware, you can also always connect an additional sensor to any device on free pins. It is only worth ensuring that the method... [Read more]
. I will not "be" but "have" connected. Not all at once of course, as some are battery operated devices most of their lives "sleeping" but waking up at events. I have quite an extensive home network... [Read more]
I didn't have time to write back, but overall you're right, there is a tiny bug - setPinChannel doesn't set the channel value. I'll try to add a test and fix the handling of this situation. I only see... [Read more]