Hello
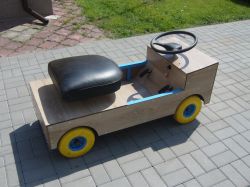
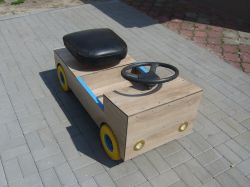
I promised my daughter that I would make a toy car powered by battery next year.
I am good at electronics - I have been in it for over 20 years but this time I had to deal with mechanics and this is where the stairs begin.
I am asking the moderator to move to the appropriate section of this topic if I put it in the wrong section and I apologize in advance, please do not remove the matter important to me.
I am asking fellow mechanics who are more familiar with car matters.
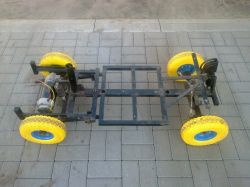
I will describe my project from the mechanical side, how I would see it and what I was thinking - I am asking for advice if such solutions will work.
1. As a drive I intend to use a DeWalt 12V two speed screwdriver - or two screwdrivers.
https://www.google.pl/search?q=dw907&client=o...ved=0ahUKEwj43IXHycLWAhVDmbQKHQGTBKQQ_AUICygC
The screwdriver has two gears and 0-350 rpm or 0 - 1200 rpm, respectively
I'm going to use a stronger gear - lower speed.
I intend to drive the rear using 26cm wheels
http://allegro.pl/show_item.php?item=6680219694
I hope that the moderator will not remove the link but unfortunately I have not found a photo of these wheels anywhere else on the Allegro
Max load up to 40 kg per wheel quite light, of course you have to knock out the bearing and mount a rigid threaded rod fi 20mm with the sleeve and on the outside squeeze with washers and tighten well
Outside, I will use a cap nut closed on the other side, i.e. a bearing with a housing will be attached from the car side
https://www.wszystkodlarolnictwa.pl/moduly/sk...les/big/15705/-/Lozysko-z-obudowa-UCP213-.jpg
Of course, the bearing for a threaded rod fi 20 also bolted to the rod from two sides and screws housing to the chassis - welded from angles, but more on that later.
The second rear wheel is mounted in the same way on this rod - the shaft rigidly and through the bearing to the chassis between the wheels will be a gear wheel also bolted to this threaded rod (rear shaft)
http://allegro.pl/listing/user/listing.php?st...ch=ss-base-relevance-floki-5-nga-hcp-uni-1-4- 0905
Gear wheel with 20mm inner diameter and another one with a 10mm inner diameter on the bolt and also bolted
http://mixstor.pl/1340-home_default/101smgn6x40.jpg
The screw will have its head cut off and screwed tightly to the screwdriver - if necessary some of these elements will be lightly welded to avoid unscrewing.
So we already have the back and I see it more or less so I ask for opinions if it can be like this or possibly how to do it better and from what.
The next thing is the front swivel wheels and here the situation is a bit complicated - the front wheels have bearings in the wheels and the threaded rod will also be fitted from the outside with a dome nut and on the other hand the element will be used as below, unfortunately I did not find such things in Poland only on ali ...
https://pl.aliexpress.com/item/1-PCS-PHSAL20-...readed-Rod-End-Joint-Bearing/32811307444.html
afterwards this element from the bearing side will be fastened with a screw to the welded chassis structure. And in this way I handle the swivel front wheel - of course the second in the same way assembled and connected by a parallel rail to be able to turn two wheels at the same time.
Now the steering wheel remains - from the Tico car small and handy, on the other hand, I think here to tighten this rail for a 33cm long sliding gate on this crossbar - this is quite the type of teeth M4
http://allegro.pl/ar-met-listwa-zebata-z-tworzywa-odcinki-33cm-i6957431262.html
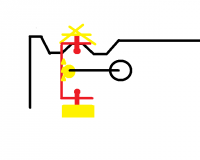
For this mode with the same tooth spacing put on the rod on which the steering wheel will now by turning the steering wheel will rotate the mode at the bottom and move the cross bar through the toothed bar and thus will change the position of the front wheels.

And the last thing I'm thinking about right now - depreciation
Depreciation will be made in such a way that there will be two stable and movable bases separated by springs installed on M20 bolts, bolts with incomplete thread and the spring will work, of course, where the thread is not
https://www.art-nierdzewne.pl/din-931-szescio...0x120-din-931-a2-szesciokatna-nierdzewna.html
and spring
http://allegro.pl/sprezyna-naciskowa-nr-162-wymiar-4x25-5x84-mm-i6921573867.html
I wonder whether to also give linear bearings from the bottom of the spring
https://www.google.pl/search?q=łożysko+liniow...ZVAKHYOACo4Q_AUICigB&biw=1024&bih=461#imgrc=_
Well, probably all ideas when it comes to mechanics please advice because if I order from China I have to think carefully
In electronic terms, the engine will be connected to a 12V 18Ah battery or two depending on the operating time and the engine will be through the PWM controller to regulate the revolutions, i.e. the speed of course the PWM potentiometer will be combined with the accelerator pedal - there is still the issue of braking but maybe the speed will not be dizzy and braking will be carried out by a gear in the screwdriver - just after releasing the accelerator pedal the speed will decrease quickly. Anyway, the assumption is that the vehicle will drive slowly - otherwise you will have to think about braking.
Once again, please do not remove the post, any transfer from the relevant department I care about answers and advice, because next year the construction of the vehicle will start and in the end there will be publication on the electrode, like my other designs.
Best regards and waiting for some advice solutions for which I thank you in advance and I am grateful ....
I promised my daughter that I would make a toy car powered by battery next year.
I am good at electronics - I have been in it for over 20 years but this time I had to deal with mechanics and this is where the stairs begin.
I am asking the moderator to move to the appropriate section of this topic if I put it in the wrong section and I apologize in advance, please do not remove the matter important to me.
I am asking fellow mechanics who are more familiar with car matters.
I will describe my project from the mechanical side, how I would see it and what I was thinking - I am asking for advice if such solutions will work.
1. As a drive I intend to use a DeWalt 12V two speed screwdriver - or two screwdrivers.
https://www.google.pl/search?q=dw907&client=o...ved=0ahUKEwj43IXHycLWAhVDmbQKHQGTBKQQ_AUICygC
The screwdriver has two gears and 0-350 rpm or 0 - 1200 rpm, respectively
I'm going to use a stronger gear - lower speed.
I intend to drive the rear using 26cm wheels
http://allegro.pl/show_item.php?item=6680219694
I hope that the moderator will not remove the link but unfortunately I have not found a photo of these wheels anywhere else on the Allegro
Max load up to 40 kg per wheel quite light, of course you have to knock out the bearing and mount a rigid threaded rod fi 20mm with the sleeve and on the outside squeeze with washers and tighten well
Outside, I will use a cap nut closed on the other side, i.e. a bearing with a housing will be attached from the car side
https://www.wszystkodlarolnictwa.pl/moduly/sk...les/big/15705/-/Lozysko-z-obudowa-UCP213-.jpg
Of course, the bearing for a threaded rod fi 20 also bolted to the rod from two sides and screws housing to the chassis - welded from angles, but more on that later.
The second rear wheel is mounted in the same way on this rod - the shaft rigidly and through the bearing to the chassis between the wheels will be a gear wheel also bolted to this threaded rod (rear shaft)
http://allegro.pl/listing/user/listing.php?st...ch=ss-base-relevance-floki-5-nga-hcp-uni-1-4- 0905
Gear wheel with 20mm inner diameter and another one with a 10mm inner diameter on the bolt and also bolted
http://mixstor.pl/1340-home_default/101smgn6x40.jpg
The screw will have its head cut off and screwed tightly to the screwdriver - if necessary some of these elements will be lightly welded to avoid unscrewing.
So we already have the back and I see it more or less so I ask for opinions if it can be like this or possibly how to do it better and from what.
The next thing is the front swivel wheels and here the situation is a bit complicated - the front wheels have bearings in the wheels and the threaded rod will also be fitted from the outside with a dome nut and on the other hand the element will be used as below, unfortunately I did not find such things in Poland only on ali ...
https://pl.aliexpress.com/item/1-PCS-PHSAL20-...readed-Rod-End-Joint-Bearing/32811307444.html
afterwards this element from the bearing side will be fastened with a screw to the welded chassis structure. And in this way I handle the swivel front wheel - of course the second in the same way assembled and connected by a parallel rail to be able to turn two wheels at the same time.
Now the steering wheel remains - from the Tico car
http://allegro.pl/ar-met-listwa-zebata-z-tworzywa-odcinki-33cm-i6957431262.html
For this mode with the same tooth spacing put on the rod on which the steering wheel will now by turning the steering wheel will rotate the mode at the bottom and move the cross bar through the toothed bar and thus will change the position of the front wheels.

And the last thing I'm thinking about right now - depreciation
Depreciation will be made in such a way that there will be two stable and movable bases separated by springs installed on M20 bolts, bolts with incomplete thread and the spring will work, of course, where the thread is not
https://www.art-nierdzewne.pl/din-931-szescio...0x120-din-931-a2-szesciokatna-nierdzewna.html
and spring
http://allegro.pl/sprezyna-naciskowa-nr-162-wymiar-4x25-5x84-mm-i6921573867.html
I wonder whether to also give linear bearings from the bottom of the spring
https://www.google.pl/search?q=łożysko+liniow...ZVAKHYOACo4Q_AUICigB&biw=1024&bih=461#imgrc=_
Well, probably all ideas when it comes to mechanics please advice because if I order from China I have to think carefully
In electronic terms, the engine will be connected to a 12V 18Ah battery or two depending on the operating time and the engine will be through the PWM controller to regulate the revolutions, i.e. the speed of course the PWM potentiometer will be combined with the accelerator pedal - there is still the issue of braking but maybe the speed will not be dizzy and braking will be carried out by a gear in the screwdriver - just after releasing the accelerator pedal the speed will decrease quickly. Anyway, the assumption is that the vehicle will drive slowly - otherwise you will have to think about braking.
Once again, please do not remove the post, any transfer from the relevant department I care about answers and advice, because next year the construction of the vehicle will start and in the end there will be publication on the electrode, like my other designs.
Best regards and waiting for some advice solutions for which I thank you in advance and I am grateful ....


