logo elektroda
logo elektroda
X
logo elektroda

Grohe Rapid - cistern - how to adjust the amount of drained water

ken-wawa 283959 25
ADVERTISEMENT
Treść została przetłumaczona polish » english Zobacz oryginalną wersję tematu
  • #1 14706132
    ken-wawa
    Level 12  
    Hi,

    Unfortunately for me, in the apartment where I live, the owner has installed a Grohe Rapid flush-mounted toilet flush (probably the SL model). The problem is that no matter if I press a large or a small button, 9 liters of water are drained (an awful lot).

    I wanted to adjust it myself so that the large button would stay at 9 liters, but the small button at around 3-4 liters. This is where the problem begins. I have not found a good manual anywhere on the web. The best I could find is:

    http://cdn08.grohe.com/lib/1/tpi/1843817.pdf - instruction, I especially recommend the tip
    https://www.youtube.com/watch?v=QNNLnygHLC4

    I do not fully understand the mechanism of action, but it turned out that if I want to leave 9 liters of water in the tank, I do not touch the X regulator (pdf from the first link, drawing almost at the end). I should have played with Y and Z to reduce the amount of water with the little button. The problem is that after removing the buttons and changing the Y position, I do not see any effect on the amount of water drained. As if it had a slight effect on the drain rate, but I'm not sure (didn't measure).

    It seems to me that the secret is hidden in the Z regulator. Unfortunately, it is so low in the tank that I have no idea how to get to it - my arm is too big and I am not able to reach so low through the buttonhole. As a result, I can't change it (not to mention that I can't see it at all).

    I would never buy something so crap designed in my life, but since I have to work with it, maybe someone has an idea how to adjust it and get to the Z regulator. I don't want to do something without being sure, because if I break something, it's still a thing it becomes more complicated (in the end, the wall will be broken and everything that is against the wall will be replaced).

    Theoretically, according to the description http://www.grohe.com/pl/7351/grohe/lazienki/s...roduct=38827-D024&color=000&material=38827000 this model should also have start functions / stop but that doesn't work at all. How to run it? I have tried different combinations, pressing the same button twice quickly, pressing the big button once, then the small one or vice versa etc. And the stop doesn't seem to work.

    Finally, a lot of limescale has formed in the tank. Is it worth cleaning it up and as best as possible?

    Can you advise?
  • ADVERTISEMENT
  • #2 14878417
    Tupson
    Level 2  
    Hello,
    I have the same at home, managed to solve this problem somehow?
  • #3 14923799
    ken-wawa
    Level 12  
    Unfortunately no, I will have to call the service if I have more time.
  • #4 15113394
    boruurob
    Level 11  
    Hey, did you get over it somehow?
  • #5 15192544
    boruurob
    Level 11  
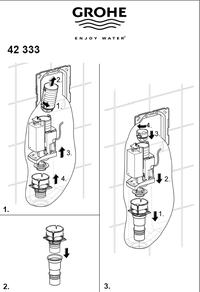
    To get to the Z adjustment, pull out this white tube in the middle. How to do this is shown on page 4 bottom left: you have to turn it to the left and then pull it up. The regulation is, however, poor and hard to adjust as you would like. Well, you can have fun and in the end I managed to achieve more or less the intended effect.
  • ADVERTISEMENT
  • #6 15192666
    ken-wawa
    Level 12  
    Thanks. I will try to play with it in my free time, because I have left the topic for now.

    And do you know what the X, Y, Z regulators are for and could you explain it somehow?

    Thanks in advance. :-)
  • ADVERTISEMENT
  • #7 15398842
    lukmistrz
    Level 13  
    Will someone explain to me how to adjust the Rapid SL cistern so that there is less water? because it's splashing now and it's mega annoying, thanks a lot in advance.
  • #9 15475498
    jarcel
    Level 1  
    There are basically three adjustments - as in the video above - by moving the adjusters (down - more water up less water) and the third one next to it by unscrewing and screwing a small polystyrene cylinder so that there is less water, unscrew it to make its position as it is lowest in the cistern - the same polystyrene cylinder is next to this device on the left side - a hose with water is connected to it
  • #10 15476490
    mooser
    Level 12  
    I installed a frame and a shell. Time to test the button. Gentlemen, this is a massacre. Why don't they set it at the factory? Reki does not go to insert, and to adjust it you have to pull out almost everything. It may not be great engineering, but it is so delicate there that you do not take it upon yourself to dismantle it.
    Does the service under the warranty set the flushing ranges?
  • #11 15501159
    A. Jafra
    Level 2  
    Grohe Rapid - cistern - how to adjust the amount of drained water Hello everyone,

    In reference to the theme of Grohe plasters.

    I myself am a supporter of good products, so far I have used various Grohe and HansGrohe products, I have always been super happy with the quality of functionality etc.
    Considering my previous experience with these products, this time I bought three Grohe plasters for my new venture.
    Everything was ok until it was launched.
    My surprise was mega not positive.
    Start stop does not work, no one can tell how to set the amount of flush water.
    The Trigger Limits set are so high that it's debauchery for me.
    I dug the subject in my spare time for three months, the seller has no idea about the settings, just the same thing - it has to work, there is nothing complicated there.
    regional service technician Grohe - West Pomeranian failure.
    Finally I called Grohe Polska,
    After talking to a quite nice and overwhelmed lady, I got a graphic e-mail
    water dosage adjustment instructions, but .......
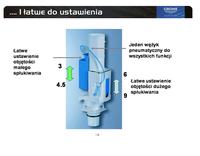
    It was possible to increase from 6 to 9 liters with a large trigger and 3 to 4.5 liters with a small trigger.
    In addition, it turned out that at the factory, the plaster is set to the maximum amount.
    so I wonder if Grohe has any benefits from the water used or some kind of fungus, because I do not understand such politics and waste.
    I changed the floats to smaller settings, but a ton of water was still flying, and Start Stop still does not work.
    I sat down to the computer and started rummaging in the net, I found a topic on the electrode forum.
    The subject included a detailed instruction or a diagram of the entire system.
    Due to the fact that I would not be myself, if I did not get to the bottom of the matter, I started to put everything together, and ........... poured out X liters of water, but I finished the topic with full success.
    So to the point:
    Turn the polystyrene float down as far as possible, so that it stays on the last turn of the lead, lift the big blue float up to the max, and lower the small one down.
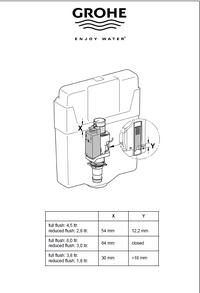
    I attach the instruction I got from Grohe, as an overview of where what is when it comes to the main settings, and in the manual - the diagram in the link, you will find the position of the polystyrene float page 4 and 5 - instructions at ken-waw

    1. With this setting,
    - first, a lot of water is filled into the tank,
    - it causes low water content with little rinsing, I think max 1 - 1.5l
    2. Finally, the start stop function works, i.e.
    - pressing and releasing the large button automatically rinses a small amount of water,
    - pressing and releasing the small and large buttons together causes a medium drain of water,
    - holding the large button, the water goes to the end,

    Honestly, I wasn't expecting such features, but it works and I finally have a clear conscience :)
    I wonder why these settings are so hidden.

    I think that with this description I will help all those who do not like wasting water and their money.

    best regards
  • #12 15502522
    mooser
    Level 12  
    A. Jafra wrote:
    Turn the polystyrene float as far down as possible

    Is the polystyrene float the one on the 5th page at the bottom right (last picture)?
    By the way, this table with mm values is interesting. I wonder how it is measured by service technicians.
    Attachments: To view the material on this forum you must be logged in.
  • #13 15502603
    A. Jafra
    Level 2  
    The polystyrene float is marked on page 5 with the parameter X.
    If the maximum lowering of the float causes that there is not enough water, you can turn it upwards in the same way. It is also a question of what type of seashell is.
    I have a new wheel with a rimfree system, and the max lowered down is ok.
  • #14 15519903
    lukmistrz
    Level 13  
    @And!. Jafra You wrote:

    "So to the point:
    Turn the polystyrene float down as far as possible, so that it stays on the last turn of the lead, lift the big blue float up to the max, and lower the small one down.
    I attach the instruction I got from Grohe, as an overview of where what is when it comes to the main settings, and in the manual - the diagram in the link, you will find the position of the polystyrene float page 4 and 5 - instructions at ken-waw "

    It seems to me that a small and large float to the maximum up, according to the instructions in the topic of how to take everything up, it is 3 and 6 liters of water, and how small you take it down, it is 4.5 liters and 3 liters when it is up.
  • ADVERTISEMENT
  • #15 15520276
    A. Jafra
    Level 2  
    Yes, but as with the float lowered to the maximum we will give a small container for 3 liters, i.e. up,
    not much of the water
    I have been testing the settings given earlier for a week, and they are ok, the start stop function is working,
    if the small button is not enough water, you can hold it for a while - more water will flow,
    suddenly there were a few combinations on the buttons that previously did not work at all and were not included in the specification :)
  • #16 15688956
    bocmar
    Level 11  
    Hello
    I have a problem with the still lying water

    After pressing the button of the small or large flush, no
    cuts off the water automatically - only after pressing the button again, the water is blocked - please help
  • #17 15724628
    andype
    Level 10  
    If the drain valve in Rapid SL does not close, try to remove the drain valve and clean it under running water, as the new valve will not help. Unless it is under warranty then file a complaint. Products purchased by 01/06/2013 have a five-year manufacturer's warranty, while purchases after this date are awarded a 10-year warranty.
    As for the adjustment, lifting the large blue element up will reduce the flush volume, while the small blue slider should reduce the large flush. for it to be effective, lower the filling of the tank, i.e. polystyrene downwards. You should not stick too much to the specification of the X size on the filling valve because depending on the connection method, the valve tucks and this size varies.
  • #18 16210478
    kuhnro2
    Level 14  
    Dear Helpers,

    Let me rehearse the topic a bit, because the new year, the water is getting more expensive as usual :)

    I have a question about the statement:
    "we raise the big blue float up to the maximum, and lower the small one down."

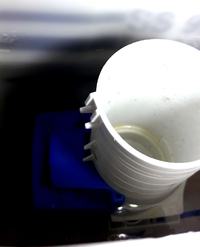
    I tried to put this float up to the max, but as the photo below shows, such white protrusions on this white shaft prevent the float from moving up.
    Grohe Rapid - cistern - how to adjust the amount of drained water

    when I took off this white element, the float can be moved upwards much more.
    How should you approach the topic here?
    Is this position in the photo, it is already max up according to the author of the idea, or maybe one tooth (tab) should be cut (then you can easily give the float higher)

    Best regards and thank you for your suggestions in advance
  • #19 16210813
    andype
    Level 10  
    The higher the big blue above, the less water flows out with a small flush, the higher the small blue, the faster the large flush closes. If we have a bowl adapted for flushing, e.g. 2.5 / 4.5 liters, you can buy a kit to reduce the amount of flowing water, catalog number 42 333 000
    Grohe Rapid - cistern - how to adjust the amount of drained water Grohe Rapid - cistern - how to adjust the amount of drained water
  • #20 16211834
    kuhnro2
    Level 14  
    Dear Mr. Andype,
    Thank you very much for the suggestions.

    And what is the price of this "repair" kit :) 42 333,000?
  • #21 16213063
    andype
    Level 10  
    According to the latest Grohe price list, EUR 18 net (about PLN 100 gross) at the price list, I saw PLN 58 but I would not be sure of this offer.
  • #22 16215224
    kuhnro2
    Level 14  
    And I think I will lift the large float up by cutting the tab in the photo slightly so I can lift it higher.

    I have one more question - what does the start-stop function mean and how is it set up?
    Does start-stop mean that we stop the flow of water at any time?
  • #23 16215520
    andype
    Level 10  
    Just bend it, you don't need to cut this tab. The stop function works as follows: press the big button, the water starts to flow, let go and press it again and release, then the valve should drop and shut off the flow of water. However, with large diameters of the outflow pipes, more water will come out than when pressing a small button. Raising the blue element above the tab will reduce the amount of water by up to 2 liters. However, I would not exaggerate with this water reduction. I do not remember now how the standards provide for it, but it should be that with a small flush, the water in the siphon is changed twice, and with a large flush - four times, and now if we have 1.5 liters in the siphon, this size should be kept. If we use too little water, scale from urine will start to settle in the bowl siphon and I do not know if it is worth it, how much we will save on water and how much we will spend on descaling agents or replacing the shells.
    It is worth considering this.
    Please do not take these data as to standards literally only as an example, I am not sure that I would have to check it at the source. These new bowls, so-called bez-rim (rim free etc names) are generally adapted to a smaller amount of rinse water. This varies depending on the manufacturer, the quantities are around 2.5 / 4.5 liters.

    If you have any more questions, I will be happy to help.
  • #24 16218634
    kuhnro2
    Level 14  
    Thanks, Andype for the hint. I picked up a large float and one tab higher and I'm happy with the amount of water to rinse the fly (I have rimfree).

    On the other hand, I would like to write that the fact of offering such "repair kits as mentioned earlier is proof of the cunning of companies - it's like you want to adjust the seat in your car and have to buy another regulator,
    although replacing the bulb also goes in the same direction.
  • #25 16220818
    andype
    Level 10  
    I don't think it looks like that. Most of the bowls that are sold, however, are traditional, i.e. 3/6 liters. By attaching another element to the flush, it would just be a ride. When processing a complaint in 50% of the 5-in-1 frame, people do not have an ankle slide installed because the installer thought. Nobody reads the assembly instructions because they know the best and the standard answer "sir, I've already installed so many of these racks"
  • #26 16254042
    kuhnro2
    Level 14  
    andype wrote:
    When processing a complaint in 50% of the 5-in-1 frame, people do not have an ankle slide installed because the installer thought. Nobody reads the assembly instructions because they know the best and the standard answer "sir, I've already installed so many of these racks"


    I confirm that the installers are moderate-minded (I do not know if out of laziness or lack of thought), he just left me to flush the max, so I had to get interested in the subject myself.

    Thanks Andy for all the help :)

Topic summary

The discussion revolves around adjusting the water flush volume of the Grohe Rapid SL flush-mounted toilet cistern. Users report that both flush buttons release 9 liters of water, which is excessive. Various suggestions are made for adjusting the flush volume, including manipulating the X, Y, and Z regulators as outlined in the provided manual and video. Key adjustments involve pulling out a white tube to access the Z adjustment and modifying the position of the polystyrene float to control the water levels. Users express frustration with the complexity of the adjustments and the lack of clear instructions, with some considering professional service for assistance. The conversation also touches on the effectiveness of the start-stop function and the potential need for a repair kit to further reduce water usage.
Summary generated by the language model.
ADVERTISEMENT