logo elektroda
logo elektroda
X
logo elektroda

Troubleshooting 230V E27 LED Bulb Power Module: Step-by-Step Guide to Identify & Repair Damages

wemibo 11706 22
ADVERTISEMENT
Treść została przetłumaczona polish » english Zobacz oryginalną wersję tematu
  • #1 16954308
    wemibo
    Level 7  
    Hello

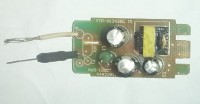
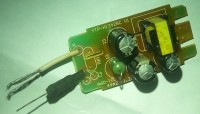
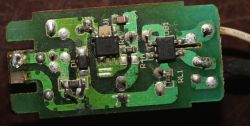
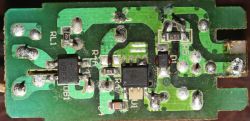
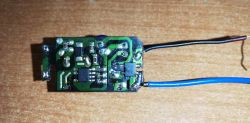
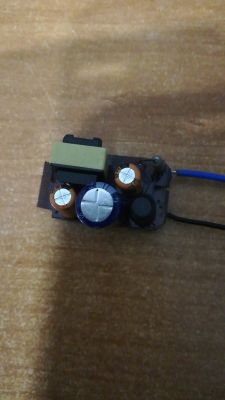
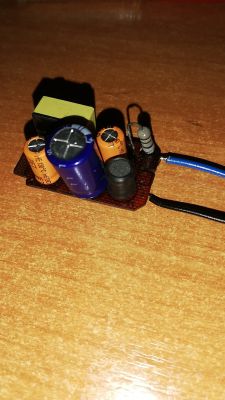
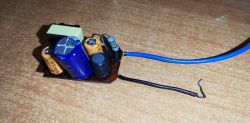
    A request for tips on how to check step by step what is damaged in the power module of the led diodes in the bulb (LED bulb thread e27 power supply 230v, power about 12W).
    The module is attached in the pictures. After connecting the module to 230V power supply (and disconnected board with LEDs) at the 'output', i.e. connecting the module to the board with LEDs, the meter shows a direct voltage of over 300V.

    Since I have about 10 such damaged bulbs, I would like to try to repair (repair or replace the module)

    Troubleshooting 230V E27 LED Bulb Power Module: Step-by-Step Guide to Identify & Repair Damagesf1.jpg Download (34.74 kB)
    Troubleshooting 230V E27 LED Bulb Power Module: Step-by-Step Guide to Identify & Repair Damagesf4.jpg Download (84.96 kB)
    Troubleshooting 230V E27 LED Bulb Power Module: Step-by-Step Guide to Identify & Repair Damagesf6.jpg Download (37.65 kB)
  • ADVERTISEMENT
  • #2 16954318
    Krzychu7
    Level 40  
    Are you sure the module is damaged and not the LEDs?
    There is LED current stabilization, not voltage.
  • #3 16954336
    wemibo
    Level 7  
    I'm not sure.

    The main argument for stating that the damaged module is just the incorrect output voltage from the module to the LED board. I assume (maybe I am wrong) that the LED board should receive direct current with an order of magnitude smaller than the one tested in the board.
  • ADVERTISEMENT
  • Helpful post
    #4 16954351
    teskot
    Level 37  
    This type of driver must not be turned on without load on the output! These 300V is the peak voltage of the network. Show the tiles with the LEDs first, then we can do something. And again I warn you - do not turn it on without load because it is nice to get hit with a fragment of an exploding capacitor.
  • #5 16954358
    wemibo
    Level 7  
    I understand, I will add additional photos in the evening.
  • #6 16954370
    barton21
    Level 26  
    You have a faulty capacitor. (First picture first from the left from the bottom)
  • #7 16954380
    teskot
    Level 37  
    This is known, but this is not the reason for the lamp not working. I bet one LED in the row is broken. We will see photos.
  • Helpful post
    #8 16954396
    barton21
    Level 26  
    "it is known"? Somehow no one wrote about this colleague. I agree that one diode may be damaged. I suggest checking the diodes and replacing the damaged capacitor (the other two are convex if they need to be replaced)
  • ADVERTISEMENT
  • #9 16954423
    wemibo
    Level 7  
    As I wrote, in the evening I will provide photos, but immediately:

    1) a request for info, how to check the diodes with a meter (or else, e.g. provide some voltage)?

    2) how do you know that the capacitor is damaged (and can it be verified with a meter)?

    Because these bulbs will be from 10+ (the whole set), so maybe from 10 bad it will be possible to make 5 good ones :)
  • #10 16954457
    barton21
    Level 26  
    The first signs that the capacitor is damaged is that its upper part is convex. You can measure the capacitor with a meter, but the meter must have a range for measuring capacitance. If you want to check the diodes with a meter, set the meter to measure the diode or test the continuity of the circuit. You measure each LED twice. When you put the red cable of the meter to the positive pole of the diode and the black to the minus, you should have a reading on the meter. If you change the polarity then it should not be read. Then the diode is theoretically weldable. However, if in each case you have a reading or you do not have it, then the diode is damaged.
  • #11 16954533
    Jawi_P
    Level 36  
    wemibo wrote:
    I'm not sure.

    Make sure you check each in turn.
    The controller is a current stabilizer, it will increase the voltage as long as it reaches the set current or its capabilities and gives the maximum voltage. If you have no load, the controller gives max voltage, which in turn can cause electrolyte death at this converter output.
    Generally, if it turns out that it is a diode, it is worth reading the mark of the chip in the inverter and determine which resistor is responsible for the value of the given current for the diodes. It is worth choosing its value to reduce the current flowing by about 10%, the light will be slightly less, and the service life will increase significantly.
    But as it turns out, it is the diodes that are replaced by an inexperienced solder need not be so simple ;)
  • #12 16955435
    teskot
    Level 37  
    Not every diode can be checked with a meter, because sometimes one housing houses several structures connected in series and the test voltage of the meter may be too low. First make a visual assessment - if a black dot is visible in the structure, then such a diode is 99% damaged. Then measuring with a multimeter on the diode range: red wire to the anode, black to the cathode. If the diode has one structure inside it should light up slightly. Check it out with a few taps. If none of them lights up, it is likely that they have several connected structures. Then you can try to light them individually by connecting + the power supply through a resistor (1 ÷ 10k? ;) to the anode, and - to the cathode. The power supply should have 12-15V, although I encountered diodes that started to glow only above 18V. With such tests, do not change polarization because high back voltage can damage the structure.
  • #13 16956122
    wemibo
    Level 7  
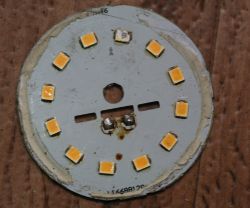
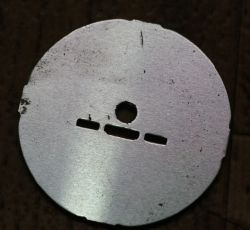
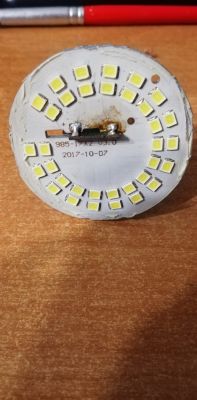
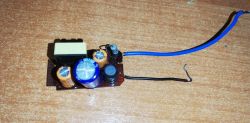
    I attach photos of the board with up / down LEDs (one of the diodes damaged by me) and the module from below. The board with LEDs is powered by the connection in the middle (these two February)

    Troubleshooting 230V E27 LED Bulb Power Module: Step-by-Step Guide to Identify & Repair Damages Troubleshooting 230V E27 LED Bulb Power Module: Step-by-Step Guide to Identify & Repair Damages Troubleshooting 230V E27 LED Bulb Power Module: Step-by-Step Guide to Identify & Repair Damages Troubleshooting 230V E27 LED Bulb Power Module: Step-by-Step Guide to Identify & Repair Damages
  • #14 16956405
    teskot
    Level 37  
    The fourth counting clockwise (starting at 12 o'clock) looks damaged. Desoldering it should not be difficult, but desoldering it from a working plate and soldering into place is not so easy. You need a hot air station and some experience.
  • #15 16961295
    SlawekKedra
    Level 43  
    Also check this element in the black heat shrink if there is a break
  • #16 16962146
    Freddy
    Level 43  
    First, swollen electrolytic capacitors for replacement.
    The LED driver is the BP9916 chip and it probably has been damaged.
    This is a fairly common damage because the cooling conditions are poor.

    The system can be bought on ebay and Aliexpress.
  • ADVERTISEMENT
  • #17 19734448
    grunio
    Level 8  
    I warmly welcome.
    I have a module that behaves strangely and I don't know what's going on.
    All leds are good. After plugging in the light bulb, the light bulb flashes without quite good bright light. when I disconnect the power, the bulb is still on, blinking for about 2-3 seconds, and suddenly it will brighten and after a while it will go out. As if the capacitor is discharging giving back voltage.
    I replaced a large capacitor and nothing helped, so if someone can ask for help, it may be damaged.
    Troubleshooting 230V E27 LED Bulb Power Module: Step-by-Step Guide to Identify & Repair Damages Troubleshooting 230V E27 LED Bulb Power Module: Step-by-Step Guide to Identify & Repair Damages Troubleshooting 230V E27 LED Bulb Power Module: Step-by-Step Guide to Identify & Repair Damages Troubleshooting 230V E27 LED Bulb Power Module: Step-by-Step Guide to Identify & Repair Damages Troubleshooting 230V E27 LED Bulb Power Module: Step-by-Step Guide to Identify & Repair Damages Troubleshooting 230V E27 LED Bulb Power Module: Step-by-Step Guide to Identify & Repair Damages
  • #18 19734604
    barton21
    Level 26  
    It would be appropriate to check these 2 small capacitors
  • #19 19734895
    grunio
    Level 8  
    Swapping the two didn't make any better. it is still the same
  • #20 19735025
    barton21
    Level 26  
    And what is the output voltage from the draiver?
  • #21 19735217
    grunio
    Level 8  
    And I'm sorry, which element is it because I'm not that good, and how to measure it?
  • #22 19735278
    barton21
    Level 26  
    What is the output voltage from the power board to the LED board. Be with connected LEDs.
  • #23 19735406
    grunio
    Level 8  
    After connecting the leds, I have an output of 118V

Topic summary

The discussion revolves around troubleshooting a 230V E27 LED bulb power module, specifically addressing issues related to high output voltage readings (over 300V) when disconnected from the LED board. Participants suggest that the module should not be tested without a load, as this can lead to dangerous voltage spikes. Common problems identified include faulty capacitors and potentially damaged LEDs. Users are advised to visually inspect components for damage, measure capacitance, and check diodes using a multimeter. The BP9916 chip is mentioned as a common component in these modules, with recommendations for replacement available on platforms like eBay and Aliexpress. Additional troubleshooting steps include checking small capacitors and ensuring proper connections to the LED board.
Summary generated by the language model.
ADVERTISEMENT