logo elektroda
logo elektroda
X
logo elektroda

Cable Installation in Built-Up Plasterboard Wall Without Damage: Sealing and Corner Passage

dper15 14391 22
ADVERTISEMENT
Treść została przetłumaczona polish » english Zobacz oryginalną wersję tematu
  • #1 17071010
    dper15
    Level 17  
    Hello

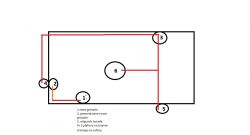
    Can you tell me how to lay a cable in a built-up plasterboard wall? If I cut a groove in the slab, will I seal it somehow? Another problem is the corner through which the cable will pass. The wall cannot be destroyed, it will only be painted and the troughs are out of the question.
    Can you suggest something?
    Thanks in advance
  • ADVERTISEMENT
  • #2 17071125
    Parowy
    Level 22  
    Hello.

    Take a picture of this wall, draw a freehand diagram of the wall and the location of the current nest and the one to be added, dimension it all.
    Put it in the topic, then we will be able to advise something :)

    Regards
  • ADVERTISEMENT
  • #3 17071146
    kokapetyl
    Level 43  
    dper15 wrote:
    Walls cannot be destroyed

    Do you propose to cut the furrow yourself?
    Since it will be painted, it may be worth considering dismantling the plate and after laying the wires, mount it again, there will be some filling.
    If you can't see it physically, it's hard to make a reasonable decision.
  • #4 17071151
    fuutro
    Level 43  
    You can cut the channel but then you have to patch it up properly, so a bit of fun awaits. Maybe only a few holes necessary to move the cable? Here you can get along with the person responsible for finishing or the one who put plasterboard walls, learn more about the construction of the wall. Youtube has a lot of tutorials on this matter. Of course, act in advance, for example, first make a cutout where it is supposed to be and then try to move it, pull the cable from the back to a new place. The method is not necessarily nice and pleasant, but it can be very effective when it comes to not destroying the structure.
  • #5 17071214
    Radiokiller
    Level 30  
    As above, it is better to make a few holes along the way of the wire and pull the wire through using a wire "pilot". The furrow will crack the more that its edges will not be screwed to the frame.
  • ADVERTISEMENT
  • #6 17071227
    fuutro
    Level 43  
    You can reinforce the cut-out from the back by placing plaster/profile strips and screwing them all together, and then plastering the prepared furrows. It might work, but it's fun.
  • #7 17071256
    dper15
    Level 17  
    Cable Installation in Built-Up Plasterboard Wall Without Damage: Sealing and Corner Passage

    Unscrewing the plate or obtaining information about the frame is not possible. The building is 20 years old.
  • ADVERTISEMENT
  • #8 17071304
    fuutro
    Level 43  
    So take out socket 1, combine a small mirror and a flashlight.
  • #9 17071325
    kokapetyl
    Level 43  
    fuutro wrote:
    So take out socket 1, combine a small mirror and a flashlight.

    It's hard to fit it all in one hole. I use the phone and take pictures, then you can determine if there are any obstacles on the road, etc.
    Not only do you need to remove the socket, you also need to remove the box from this socket.
  • #10 17071333
    fuutro
    Level 43  
    This is always the first least destructive step. Depending on what he sees, he will decide next.
  • #11 17071340
    Parowy
    Level 22  
    Is the ceiling suspended? Is the plaster?

    If suspended, you could run the wires through the ceiling, go down to the lamp / switch, thanks to which the vertical profiles in the wall structure will be avoided.
    Squeezing the wire in the wall vertically is not that difficult.
    This is about lighting.

    A new nest would be the fastest to put in the wall.
    What are the approximate distances from the corner to the old and new nest?
  • #12 17071348
    Radiokiller
    Level 30  
    Isn't there a skirting board there?
    So I'm asking as a last resort.
    In the place where the wall meets the floor, you can cut a furrow and then re-install the skirting board. Only the vertical connection would remain.
    The frame in the wall is probably vertical and drilling it between the boards is rather impossible.
  • #13 17071378
    kokapetyl
    Level 43  
    Parowy wrote:
    This is about lighting.

    The author does not mention anything about it.
    Radiokiller wrote:
    The frame in the wall is probably vertical and drilling it between the boards is rather impossible.

    Well, here's a problem, we don't know the construction of this wall.

    Question to the author. There's only one socket in this room? (And it's supposed to stay that way?)
    What is behind the wall where this new nest is to be built?
  • #14 17071401
    dper15
    Level 17  
    Thanks gentlemen for your interest. I will try these holes and the steel pilot. I think the detector detects it. The mirror or camera method is out of the question, unless I pull out cotton wool. Unfortunately, there are no skirting boards. The walls are made of one layer of boards.
    Everything is made of tiles, including the ceiling. The building is held only by pillars.
    How to cover such holes? Unfortunately, I have no idea about the builder.
  • #15 17071406
    Parowy
    Level 22  
    If you want to make a lamp on the ceiling, you take into account that there will be a groove for filling, or holes if the ceiling is suspended.
    This takes care of the lighting, this or that, run the wires to the switch and plafonds from the ceiling, the lamp stays on the ceiling, the plafonds and the switch go down the wall from the ceiling.
    One hole in the corner between the ceiling and the wall, and the other in the place where the plafond and the switch are mounted.

    The socket should be able to make extra money with one additional hole in the corner of the walls, at the height of the socket assembly.

    Old junction box No. 1, disassemble completely, make a ready hole for the new junction box No. 2, in the very corner, between the sockets, at the same height, cut a groove in the plasterboard, depending on the number of layers of plasterboard (one or two layers), it may be necessary to cut the profiles as well, so that the depth of the furrow is about two centimeters.
    Push the wire from box 1 to the corner, make it neat in the corner and push it from the corner to box 2.

    In the corner, in the place of the cut profile, it would be worth protecting the cable against possible abrasion.


    It is understood that the circuits of lighting and sockets are different from each other?
    Switch No. 3 exists :)
  • #16 17071415
    dper15
    Level 17  
    kokapetyl wrote:
    Parowy wrote:
    This is about lighting.

    The author does not mention anything about it.
    Radiokiller wrote:
    The frame in the wall is probably vertical and drilling it between the boards is rather impossible.

    Well, here's a problem, we don't know the construction of this wall.

    Question to the author. There's only one socket in this room? (And it's supposed to stay that way?)
    What is behind the wall where this new nest is to be built?


    I did not write about lighting because I would use the way from the socket.
    There will be one nest, and behind the wall where the nest is to be, there is a renovated room.
  • #17 17071416
    Radiokiller
    Level 30  
    In post #1 it says "wall g-k". It seems obvious that on the other side of the plate in question there is a second plate. If only there wasn't some damping between them, eg wool.
  • #18 17071444
    dper15
    Level 17  
    The ceiling lamp is already powered from this switch.
    The most important thing is that there are some concepts so tomorrow on site some method will definitely work. Even if you wrote whether gypsum putty is suitable for gluing such holes, I would be grateful :) .
  • #20 17071475
    Parowy
    Level 22  
    kokapetyl wrote:

    Steam wrote:
    This is about lighting.

    The author does not mention anything about it.


    In the first post, no, but the lighting points are marked in the picture, I don't think they are there, for better insight into the situation of making a socket.


    99% of the walls have some kind of insulation, it is not easy to break through it, you need to make holes for wires in the vertical profiles, you need a large hole in the plasterboard for this.

    There is a suspended ceiling in which 99% there is no insulation, passing the cable through the ceiling is almost trivial.


    You do as you think :)

    Added after 9 [minutes]:

    fuutro wrote:


    Nicely told :)

    I would add from myself, if you cut a circle from the GK board, do not throw it away, paste it later after routing the cable.
  • #21 17071501
    Łukasz-O
    Admin of electroenergetics
    fuutro wrote:

    Everything and about.
    It is a pity that the guides on electrical installations posted on YT by various "heroes in their homes" are not at the level of this :|

    Parowy wrote:

    I would add from myself, if you cut a circle from the GK board, do not throw it away, paste it later after routing the cable.

    It's strange that the author of the video didn't mention this.

    In such cases, I always drill holes at the vertical profiles - on both sides. Between the holes at the height of the profile, I cut a groove for the cable. The rest I push with or without the remote.
  • #22 17071707
    fuutro
    Level 43  
    I download these guides and save them to disk :D
  • #23 17071719
    kokapetyl
    Level 43  
    kokapetyl wrote:
    What is behind the wall where this new nest is to be built?

    dper15 wrote:

    I did not write about lighting because I would use the way from the socket.
    There will be one nest, and behind the wall where the nest is to be, there is a renovated room.

    Since there's more work to be done, my question doesn't matter anymore, and I meant whether it wouldn't be simpler to run the power supply to this socket from the next room.

Topic summary

The discussion revolves around the challenges of installing a cable in a built-up plasterboard wall without causing damage. Users suggest various methods, including cutting a groove for the cable and patching it afterward, or making small holes to pull the wire through using a wire pilot. The importance of understanding the wall's structure, including the presence of vertical profiles and insulation, is emphasized. Suggestions include using a mirror or flashlight to inspect the wall's interior and considering the installation of a new socket from an adjacent room. The conversation also touches on the use of gypsum putty for sealing any holes created during the installation process.
Summary generated by the language model.
ADVERTISEMENT