FAQ
TL;DR: Use two wrenches to remove a leaking angle valve; "You will need two wrenches in total." Shut off water first to avoid damage. [Elektroda, korystor, post #17537556]
Why it matters: This FAQ helps DIYers fix a leaking bathroom angle valve without cracking tiles, twisting hidden fittings, or flooding rooms.
Quick Facts
- Standard right‑hand threads: loosen counterclockwise ("to the left"). [Elektroda, Rezystor240, post #17537566]
- Use two adjustable wrenches; hold the protruding stub while turning the valve body. [Elektroda, korystor, post #17537556]
- Close the main cold shutoff at the meter, then open the lowest tap (often the bathtub) to drain. [Elektroda, E8600, post #17539113]
- An extension/reduction or muff may hide behind the escutcheon; parts may be steel or brass, with possible plastic pipe. [Elektroda, mczapski, post #17543207]
- The wall or fitting can move or even break—apply controlled force and "unscrew sensitively." [Elektroda, korystor, post #17542936]
How do I unscrew and replace a leaking angle valve without damaging the wall?
Follow this 3‑step method:
- "First turn off the water in the apartment."
- Put an adjustable (hydraulic) wrench on the valve and turn counterclockwise.
- Swap the valve and tighten gently to seal.
This simple approach avoids surprises and respects thread direction. [Elektroda, Rezystor240, post #17537566]
What tools prevent twisting the in‑wall fitting while I loosen the valve?
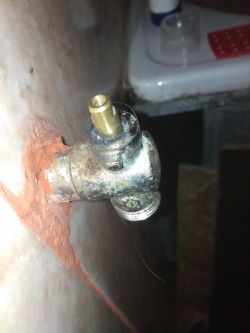
Use two adjustable wrenches. Hold the stub coming out of the wall with one wrench. Turn the valve body with the other wrench. "You will need two wrenches in total." This two‑wrench method greatly reduces stress on hidden joints. [Elektroda, korystor, post #17537556]
Which way do I turn the valve to loosen it?
Loosen standard angle valves counterclockwise. In other words, turn it "to the left." Most domestic valves use right‑hand threads. That direction avoids cross‑threading and damage. Confirm your grip is square before applying force. [Elektroda, Rezystor240, post #17537566]
Do I need to scratch grout or remove tiles to access the extension?
Sometimes you must expose more metal for a safe grip. Lightly scratch or remove grout around the escutcheon to access the hex or extension. Work carefully to avoid tile chips. This small clearance can enable the two‑wrench method. [Elektroda, ciuqu, post #17537593]
What if the wall or fitting starts to move while I’m loosening?
Stop and reassess your counter‑hold. The wall or fitting can move or even break. Apply controlled torque and improve access if needed. "Unscrew sensitively." Increase support, then continue only when movement stops. [Elektroda, korystor, post #17542936]
Where should I shut off and drain the line before starting?
Shut the cold water at the main bathroom valve by the meter. Then open the bathtub’s cold tap to drain the line. The bathtub is usually the lowest point, so it drains best. This reduces mess during removal. [Elektroda, E8600, post #17539113]
Is this fitting an elbow or a valve?
It’s a valve, not an elbow, unless the elbow is inside the wall. The visible part is the angle valve body. Identifying it correctly helps you choose the right replacement and tools. "It is not an elbow, it is a valve." [Elektroda, korystor, post #17537556]
What hidden parts might be behind the escutcheon that affect removal?
There may be an extension, reduction, or muff between the valve and in‑wall fitting. These parts can be steel or brass. Some installations transition to plastic pipe in the wall. Limited protrusion reduces gripping options. Plan a counter‑hold accordingly. [Elektroda, mczapski, post #17543207]
Could the valve break and leave threads in the wall?
Yes, that’s a real failure mode with delicate decorative valves. The body can snap, leaving threaded remnants in the wall fitting. Work gently and square. "These types of valves only look nice and are quite delicate." [Elektroda, E8600, post #17539113]
I can’t brace the extension without removing tiles—can I try loosening anyway?
Some users have loosened the valve without bracing and saw no leaks afterward. Proceed only if you accept the risk and inspect closely. One poster reported success without holding the extension and no signs of movement. Monitor after reassembly. [Elektroda, blackwolf7, post #17557779]
Should I brace or “shoe” directly to the in‑wall fitting?
You can add support by bracing up to the fitting the valve screws into. This reduces torque on concealed joints. Fit a support carefully to avoid damaging finishes. Recheck alignment before turning. [Elektroda, Covul, post #17539075]
Should anything in the wall move during this work?
Aim for zero movement within the wall. Secure a counter‑hold and keep torque controlled. "Nothing is allowed to move in the wall." If anything shifts, stop and improve support before continuing. [Elektroda, Rezystor240, post #17541537]
In an apartment, is there always a shutoff near the meter?
Yes, flats typically have a shutoff valve ahead of the water meter. That location simplifies isolation for small plumbing tasks. Look near the meter before starting work. Close it fully to prevent leaks. [Elektroda, E8600, post #17545186]
My toilet tank drips silently at night—what should I check first?
Inspect the fill valve for seepage. If the level rises above the overflow bell, water leaks invisibly into the bowl. Look for slow dripping near the fill valve body. Replace or service the fill valve if needed. [Elektroda, ta_tar, post #17557966]


