With the STM32MP157 Mini in hand, my aim was to port a Linux distribution. However, the provided manual only offered a Debian version customized by Linaro. Thus, I decided to adapt Ubuntu for this purpose. Given the scarcity of in-depth articles online, I have documented the entire process herein.
Embark on an advanced computing journey with the STM32MP157 Mini and Unikeyic's comprehensive solutions. While the default manual offers limited options, we strive to provide you with diverse possibilities. Discover how to adapt Ubuntu on this device with our detailed guide. For all your electronics needs, explore the Unikeyic (Link) component platform, available for purchase online.
Obtaining ubuntu-base
Upon checking the Linaro official website, I found that the latest version of Ubuntu available was still 15.12, also known as vivid. However, it was challenging to locate the armhf-supported Ubuntu-vivid sources in China. Consequently, I opted to use ubuntu-base to build the rootfs.
I first visited the Ubuntu official website and chose ubuntu-base-18.04. This choice was due to the fact that my virtual machine environment on my computer is also ubuntu-18.04. If I were to attempt building ubuntu-base-20.04 and chroot using an 18.04 virtual machine environment, an error "qemu: Unsupported syscall: 403" would occur. This is because the older version of qemu installed in ubuntu-18.04. Therefore, installing qemu5.2.0 through source code compilation, which is a complex process, would be necessary. Hence, I selected ubuntu-base-18.04 instead.
Once the download of ubuntu-base-18.04.5-base-armhf.tar.gz was complete, I copied it into the virtual machine. It is crucial not to extract it in Windows or in the WSL (Windows Subsystem for Linux) environment for Ubuntu, as some file names are identical except for capitalization. In Windows, they would be regarded as the same file and overwrite each other, whereas in Linux, this does not happen.
I copied it to the ~/Desktop/Image/ directory, created a new folder, and extracted the compressed package into it. Note that both the extraction and subsequent operations require the use of sudo.

Setting up the environment
After entering the extracted directory, copy qemu-arm-static to the root file system you are about to build. Ensure that qemu-user-static is properly installed at this point.

If you encounter an error like "chroot: failed to run command '/bin/bash': No such file or directory," it indicates that either the copying process was unsuccessful or qemu was not installed correctly. You can use the following command to forcefully reinstall it.

The next step is to configure DNS to establish a proper internet connection. You have two options: either directly copy the configuration file from the virtual machine to the root file system or edit the configuration file of the root file system.

Change the software source to USTC ARM source.

Delete all the existing content in the original file and add the following:

Mounting the root file system
Now you can chroot into the root file system. We will be using arch-chroot, an automated chroot script provided by Arch Linux, which allows for automatic mounting of virtual file systems and other operations, eliminating the need for manual mounting. Below are the installation and execution commands (ensure you are in the ubuntu-base-18.04 directory):

After execution, it will enter the base root file system.

Please note that many tutorials recommend installing rsyslog. However, it has been observed that after installation, numerous issues may arise. Therefore, it is advisable not to install it at this moment.

The software packages that must be installed include systemd. Without installing this package, the serial port service cannot be properly configured, resulting in a kernel panic and the inability to boot the system after burning it onto the board. Additionally, ethtool and ifupdown are also required for network configuration.
Set root password

Set the hostname STM32MP157(Link) and the local IP address.

Setting up DHCP

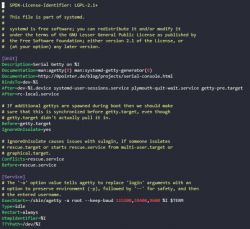
Configure automatic login for the serial port.

Modify BindsTo: Change dev-%i.device to dev-%i;
Modify ExecStart: Change -/sbin/agetty --keep-baud 115200,38400,9600 %I $TERM to -/sbin/agetty -a root --keep-baud 115200,38400,9600 %I $TERM (If there is an -o parameter after -/sbin/agetty, please delete it to ensure consistency after modification).
Please exit the root file system.
Creating an ext4 file system image.
First, use the "du" command to check the size of the root file system.

The size of the root file system is approximately 400MB, so let's create a 500MB empty ext4 file and format it.

If the size of the empty ext4 file here is smaller than the size of the root file system, you will receive a prompt of insufficient space when trying to copy it. In this case, simply adjust the size and start over again.
Next, mount the newly created ext4 empty file. Here, I mounted it to ~/Desktop/Image/fsmp1x_rootfs. Then, copy all contents from the ubuntu-base-18.04 folder to the temporarily mounted directory.

Unmount the previously mounted ext4 file.

System Flashing and Booting
The specific process of flashing can be referred to in the accompanying document "STM32MP157 Quick Start Experience V1.5.pdf" Chapter 2 - System Flashing. Here, I will briefly describe the key steps.
Set the boot switch on the development board to 000 and connect the USB_OTG cable (it is recommended to connect to a USB 3.0 port on your computer).
Locate the flashlayout file "atk_emmc-stm32mp157d-atk-qt.tsv" in the accompanying package, and open it with a text editor. Edit the last line corresponding to the ext4 filesystem name for the rootfs, and modify it to "fsmp1x_rootfs.ext4" (copy this file to the destination).

Open STM32CubeProgrammer, open the modified flashlayout file, select the path of the binary file, click on download, and once finished, set the DIP switches to '010' and power on.
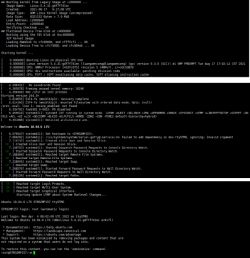
Monitor the system startup status through the serial port. Here, capture three significant checkpoints: kernel boot, system boot, and successful startup.
System Configuration
1.Adjusting Partition Size
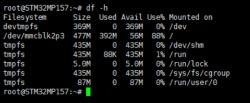
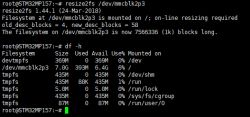
By using the command "df -h" to observe the disk usage of file systems, it was discovered that the size of the root file system is only 477M, and it is already 88% full. This is due to the fact that the created ext4 empty file has a size of 500M.
Execute the command "fdisk -l" to display all partition information. At the end, you will find that the partition "/dev/mmcblk2p3" has a total capacity of 7.2GB.
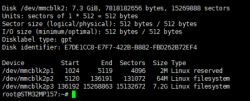
Therefore, the resize2fs command should be used to adjust the size of the /dev/mmcblk2p3 partition. After the adjustment is complete, check again and you will find that the space of this partition has been fully utilized.
2.Install GNOME and VNCServer.
Install GNOME and its dependencies. During the installation process, you will be prompted to choose your timezone. Please select "Asia-Shanghai".

Install VNC Server

Please refrain from starting the VNC server hastily, as connecting to it at this stage will only display a gray screen and an 'x' shaped cursor. First, proceed with installing xfonts.

Please proceed to delete the original content of the ~/.vnc/xstartup file and replace it with the following:
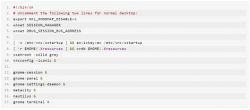
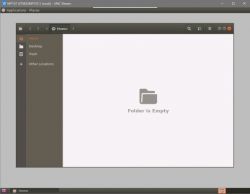
To start, enter "vncserver". The first time you start it, you will be prompted to set a password. Then, use a VNC client to connect, making sure to add ":1" after the IP address. You can also use the "-geometry" option to specify the resolution.
 \
\
3.Installing the MATE Desktop
The aforementioned GNOME desktop is rather simplistic. To install the MATE desktop, please execute the following command. It should be noted that this process will require a minimum of 2GB of available space and may take a considerable amount of time.

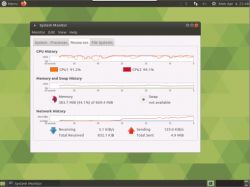
After completing the installation, restart and reconnect using VNC. Wait for about ten seconds, and you will be able to see the Mate desktop. To be honest, it looks great, but one drawback is that when idle, this board can fully utilize its 800MHz CPU without doing anything.
Embark on an advanced computing journey with the STM32MP157 Mini and Unikeyic's comprehensive solutions. While the default manual offers limited options, we strive to provide you with diverse possibilities. Discover how to adapt Ubuntu on this device with our detailed guide. For all your electronics needs, explore the Unikeyic (Link) component platform, available for purchase online.
Obtaining ubuntu-base
Upon checking the Linaro official website, I found that the latest version of Ubuntu available was still 15.12, also known as vivid. However, it was challenging to locate the armhf-supported Ubuntu-vivid sources in China. Consequently, I opted to use ubuntu-base to build the rootfs.
I first visited the Ubuntu official website and chose ubuntu-base-18.04. This choice was due to the fact that my virtual machine environment on my computer is also ubuntu-18.04. If I were to attempt building ubuntu-base-20.04 and chroot using an 18.04 virtual machine environment, an error "qemu: Unsupported syscall: 403" would occur. This is because the older version of qemu installed in ubuntu-18.04. Therefore, installing qemu5.2.0 through source code compilation, which is a complex process, would be necessary. Hence, I selected ubuntu-base-18.04 instead.
Once the download of ubuntu-base-18.04.5-base-armhf.tar.gz was complete, I copied it into the virtual machine. It is crucial not to extract it in Windows or in the WSL (Windows Subsystem for Linux) environment for Ubuntu, as some file names are identical except for capitalization. In Windows, they would be regarded as the same file and overwrite each other, whereas in Linux, this does not happen.
I copied it to the ~/Desktop/Image/ directory, created a new folder, and extracted the compressed package into it. Note that both the extraction and subsequent operations require the use of sudo.
Setting up the environment
After entering the extracted directory, copy qemu-arm-static to the root file system you are about to build. Ensure that qemu-user-static is properly installed at this point.
If you encounter an error like "chroot: failed to run command '/bin/bash': No such file or directory," it indicates that either the copying process was unsuccessful or qemu was not installed correctly. You can use the following command to forcefully reinstall it.
The next step is to configure DNS to establish a proper internet connection. You have two options: either directly copy the configuration file from the virtual machine to the root file system or edit the configuration file of the root file system.
Change the software source to USTC ARM source.
Delete all the existing content in the original file and add the following:
add the content
Mounting the root file system
Now you can chroot into the root file system. We will be using arch-chroot, an automated chroot script provided by Arch Linux, which allows for automatic mounting of virtual file systems and other operations, eliminating the need for manual mounting. Below are the installation and execution commands (ensure you are in the ubuntu-base-18.04 directory):
After execution, it will enter the base root file system.
Please note that many tutorials recommend installing rsyslog. However, it has been observed that after installation, numerous issues may arise. Therefore, it is advisable not to install it at this moment.
The software packages that must be installed include systemd. Without installing this package, the serial port service cannot be properly configured, resulting in a kernel panic and the inability to boot the system after burning it onto the board. Additionally, ethtool and ifupdown are also required for network configuration.
Set root password
Set the hostname STM32MP157(Link) and the local IP address.
Setting up DHCP
Configure automatic login for the serial port.
Modify BindsTo: Change dev-%i.device to dev-%i;
Modify ExecStart: Change -/sbin/agetty --keep-baud 115200,38400,9600 %I $TERM to -/sbin/agetty -a root --keep-baud 115200,38400,9600 %I $TERM (If there is an -o parameter after -/sbin/agetty, please delete it to ensure consistency after modification).

Modify process
Please exit the root file system.
Creating an ext4 file system image.
First, use the "du" command to check the size of the root file system.
The size of the root file system is approximately 400MB, so let's create a 500MB empty ext4 file and format it.
If the size of the empty ext4 file here is smaller than the size of the root file system, you will receive a prompt of insufficient space when trying to copy it. In this case, simply adjust the size and start over again.
Next, mount the newly created ext4 empty file. Here, I mounted it to ~/Desktop/Image/fsmp1x_rootfs. Then, copy all contents from the ubuntu-base-18.04 folder to the temporarily mounted directory.
Unmount the previously mounted ext4 file.
System Flashing and Booting
The specific process of flashing can be referred to in the accompanying document "STM32MP157 Quick Start Experience V1.5.pdf" Chapter 2 - System Flashing. Here, I will briefly describe the key steps.
Set the boot switch on the development board to 000 and connect the USB_OTG cable (it is recommended to connect to a USB 3.0 port on your computer).
Locate the flashlayout file "atk_emmc-stm32mp157d-atk-qt.tsv" in the accompanying package, and open it with a text editor. Edit the last line corresponding to the ext4 filesystem name for the rootfs, and modify it to "fsmp1x_rootfs.ext4" (copy this file to the destination).

Copy this file to the destination
Open STM32CubeProgrammer, open the modified flashlayout file, select the path of the binary file, click on download, and once finished, set the DIP switches to '010' and power on.
Monitor the system startup status through the serial port. Here, capture three significant checkpoints: kernel boot, system boot, and successful startup.

startup status
System Configuration
1.Adjusting Partition Size
By using the command "df -h" to observe the disk usage of file systems, it was discovered that the size of the root file system is only 477M, and it is already 88% full. This is due to the fact that the created ext4 empty file has a size of 500M.

disk usage of file system
Execute the command "fdisk -l" to display all partition information. At the end, you will find that the partition "/dev/mmcblk2p3" has a total capacity of 7.2GB.

display all partition information
Therefore, the resize2fs command should be used to adjust the size of the /dev/mmcblk2p3 partition. After the adjustment is complete, check again and you will find that the space of this partition has been fully utilized.

Adjustment of the space
2.Install GNOME and VNCServer.
Install GNOME and its dependencies. During the installation process, you will be prompted to choose your timezone. Please select "Asia-Shanghai".
Install VNC Server
Please refrain from starting the VNC server hastily, as connecting to it at this stage will only display a gray screen and an 'x' shaped cursor. First, proceed with installing xfonts.
Please proceed to delete the original content of the ~/.vnc/xstartup file and replace it with the following:

To start, enter "vncserver". The first time you start it, you will be prompted to set a password. Then, use a VNC client to connect, making sure to add ":1" after the IP address. You can also use the "-geometry" option to specify the resolution.
 \
\
Enter "vncserver"
3.Installing the MATE Desktop
The aforementioned GNOME desktop is rather simplistic. To install the MATE desktop, please execute the following command. It should be noted that this process will require a minimum of 2GB of available space and may take a considerable amount of time.
After completing the installation, restart and reconnect using VNC. Wait for about ten seconds, and you will be able to see the Mate desktop. To be honest, it looks great, but one drawback is that when idle, this board can fully utilize its 800MHz CPU without doing anything.

MATE Desktop


