Here I will show the inside of the 'intelligent' Tuya radar/motion/light sensor based on TuyaMCU, I will analyze its communication protocol, and then I will show how it can be handled in OpenBeken. For the convenience of use, I will also create a mini website for this device in Bootstrap, which I will host on OBK and communicate with the firmware itself via the REST interface. The result of the game will be the complete release of the device from the cloud while maintaining its functionality that interests us.
The theme was created in collaboration with @DeDaMrAz. I never had the device from the subject at home, my colleague from Serbia performed all measurements, photos and tests.
NOTE: Some time ago we ran a similar device that was just a light sensor. The topic about it can be found below:
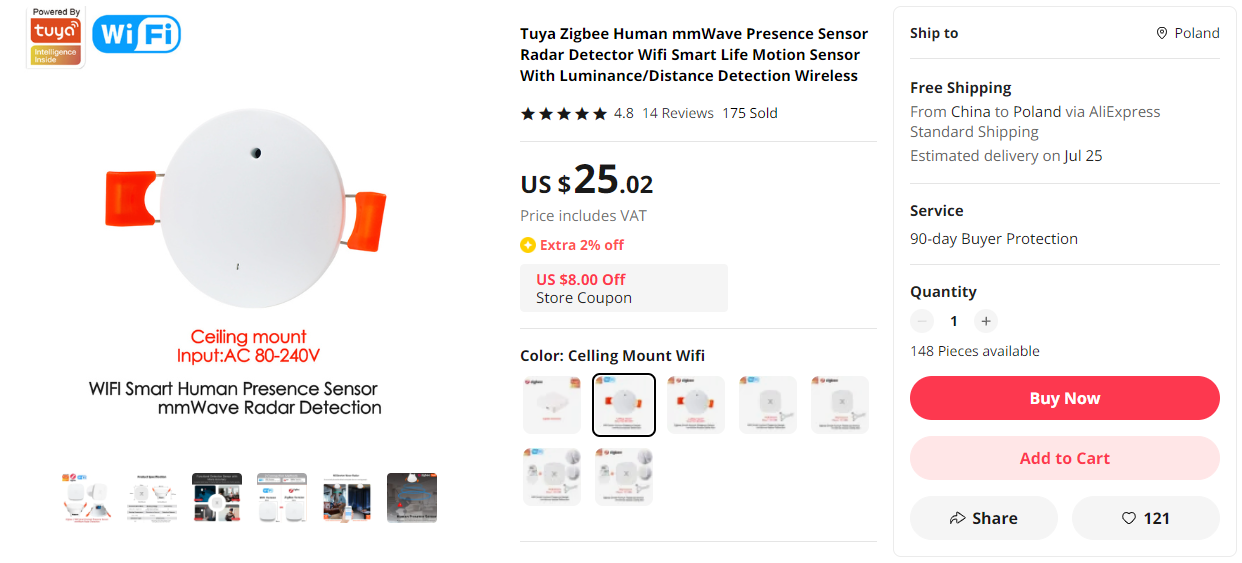
https://www.elektroda.pl/rtvforum/topic3984681.html Purchase of a sensor-radar We made the purchase on a Chinese shipping service. The sensor is available in Zigbee and WiFi versions, we chose WiFi. In the same offer, you can also order a hub from Zigbee. We paid $20 for the sensor alone:

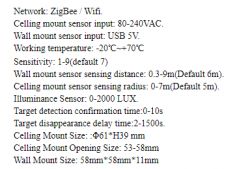
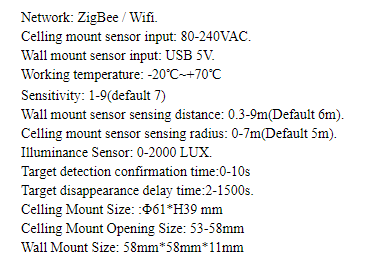
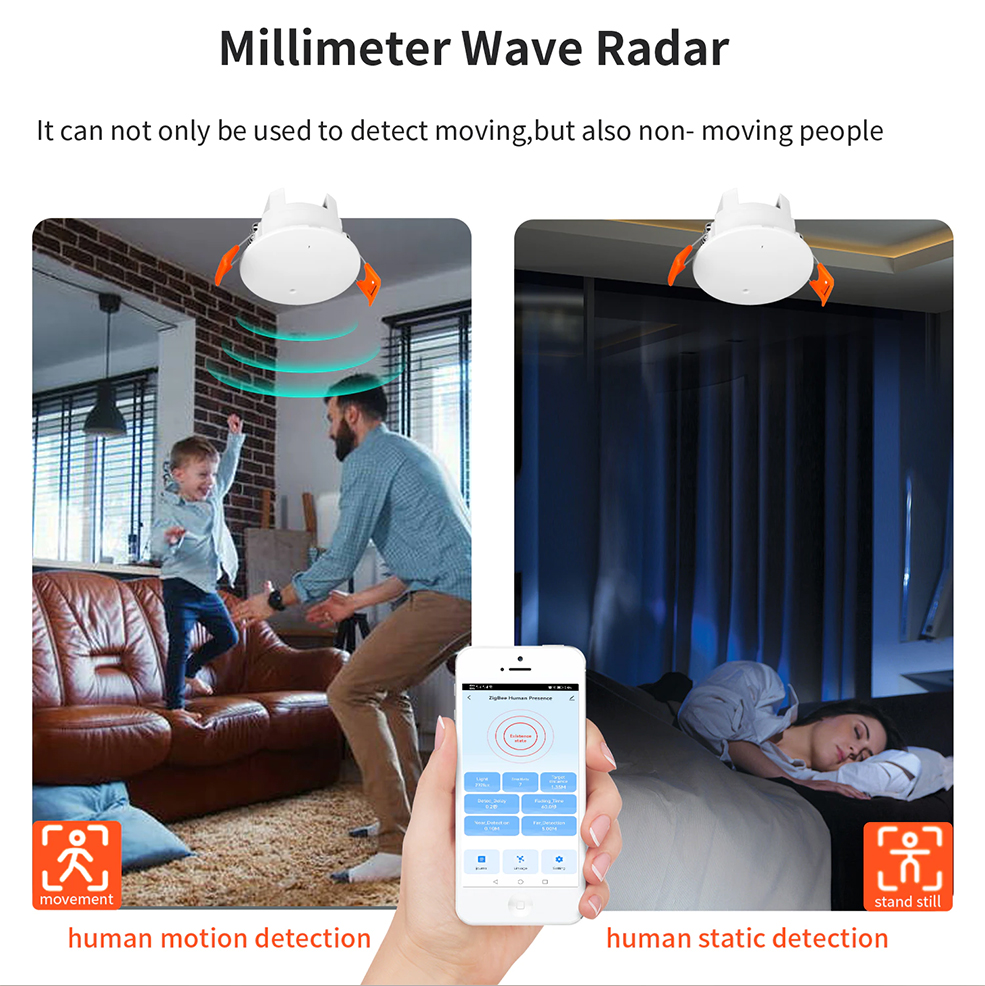
Here is the product specification. Power is from 5V, the product offers motion detection in the range of distance set by the user, as well as performs lighting measurement:
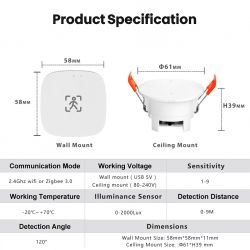
Dimensions and promotional graphics:

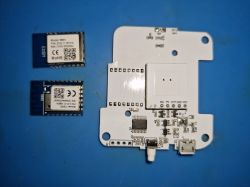
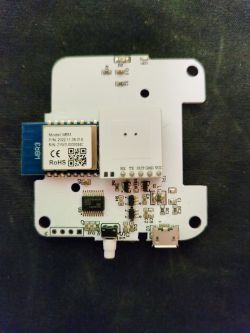
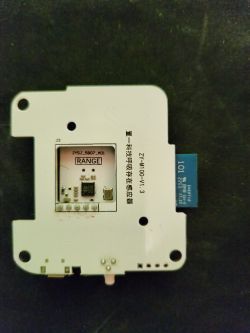
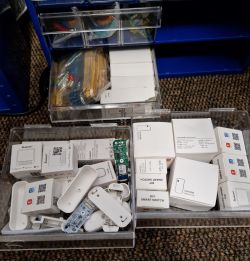
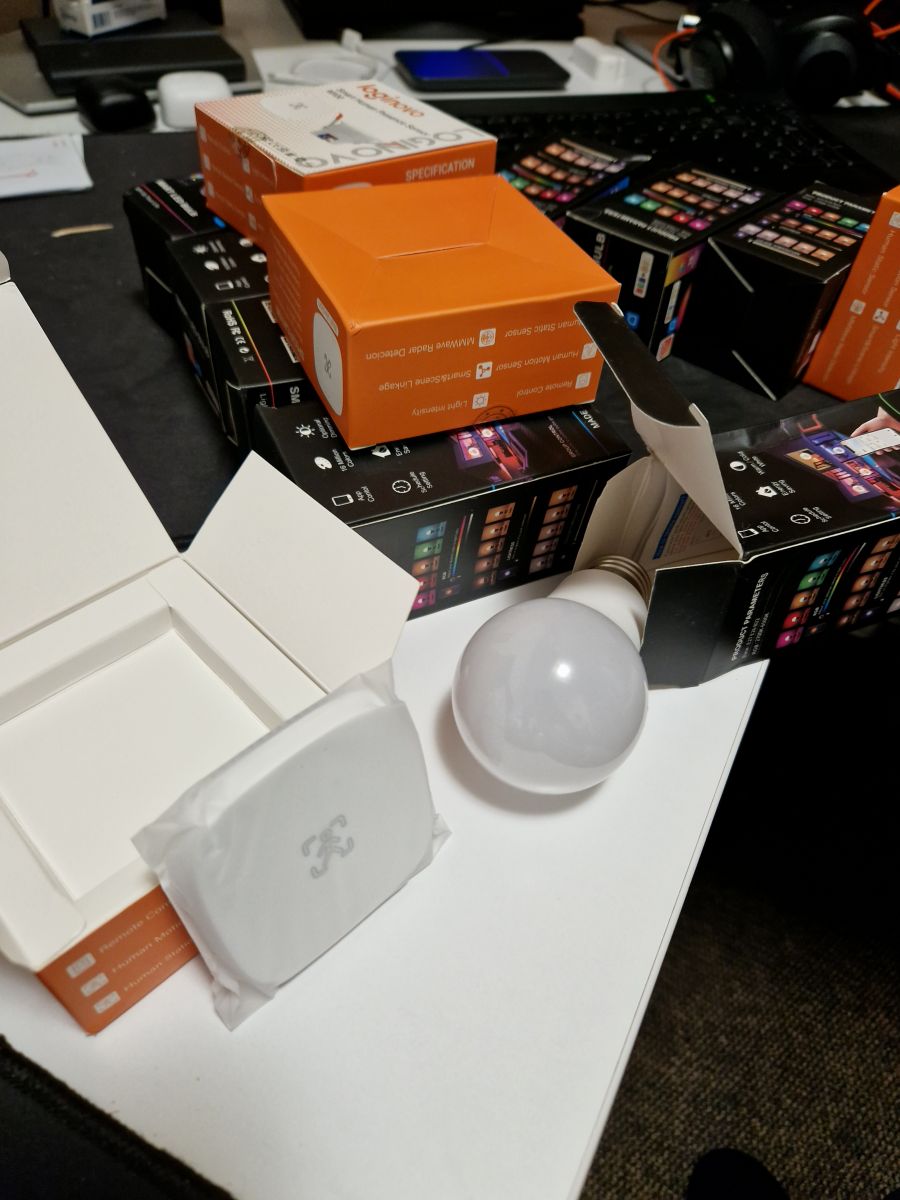
 The contents of the package, inside
 We look at what we got. The housing is held on the catches.

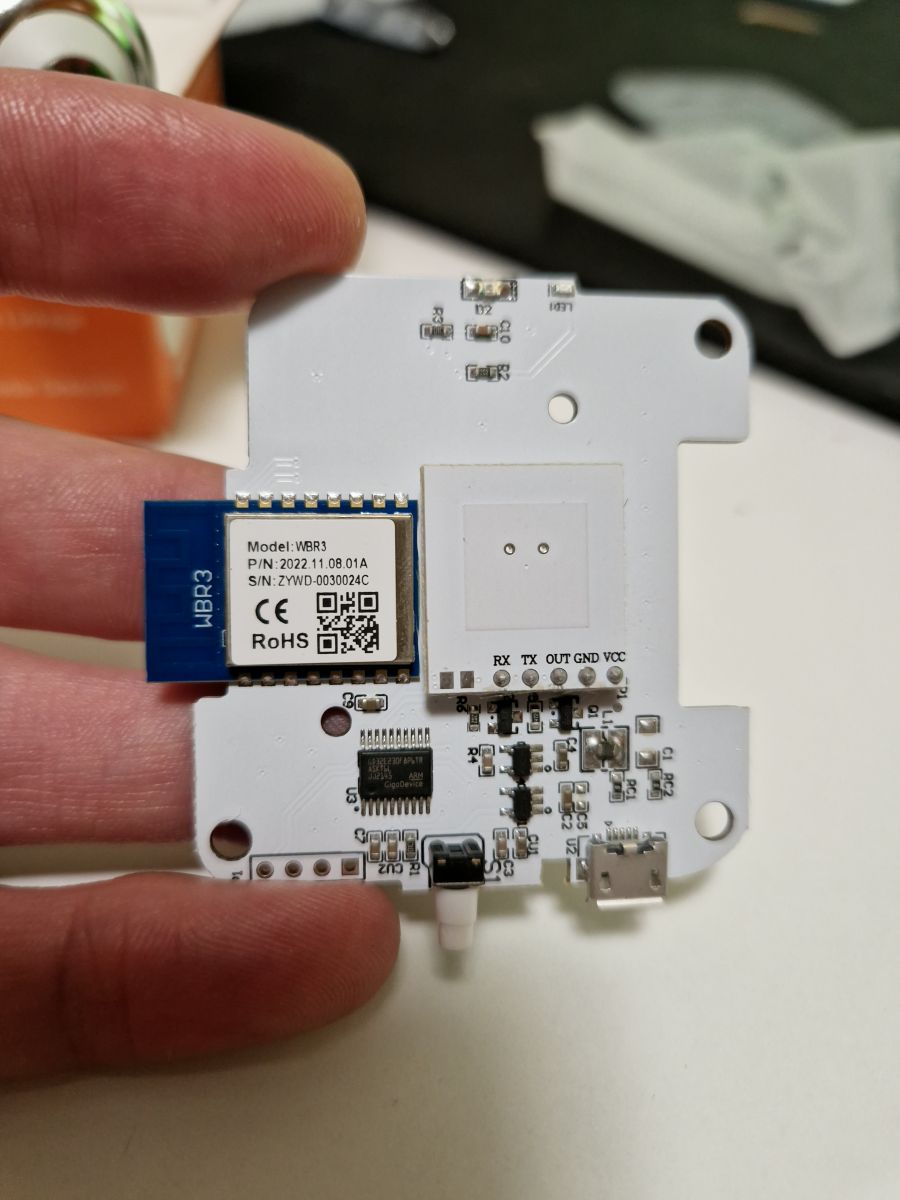
It turns out that this is a device based on TuyaMCU and a WiFi module, the support of which is still in progress. Does this mean this topic is about to end?

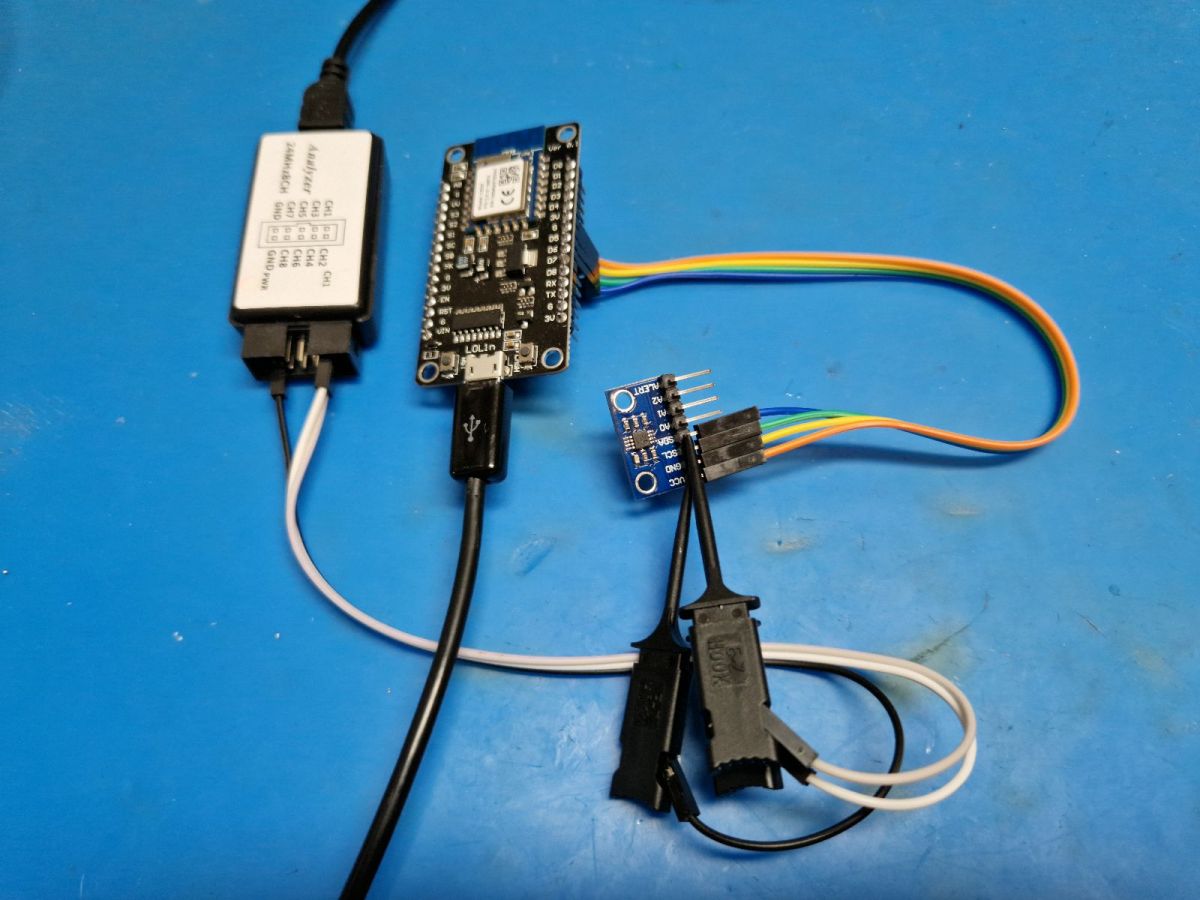
Nothing more wrong! This is a device based on TuyaMCU, so at the beginning you can capture their UART communication packets. I discussed it in the topic about the TuyaMCU analyzer:
https://www.elektroda.pl/rtvforum/topic3970199.html https://www.elektroda.com/rtvforum/topic3970199.html Link to the analyzer repository:
https://github.com/openshwprojects/TuyaMCUAnalyzer TuyaMCU itself would also be covered, so I won't repeat details like what dpID is, what are the types of variables in TuyaMCU, and so on:
https://www.elektroda.pl/rtvforum/topic3880546.html https://www.elektroda.com/rtvforum/topic3880546.html TuyaMCU communication So we do packet capture. We connect the mass and RX of the USB to UART converter operating in 3.3V mode first to the TX of the WiFi module, and then to the RX and save the sent data. Baud is usually 9600, but here it was different - 115200 was used here, which can also be found in some Tuya devices.
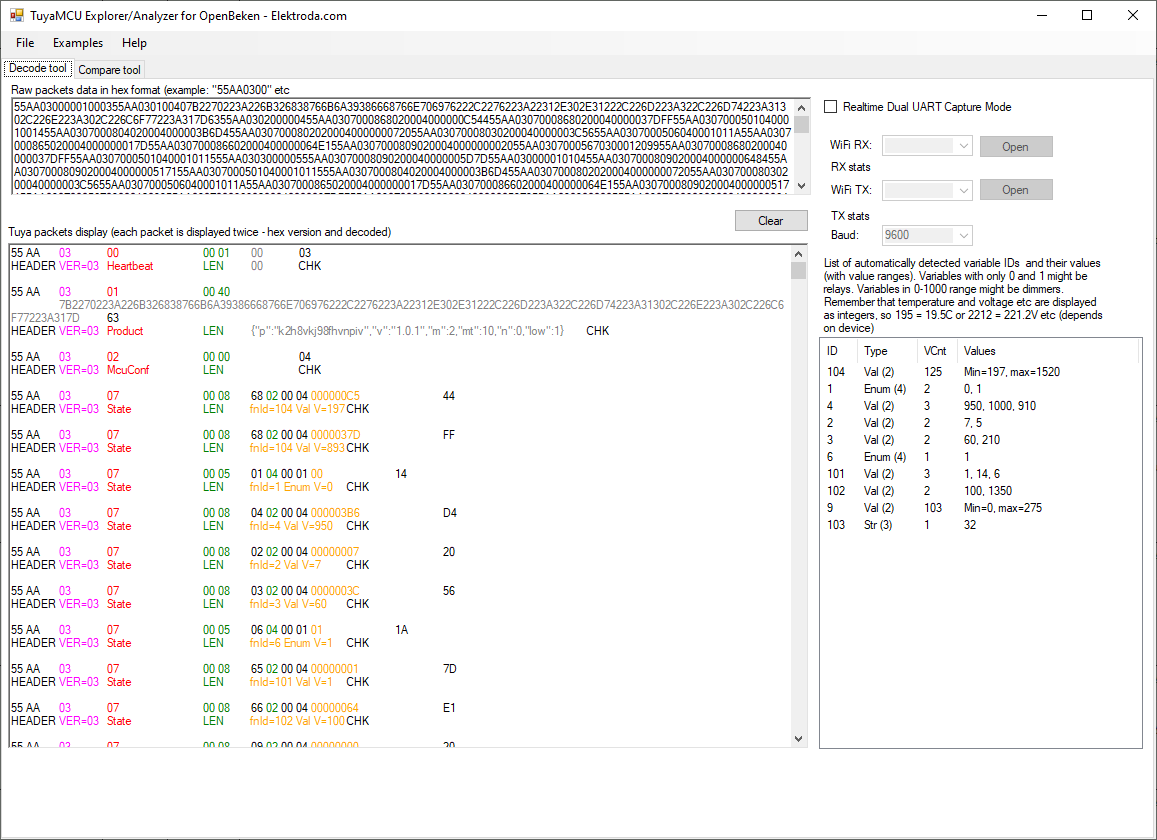
Here is the collected data, first what the MCU sends to the WiFi module:
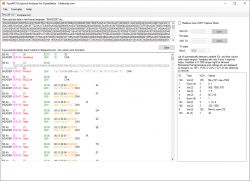
Here we see the MCU check in first with the product code in JSON:
and then a lot of variables with different dpIDs, the meaning of which we are yet to learn. Here we have the variables that the MCU sends to us, i.e. measurements.
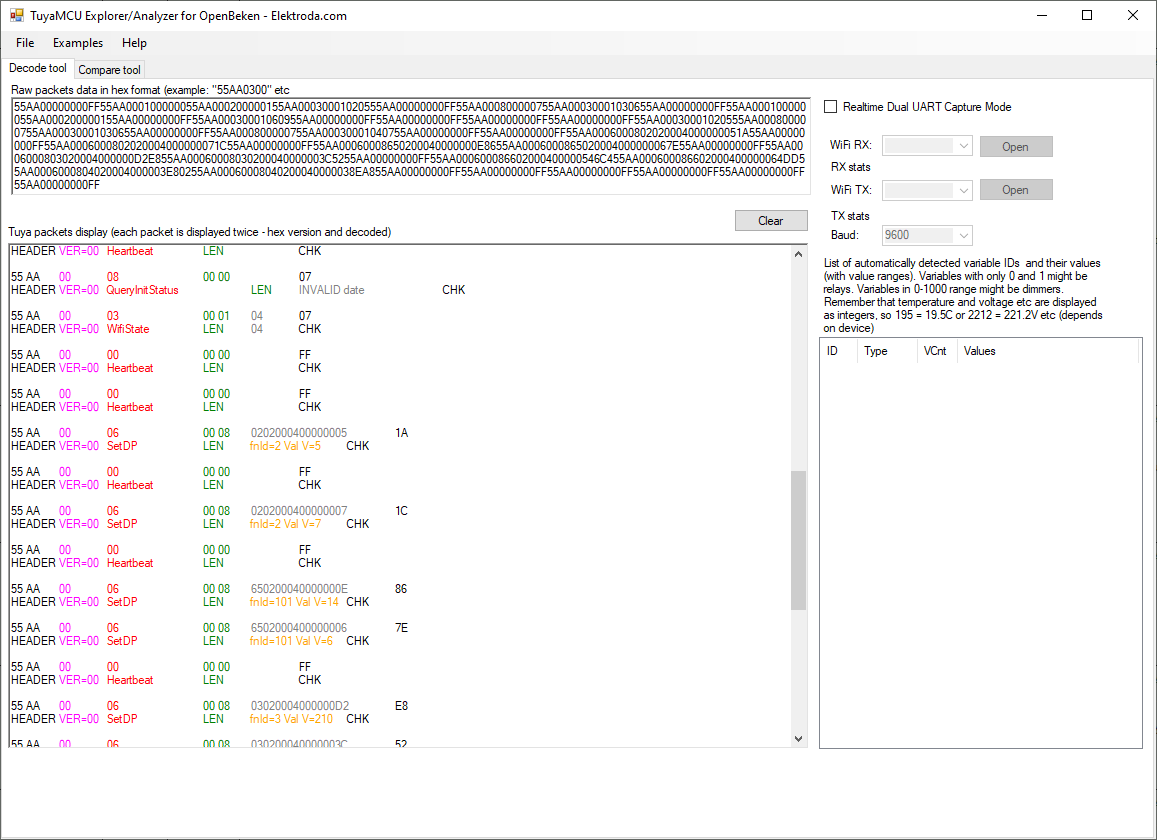
In turn, the packets sent by the WiFi module to the MCU look like this:
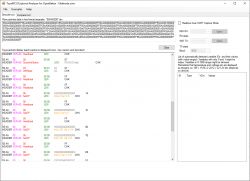
Here we have the variables that the WiFi module sends to the MCU. These are the operating parameters of the device, e.g. radar sensitivity is sent here.
A short analysis and tests with the Tuya application show us what is what. We just switched options in the app and watched what changed. We watched what the UART shows and what the application shows. Here are the roles of each dpID:
- 1 presence alarm
- 2 radar sensitivity
- 3 mine spotting distance (unless in cm)
- 4 max detection distance (unless as cm)
- 6 self test (0 or 1)
- 9 detected distance to move (unless in cm)
- 101 detection delay (the unit is tenths of a second, so 10 means 1 sec and 5 means 0.5 sec)
- 102 presence with delay (similar to presence but turns off after delay)
- 103 debug CLI flag (default 32)
- 104 light sensor reading
These roles can also be derived from the Tuya API, but we didn't use this approach here.
I put full communication dumps on the analyzer repository:
https://github.com/openshwprojects/TuyaMCUAna...mmit/9a7a87fde797d56b29095d9218910384c0b84b1c TuyaMCU support in OpenBeken The WiFi module encountered inside is not yet supported, but manufacturers often use it interchangeably with TYWE3S (ESP8266, rather in the past) and CB3S and WB3S (BK7231). So you can try to replace the module and test TuyaMCU support in OpenBeken. This will give us a little more information on how this device works, and show us if TuyaMCU support in
OBK can handle quite unusual equipment.
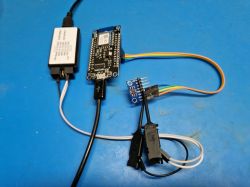
So - hot air in motion and we solder CB3S with the already uploaded one in place
OBK :
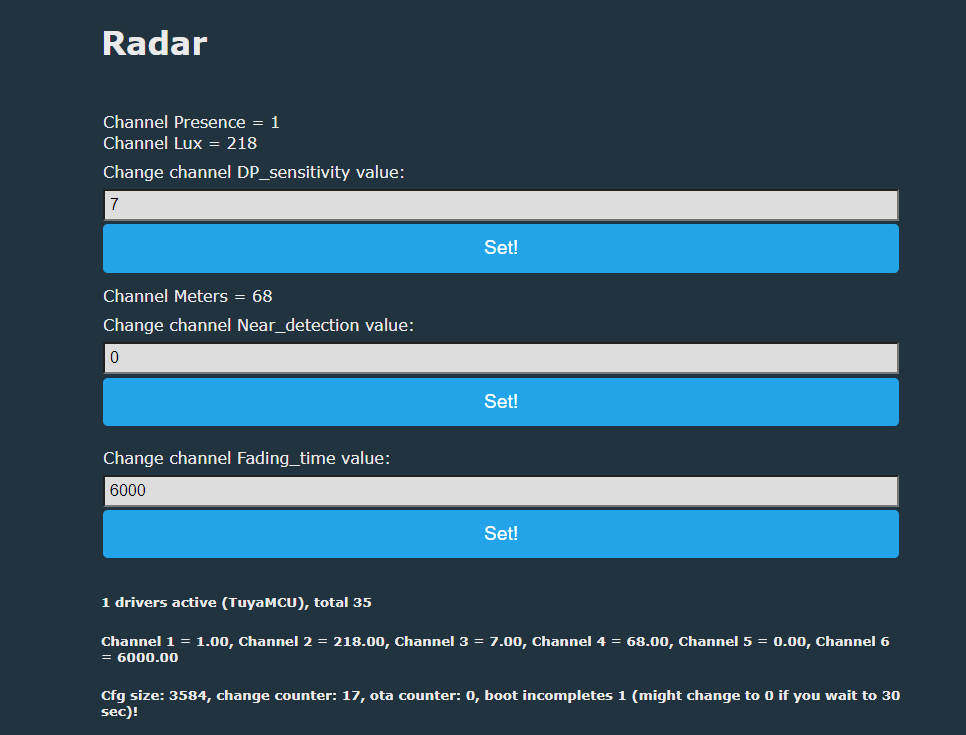
Then configure TuyaMCU in OpenBeken. In the autoexec.bat script, we map the dpID of variables from TuyaMCU to OpenBeken channels and set their types. It is necessary that the system knows how to display them on the GUI and how to send them to Home Assistant, also with the automatic Discovery of the device.
We place the script in the LIttleFS file system via Web App.
startDriver TuyaMCU

// always report paired
tuyaMcu_defWiFiState 4
// baud
tuyaMcu_setBaudRate 115200

// 104 is light sensor
setChannelType 2 ReadOnly
setChannelLabel 2 Lux
linkTuyaMCUOutputToChannel 104 val 2

// 1 is presence alarm
setChannelType 1 ReadOnly
setChannelLabel 1 Presence
linkTuyaMCUOutputToChannel 1 bool 1

//2 is dp_sensitivity - default 7
setChannelType 3 TextField
setChannelLabel 3 DP_sensitivity
linkTuyaMCUOutputToChannel 2 val 3

// 9 is target distance
setChannelType 4 ReadOnly
setChannelLabel 4 Meters
linkTuyaMCUOutputToChannel 9 val 4

// 3 is near detection
setChannelType 5 TextField
setChannelLabel 5 Near_detection
linkTuyaMCUOutputToChannel 3 val 5

//102 is fading time
setChannelType 6 TextField
setChannelLabel 6 Fading_time
linkTuyaMCUOutputToChannel 102 val 6

//4 is fading time
setChannelType 7 TextField
setChannelLabel 7 Far_detection
linkTuyaMCUOutputToChannel 4 val 7
This script is executed once at device startup.
This command starts the TuyaMCU driver.
// always report paired
tuyaMcu_defWiFiState 4
This command always forces WiFi 0x04 status to be reported to TuyaMCU, i.e. "online and connected to cloud"
// baud
tuyaMcu_setBaudRate 115200
This command sets the communication baud rate.
// 104 is light sensor
setChannelType 2 ReadOnly
setChannelLabel 2 Lux
linkTuyaMCUOutputToChannel 104 val 2
Then we have three commands that sequentially set the OpenBeken channel type (determines its display, processing and the method of publishing its values to the HA), set the label (name) of the channel and then map the dpID data and variable type from TuyaMCU to this channel.
Here is the result:
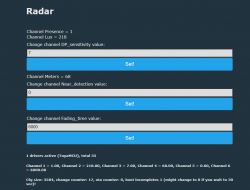
The GUI doesn't look very good, we're going to improve it a bit...
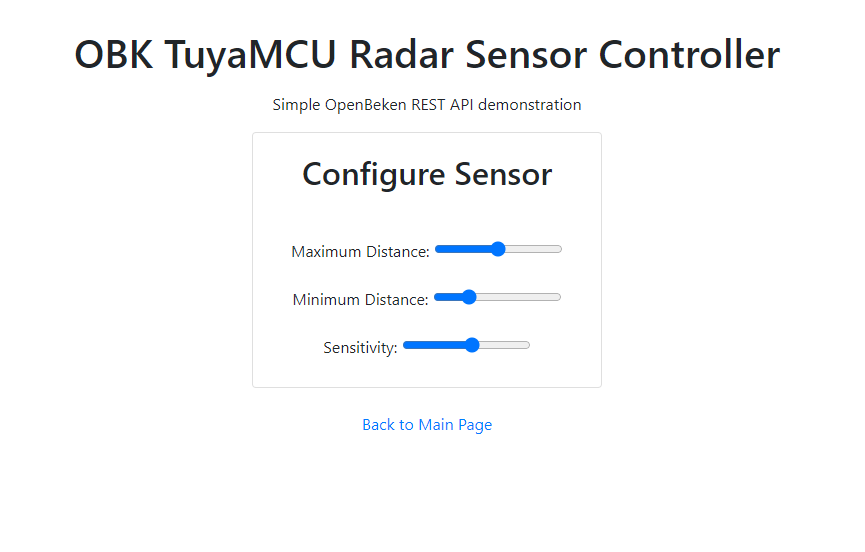
Own configuration page The device can already work with Home Assistant, but we haven't mapped the entire manufacturer's GUI yet. So you can go a step further. OpenBeken firmware does not have the ability to customize the channels from the main panel to the specific needs of this device, so normally there would be a problem with setting nice sliders with appropriate ranges and descriptions, but LittleFS and the REST interface come to the rescue here.
OpenBeken allows us to create our own mini device page, written in HTML and Javascript, hosted on the WiFi device itself and communicating with the main firmware via a REST interface, without refreshing the page.
This was presented in the topic below (English and Polish versions):
https://www.elektroda.pl/rtvforum/topic3971355.html https://www.elektroda.com/rtvforum/topic3971355.html Demo repository:
https://github.com/openshwprojects/OpenBekenRESTDemo Here, too, I thought it would be worth doing something like this. This resulted in the page linked below:
https://github.com/openshwprojects/OpenBekenR.../main/examples/TuyaMCU_RadarSensorConfig.html 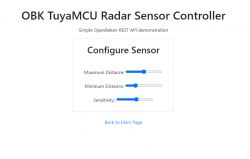
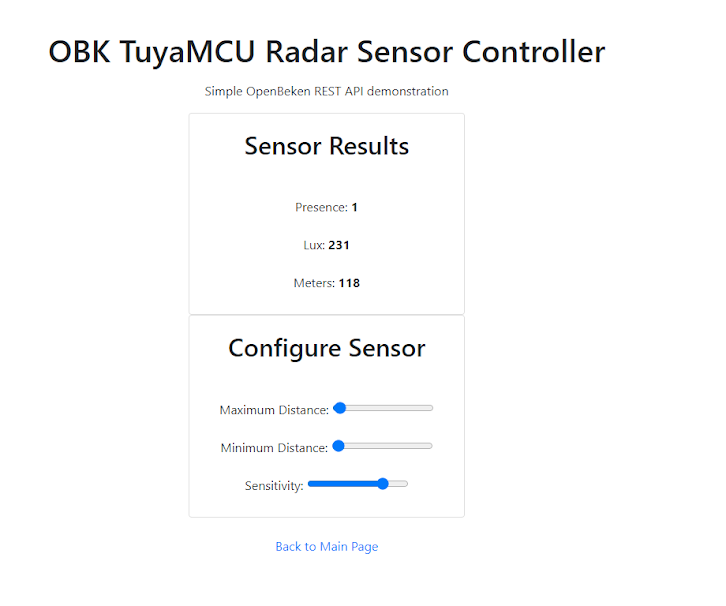
Then I developed the website to show readings from the sensor:
https://github.com/openshwprojects/OpenBekenR...ples/TuyaMCU_RadarSensorConfigAndResults.html 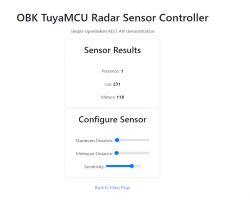 Let's analyze how this site works.
 A page is one file - an HTML document with embedded Javascript. The page doesn't reload all the way, just the script refreshes parts of it in the background. The site includes Bootstrap styles and helper scripts to have any aesthetic appeal. In the HTML itself, sliders and fields with measurement results are also created:
These sliders have onChange events hooked, i.e. they trigger the script when the user changes the setting.
At the moment of changing the value of the slider, the common function setting the OpenBeken channel is called, because in
OBK channels can contain any value, a channel is like a variable:
setChannel itself is shared and uses fetchto send to
OBK changing the value of the variable (channel):
That would be all if you didn't need to know the initial state of the parameters. That is, what we download once when opening the page. This is done in window.onload and then in interval every now and then (to refresh changes that came from outside):
And the fetching function itself:
The function refreshes both parameters that can be edited and read-only values (current distance measurement result, etc.).
It is worth noting that through the Tasmota-style REST command interface, you can also execute Tasmota POWER, STATUS commands here, their responses in JSON format also follow the Tasmota standard. Only the channel access itself is in
OBK incompatible with Tasmota, because Tasmota simply does not have channels as such.
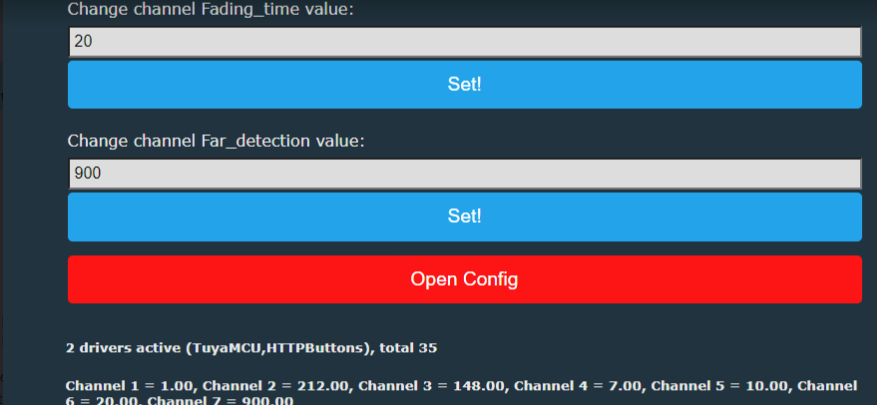
https://github.com/openshwprojects/OpenBK7231T_App/blob/main/docs/README.md Recent fixes Finally, it is worth linking to our new page from the main OBK panel. Here the httpButtons driver will help us - below is the code that should be added to autoexec.bat:
startDriver httpButtons
setButtonEnabled 0 1
setButtonLabel 0 "Open Config"
setButtonCommand 0 "*/api/lfs/cfg.html"
setButtonColor 0 "#FF0000"
First, it starts the button driver, then it enables the first button (index zero), then it sets the label for it, then it sets the command, in this case with an asterisk, i.e. the link, and finally it sets its color.
Result:
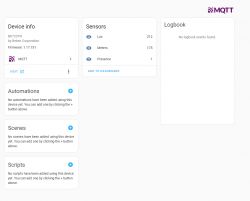
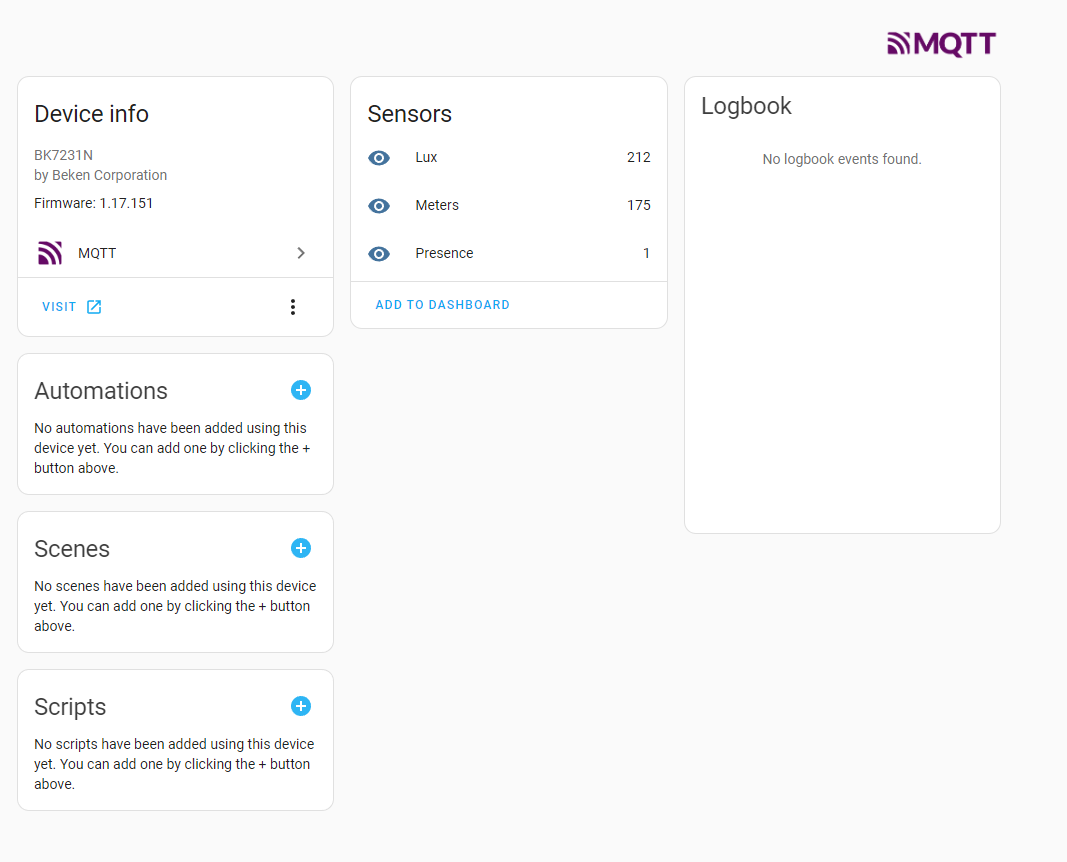
 Connecting to Home Assistant
 OpenBeken supports Home Assistant Discovery, so the device can be easily connected to HA and track its status there and create automations.
 (distance value above does not have corrected unit yet)
 Then we create automations in HA just like for any other device.
Automations without Home Assistant In OBK you can also do automations without HA. Changes in the channel value are sufficient for this event. The channel can be any variable and any dpID mapped from TuyaMCU, so we can call scripts as a result of reading any measurement from the device. You can also construct conditional events, e.g. turn on the light only when movement is detected and the lighting level is lower than the set value. Turning on the light itself can be done by sending a GET request to another device. This allows you to do everything without an external server.
Here are examples of how to handle the channel value change event:
// when channel 1 becomes 0, send OFF
addChangeHandler Channel1 == 0 SendGet http://192.168.0.112/cm?cmnd=Power0%20OFF
// when channel 1 becomes 1, send ON
addChangeHandler Channel1 == 1 SendGet http://192.168.0.112/cm?cmnd=Power0%20ON
// This will automatically turn off relay after about 2 seconds
// NOTE: addRepeatingEvent [RepeatTime] [RepeatCount]
addChangeHandler Channel0 != 0 addRepeatingEvent 2 1 setChannel 0 0
It was something new for me, I haven't seen this kind of motion sensor/radar before. This device really gives you a lot of possibilities to adjust its operation to your needs. Depending on the mounting location, you can adjust the distance from which motion is detected, you can also adjust its sensitivity and time after which it is reported as detected. In addition, there is also a light level measurement, which can also be useful.
OpenBeken it copes with this device without any problems, but, as I mentioned, we tested it on an artificially made version with BK7231N, because the BR module is not yet fully supported, although the SDK for it is available and work on it is in progress.
The ability to create simple pages in the LittleFS file system directly on the OBK (on the WiFi module itself) additionally facilitates the integration of this device and allows a much better and more aesthetic mapping of its page from the Tuya application. Of course, much more could be placed on this page than in my example, the possibilities are very large.
That's it for now, and now I'll announce that my colleague @DeDaMrAz has more equipment waiting for review:
Finally, I can also thank @DeDaMrAz for the constantly developed, fruitful cooperation on releasing Chinese gadgets from the cloud and remaking them so that they can work 100% locally while maintaining convenience and functionality.


Comments
How does "human static detection" work? In general - how does this "radar" work? [Read more]
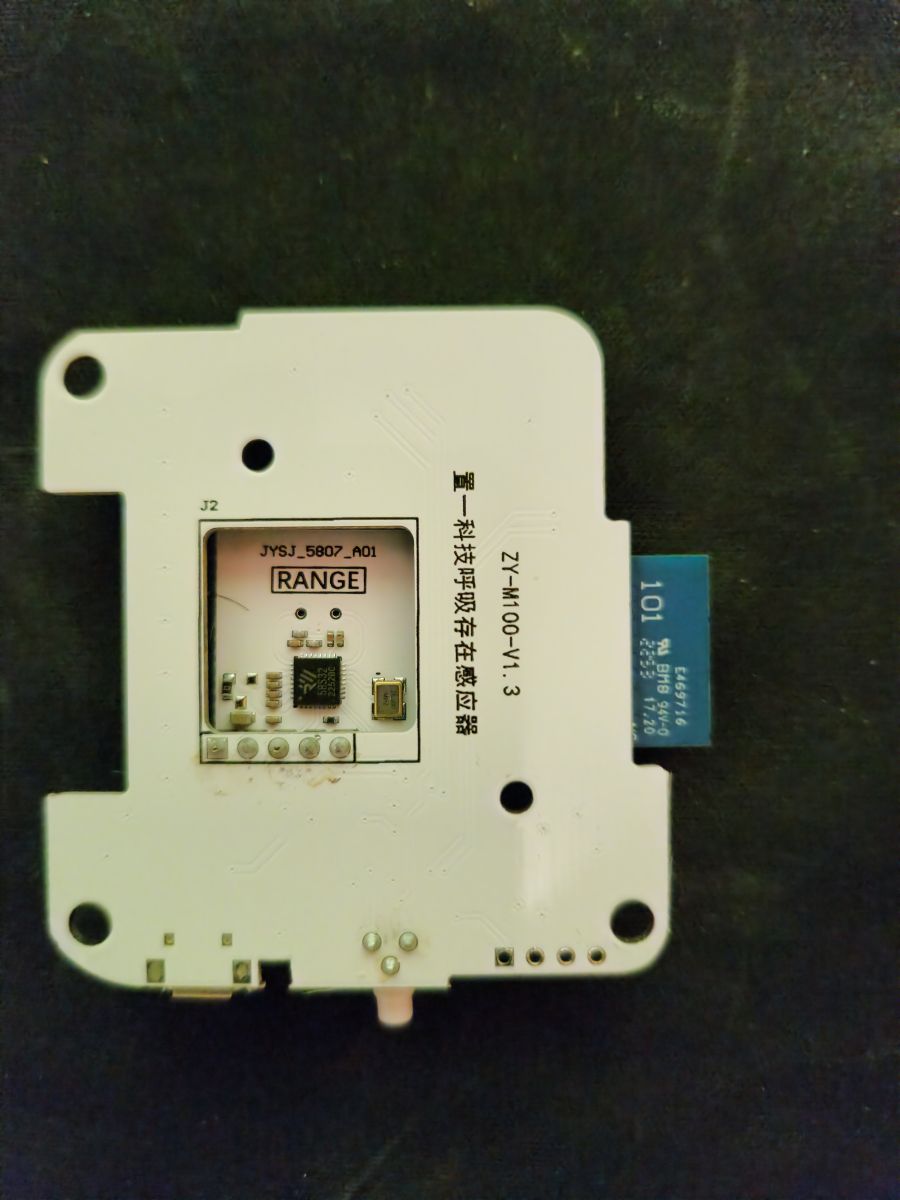
We haven't actually researched that, but it's a very good question. I googled after your post JYSJ_5807_A01 and got here: https://karlquinsland.com/two-mmwave-sensors/ It turns out that the... [Read more]
I managed to translate it with some online converter. It turns out that it does not detect a "static" person, but small movements - it can detect head tilt, hand waving, hand raising, turning around, moving... [Read more]
Good job with the translation. I would only gently point out that the versions of the device recognized by zigbee2mqtt are Zigbee versions, not versions with WiFi, such as the one I analyzed here with... [Read more]