Door Sensor D06 (BK7231N/CB3S) with TuyaMCU (DeepSleep)
One more Door Sensor
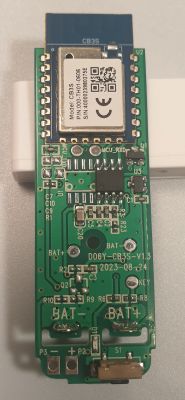
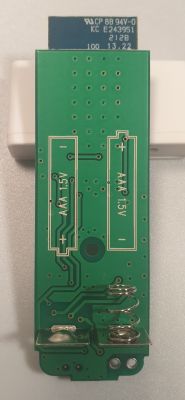
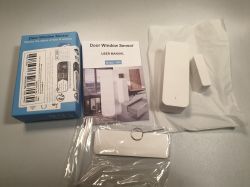
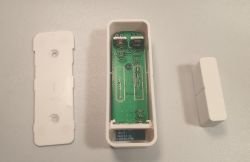
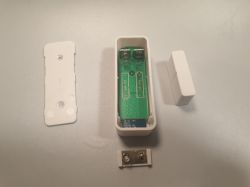
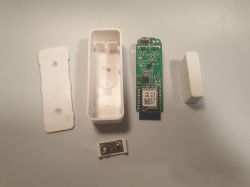
First Look
WiFi Chipset BK7231N/CB3S connected only to TuyaMCU via serial interface. Even LED connected to TuyaMCU.
TuyaMCU has power control for WiFi module.
There are two pins on the bottom of the board P3 and P2. Seems like this is for external sensor like a water leak sensor. To use it need Q2, R10, R9. But it use the same TuyaMCU pin that used for Magnetic Field Sensor now. So U3 needs to be dismounted in this case. (??? maybe they have a HighZ output and can work at the same time)
Firmware update
Firmware update possible only by desoldering chipset because TX-RX already connected to TuyaMCU .
Or maybe OTA?
OTA is probably possible via tuya-cloudcutter project https://github.com/tuya-cloudcutter/tuya-cloudcutter/tree/main
I found 2 similar sensors there:
- https://github.com/tuya-cloudcutter/tuya-clou...es/tuya-generic-cb3s-door-sensor-v1.0.10.json
- https://github.com/tuya-cloudcutter/tuya-clou...b/master/devices/avatto-ds06-door-sensor.json
Last one looks better.
Unfortunately, my unit has a new firmware version, so tuya-cloudcutter doen't work for it. No OTA update for today.
I conected it via serial inteface, and download original firmware. (You don't need to desolder WiFi chip, easy way to take of TuyaMCU. I has only 8 pins)
tuya-cloudcutter/profile-building/build_profile.py gaves me this:
OpenBK firmware was uploded via serial inteface and working good.
Draft config
Pins:
RX1 and TX1 connected to TuyaMCU.
TuyaMCU channels
#1 - Door Sensor (0-Closed, 1-Open)
#3 - Battery ( 2 -> 3V, 1-> ???, 0->??? )
Everything exactly like here Energy-saving (?) Battery-operated door / window sensor for WiFi DS06
Just a log of TuyaMCU communication:
Power consumption
~75..80mA - WiFi on and sending data to MQTT server
13uA - Sensor sleeping
For a test, I put BK7231N in to DeepSleep mode and all unit has ~20uA. So, It not so good as I was expected, and cutting power from WiFi chip is saving only ecreasing curent from 20uA to 13uA.
Cons of using TuyaMCU:
- no way to control main loop via BK7231N firmware (it will be power on only when TuyaMCU will do)
Pros:
- less power consumption
- TuyaMCU collect data (sensor status) while WiFi is booting. For example: door was opened, and closed several times during WiFi was booting. Tuya MCU will remember this, and will send this information to BK7231N.
Links
Aliexpress: https://www.aliexpress.us/item/3256805832136366.html
https://fccid.io/2ANK8-D06/Internal-Photos/09-D06-IntPho-4574559
https://www.elektroda.com/rtvforum/topic3866123-420.html#19982243
Energy-saving (?) Battery-operated door / window sensor for WiFi DS06
Door Sensor 19JWT-B (BK7231N)
More information to come...


First Look
WiFi Chipset BK7231N/CB3S connected only to TuyaMCU via serial interface. Even LED connected to TuyaMCU.
TuyaMCU has power control for WiFi module.
There are two pins on the bottom of the board P3 and P2. Seems like this is for external sensor like a water leak sensor. To use it need Q2, R10, R9. But it use the same TuyaMCU pin that used for Magnetic Field Sensor now. So U3 needs to be dismounted in this case. (??? maybe they have a HighZ output and can work at the same time)
Firmware update
Firmware update possible only by desoldering chipset because TX-RX already connected to TuyaMCU .
Or maybe OTA?
OTA is probably possible via tuya-cloudcutter project https://github.com/tuya-cloudcutter/tuya-cloudcutter/tree/main
I found 2 similar sensors there:
- https://github.com/tuya-cloudcutter/tuya-clou...es/tuya-generic-cb3s-door-sensor-v1.0.10.json
- https://github.com/tuya-cloudcutter/tuya-clou...b/master/devices/avatto-ds06-door-sensor.json
Last one looks better.
Unfortunately, my unit has a new firmware version, so tuya-cloudcutter doen't work for it. No OTA update for today.
I conected it via serial inteface, and download original firmware. (You don't need to desolder WiFi chip, easy way to take of TuyaMCU. I has only 8 pins)
tuya-cloudcutter/profile-building/build_profile.py gaves me this:
[+] Processing file='Tuya-Generic_DoorSensor-D06.bin' as Tuya-Generic_DoorSensor-D06
RBL containers:
        0x10f9a: bootloader - [encoding_algorithm=NONE, size=0xea20]
                extracted to Tuya-Generic_DoorSensor-D06
        0x129f0a: app - [encoding_algorithm=NONE, size=0xe0820]
                extracted to Tuya-Generic_DoorSensor-D06
Storage partition:
        0x1ee000: 60 KiB - 7 keys
        - 'gw_bi'
        - 'gw_di'
        - 'wf_start_md'
        - 'gw_wsm'
        - 'gw_ai'
        - 'record_head'
        - 'baud_cfg'
                extracted all keys to Tuya-Generic_DoorSensor-D06/Tuya-Generic_DoorSensor-D06_storage.json
App code `user_param_key`:
        - not found!
[+] Searching for known exploit patterns
[+] Matched pattern for BK7231N version SDK 2.3.1, payload type ssid
[!] The binary supplied appears to be patched and no longer vulnerable to the tuya-cloudcutter exploit.
OpenBK firmware was uploded via serial inteface and working good.
Draft config
Code: JSON
Pins:
RX1 and TX1 connected to TuyaMCU.
TuyaMCU channels
#1 - Door Sensor (0-Closed, 1-Open)
#3 - Battery ( 2 -> 3V, 1-> ???, 0->??? )
Everything exactly like here Energy-saving (?) Battery-operated door / window sensor for WiFi DS06
Just a log of TuyaMCU communication:
Info:CMD:[WebApp Cmd 'uartSendHex 55 AA 00 01 00 00 00' Result] OK
Info:TuyaMCU:TUYAMCU received: 55 AA 00 01 00 24 7B 22 70 22 3A 22 6E 79 77 72 76 67 68 7A 30 6F 32 74 71 32 67 34 22 2C 22 76 22 3A 22 31 2E 30 2E 30 22 7D B1
Info:TuyaMCU:TuyaMCU_ProcessIncoming[ver=0]: processing command 1 (QueryProductInformation) with 43 bytes
Info:TuyaMCU:TuyaMCU_ParseQueryProductInformation: received {"p":"nywrvghz0o2tq2g4","v":"1.0.0"}

Info:CMD:[WebApp Cmd 'uartSendHex 55 AA 00 02 00 01 04 06' Result] OK
Info:TuyaMCU:TUYAMCU received: 55 AA 00 02 00 00 01
Info:TuyaMCU:TuyaMCU_ProcessIncoming[ver=0]: processing command 2 (MCUconf) with 7 bytes
Info:TuyaMCU:TuyaMCU_ProcessIncoming: TUYA_CMD_MCU_CONF, TODO!
Info:TuyaMCU:TUYAMCU received: 55 AA 00 08 00 0C 00 02 02 02 02 02 02 01 01 00 01 00 22
Info:TuyaMCU:TuyaMCU_ProcessIncoming[ver=0]: processing command 8 (QueryState) with 19 bytes
Info:TuyaMCU:TuyaMCU_V0_ParseRealTimeWithRecordStorage: processing dpId 1, dataType 1-bool and 1 data bytes
Info:TuyaMCU:TuyaMCU_V0_ParseRealTimeWithRecordStorage: raw data 1 byte: 0
Info:TuyaMCU:TUYAMCU received: 55 AA 00 08 00 0C 00 02 02 02 02 02 02 01 01 00 01 01 23
Info:TuyaMCU:TuyaMCU_ProcessIncoming[ver=0]: processing command 8 (QueryState) with 19 bytes
Info:TuyaMCU:TuyaMCU_V0_ParseRealTimeWithRecordStorage: processing dpId 1, dataType 1-bool and 1 data bytes
Info:TuyaMCU:TuyaMCU_V0_ParseRealTimeWithRecordStorage: raw data 1 byte: 1
Info:TuyaMCU:TUYAMCU received: 55 AA 00 08 00 0C 00 01 01 01 01 01 01 03 04 00 01 02 23
Info:TuyaMCU:TuyaMCU_ProcessIncoming[ver=0]: processing command 8 (QueryState) with 19 bytes
Info:TuyaMCU:TuyaMCU_V0_ParseRealTimeWithRecordStorage: processing dpId 3, dataType 4-enum and 1 data bytes
Info:TuyaMCU:TuyaMCU_V0_ParseRealTimeWithRecordStorage: raw data 1 byte: 2
Power consumption
~75..80mA - WiFi on and sending data to MQTT server
13uA - Sensor sleeping
For a test, I put BK7231N in to DeepSleep mode and all unit has ~20uA. So, It not so good as I was expected, and cutting power from WiFi chip is saving only ecreasing curent from 20uA to 13uA.
Cons of using TuyaMCU:
- no way to control main loop via BK7231N firmware (it will be power on only when TuyaMCU will do)
Pros:
- less power consumption
- TuyaMCU collect data (sensor status) while WiFi is booting. For example: door was opened, and closed several times during WiFi was booting. Tuya MCU will remember this, and will send this information to BK7231N.
Links
Aliexpress: https://www.aliexpress.us/item/3256805832136366.html
https://fccid.io/2ANK8-D06/Internal-Photos/09-D06-IntPho-4574559
https://www.elektroda.com/rtvforum/topic3866123-420.html#19982243
Energy-saving (?) Battery-operated door / window sensor for WiFi DS06
Door Sensor 19JWT-B (BK7231N)
More information to come...


Comments
I can't understand, what "startDriver tmSensor" for? Seems like it's in "src/driver/drv_tuyaMCUSensor.c" But it's doing nothing. All actions are commented now. [Read more]
@cmy I know this is unfortunate, but tmSensor code is now integrated with TuyaMCU driver, so it is still required to run , it's just the functions are in the other file. Everything should be okay once... [Read more]
Sure. But in this case better get this one "Door Sensor 19JWT-B (BK7231N)" https://www.elektroda.com/rtvforum/viewtopic.php?p=20906219 Or you can - remove power controll Triac, - connect WiFi... [Read more]
Your concept is very interesting, @cmy , but wouldn't that reduce battery life, with both MCU and BK draining current slowly? [Read more]
I alredy cheked it. So. Yes, 13uA vs 20uA. About +50% in deep sleep mode. It is all depends. But if i wanna do this, i will wakeup WiFi module like a every 5 min. And this will be more effected... [Read more]
https://github.com/OpenBekenIOT/webapp/pull/141/commits/879c3d9f8c0413b874174c440eacd1a73da4c7da [Read more]
backup from my own exact device + boot log V:BK7231N_1.0.1 REG:cpsr spsr r13 r14 SVC:000000D3 00401C1C 000033AC IRQ:000000d2 00000010 00401e0c de717d4f FIR:000000d1 00000010... [Read more]
Would it be possible to remove tuyamcu entirely and use magnetic chip directly? And magentic chip would serve as a wakeup from deepsleep for wifi chip? I find that on my device, it's not working very... [Read more]
I believe so. @pkaczmarek2 has suggested such a step with other devices before though I've never actually progressed to trying. Is it basically trace the legs from TuyaMCU to each main component, button,... [Read more]
We've been planning to make such tutorial with @DeDaMrAz . It should be possible to convert TuyaMCU devices to Beken-only DeepSleep. The magned sensor could be dinput as @divadiow says, but you can also... [Read more]
my hacky TuyaMCUless prototype. not 100% sure of the LED/GND situation. And I don't know if there's a BAT_ADC/BAT_REL - could the MCU have done this measurement internally? https://obrazki.elektroda.pl/1093702600_1731356814_thumb.jpg... [Read more]
Nice, does deep sleep work as well? Also... your MCU was in SO8 case? That seems unusual for me. I saw many devices with SO16-etc MCUs. [Read more]
yes. with: "7": "DoorSnsrWSleep;1", "8": "Btn;2", "14": "WifiLED;2" same wake with button. no additional DSEdge config. Closed/magnet = channel 1 value 0, open/no magnet = channel... [Read more]
So it's easier than I expected. Please consider making a separate guide for Smart Home Tutorials section. I see you also labeled pins on the MCU - so there is not BAT_ADC pin? I guess you may need to... [Read more]
could.do. I also have the solder-less flashing thing to do. I didn't want to distract from you and @dedamraz's upcoming guide and I didn't document what I did in infinite detail ;) I don't *think*... [Read more]
Could you provide schematic or some sort of tuturial on how to make it tuyaless ? Or at least which connections to bridge, so it would work without the MCU. [Read more]
I didn't do any more, but the steps to date can be boiled down to: -remove TuyaMCU with solder sausage method (demonstrated here https://www.youtube.com/watch?v=fSbeKwCCMHM) -solder wires between these... [Read more]
Thank you! [Read more]
bit more info. The P558K component is a hall-effect sensor. This is what the magnet needs to get close to https://obrazki.elektroda.pl/2642279600_1733254347_thumb.jpg [Read more]