logo elektroda
logo elektroda
X
logo elektroda

Mazda 6, 2.0 Diesel: Seeking Timing Belt Setup Scheme for Replacement Process

jacekfordfocus 111201 25
ADVERTISEMENT
Treść została przetłumaczona polish » english Zobacz oryginalną wersję tematu
  • #1 9434410
    jacekfordfocus
    Level 10  
    Hello, does anyone have a timing belt setup scheme for Mazda 6, 2.0 diesel? I need to replace the belt.
  • ADVERTISEMENT
  • Helpful post
    #2 9434484
    pioart
    Level 38  
    Little data
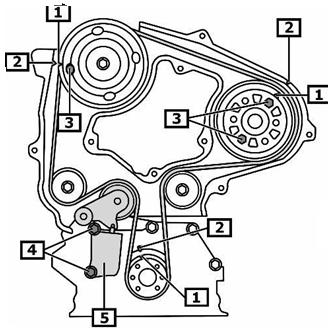
    MAZDA 6 (GG) 2.0 DI
    1 GMP marking
    2 reference mark
    3 Retaining screw (s)
    4 Bolt (s) - Tensioning Device
    5 tensioning device
    Mazda 6, 2.0 Diesel: Seeking Timing Belt Setup Scheme for Replacement Process
  • #3 9437423
    jacekfordfocus
    Level 10  
    thanks for the diagram, it should help me replace the belt
  • #4 9466943
    jacekfordfocus
    Level 10  
    the scheme seems to be good enough to change the strap, additional question - what needs to be undressed to get to it and in what order? If someone can tell you something about it, please.
  • #5 9466984
    romanhoks
    Level 16  
    Buddy, you have a diagram and you do not know how to choose the belt. It means that you have no idea about the replacement and you do not know how to approach it. Leave these works to a specialist because wrong installation of the belt may cause the valves to bend. And it costs a little.
  • Helpful post
    #6 9467626
    pioart
    Level 38  
    Please

    1 Cover
    2 Crankshaft pulley bolt
    3 Crankshaft pulley
    4 Timing Belt Cover Bolts
    5 Timing belt cover
    Mazda 6, 2.0 Diesel: Seeking Timing Belt Setup Scheme for Replacement Process
  • ADVERTISEMENT
  • #7 9467655
    jacekfordfocus
    Level 10  
    I appreciate this honest advice, but that's all my grandmother could tell me. I have already replaced the belts in a few of my cars, sometimes it was troublesome to remove the timing cover and other belts so as not to damage anything. The belt itself does not need to be replaced yet but wants to check if it is correctly set. If it's okay, I won't touch it.

    Added after 16 [minutes]:

    Thanks for the important hint. I have already tried this replacement and removed the top cover, engine suspension mount, moved the washer fluid reservoir aside. Now you will have to work with the V-belt and pulley to reach the lower timing cover cover.
  • #8 9467811
    Anonymous
    Anonymous  
  • #9 9468122
    pioart
    Level 38  
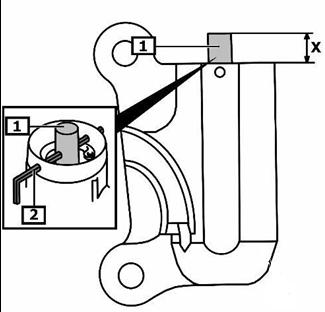
    "Jorgr83" is right, the timing is simple, even the lack of a platform to hang the engine is not a big obstacle. As for the tensioner, when replacing it, basically replace it, but it is necessary when it does not keep the dimension parameter / when locked / must be within the dimensions of 12.9 - 14.6 mm, otherwise replacement. The roll is known to be replaced.
    Regards
    Mazda 6, 2.0 Diesel: Seeking Timing Belt Setup Scheme for Replacement Process
  • #10 9470321
    Anonymous
    Anonymous  
  • #11 9477716
    jacekfordfocus
    Level 10  
    Thanks to all the important hints, I changed the timing belt, I don't know how the alternator belt is tightened. How to loosen the tension in the alternator belt tensioner, please give me a hint
  • #12 9477844
    romanhoks
    Level 16  
    How did you disassemble the belt? With a knife?
  • ADVERTISEMENT
  • #13 9479861
    jacekfordfocus
    Level 10  
    The disassembly was easy, I unscrewed the tensioner, the belt loosened enough that it could be removed without a knife. I finally installed it after pulling the tensioner pin upwards. Fill up primitive but effective.
    The car fired without a problem, it works like a watch, I have already traveled 100 km after changing the belt, it should be all right, thanks to everyone for your help
  • #14 16197087
    zmarta
    Level 9  
    pioart wrote:
    Little data
    MAZDA 6 (GG) 2.0 DI
    1 GMP marking
    2 reference mark
    3 Retaining screw (s)
    4 Bolt (s) - Tensioning Device
    5 tensioning device
    Mazda 6, 2.0 Diesel: Seeking Timing Belt Setup Scheme for Replacement Process


    I'm replacing the head gasket. Head removed.
    Setting the motor shaft according to the TDC signs - as in the picture, pistons 2 and 3 have TDC, piston 1 and 4 are at the bottom
    how to explain it? in principle, you should set the timing to cylinder 1 or 4 depending on the engine design
  • #15 16197397
    coperfild
    Level 35  
    Set the timing shaft to the marks and see which cams are up, maybe it should be.
  • ADVERTISEMENT
  • #16 16197724
    zmarta
    Level 9  
    coperfild wrote:
    Set the timing shaft to the marks and see which cams are up, maybe it should be.


    screwed head: according to the instructions lightly, 30Nm and 3 x 90 degrees

    tomorrow I set up all the signs and put on the belt, but I don't understand why Mazda does not respect the rule:
    And cylinder, TDC, injection pump mark, cams on the first cylinder?

    And I have a question: does the injection point in this setting depend on the shaft position sensor?
  • #17 16197736
    T5
    Admin of Cars group
    zmarta wrote:
    Setting the motor shaft according to the TDC signs - as in the picture, pistons 2 and 3 have TDC, piston 1 and 4 are at the bottom

    A turn the shaft so that the first piston is up and see the mark on the shaft. :)

    Thinking at work, thinking :)
  • #18 16199208
    zmarta
    Level 9  
    T5 wrote:
    zmarta wrote:
    Setting the motor shaft according to the TDC signs - as in the picture, pistons 2 and 3 have TDC, piston 1 and 4 are at the bottom

    A turn the shaft so that the first piston is up and see the mark on the shaft. :)

    Thinking at work, thinking :)


    camshaft installed. toothed wheel as per mounting point> valves closed for 1 cylinder / cam at the bottom /
    the piston of the first cylinder at TDC, but the mounting mark on the shaft is shifted by 180 degrees / you have to make the mark yourself with a marker, physically it cannot be otherwise.

    I wonder if this is normal, or if someone unscrewed and vice versa mounted the wheel with marks on the motor shaft?
  • #19 16199258
    T5
    Admin of Cars group
    But that's not a sign, buddy :)
    The sign is cast aluminum behind the gear on the shaft and a cutout on the gear on the side of the engine block.

    Look, this cutout is supposed to match the mark on the casing, it's hard to see with the strap on.
    https://www.google.pl/search?q=mazda+6+2.0+d+...PzEN_ptlRnru0M%253A%253B7HGFeBlyMa1A1M%252F3A %252252 elektroda.pl%25252Frtvforum%25252Ftopic1979591.html&source=iu&pf=m&fir=PzEN_ptlRnru0M%253A%252C7HGFeBlyMa1A1M%252C_&usg=__32b-YbGpKM6PJ2KPRxiPVbdU2SM%3D&biw=1280&bih=651&ved=0ahUKEwjavoruhcLRAhVBoBQKHaJWCmwQyjcIPw&ei=blB6WNpPwcBSoq2p4AY#tbm=isch&q=mazda+6+2.0+d+ko% C5% 82o + spread% C4% 85du + on + shaft & imgrc = keqfSecRs6lbGM% 3A
  • #20 16199311
    pioart
    Level 38  
    zmarta wrote:
    Has anyone unscrewed and vice versa mounted the wheel with marks on the motor shaft?

    It cannot be installed otherwise. There is no other mark on the inside of the circle?
  • #21 16199538
    zmarta
    Level 9  
    the notch on the engine block and the protrusion on the shaft gear are not "marks" of the belt assembly, because they show after setting the piston DMP, that means that there is no factory mark on my shaft wheel relating to the GMP setting of the piston on 1 cylinder.
    Photo with description.
    I marked the point with a marker, everything is set, the bar is on, everything spins without collisions.
    When I start the engine, I do not know, because in my garage it is cold, and there is still some turning time left.
    When I run it, I will let you know.

    My
    Mazda Premacy 2.0 DiTD from December 2001, year of production, and this is what the pulley on the timing belt shaft has, the pulley driving the alternator and the air conditioning is screwed on to this pulley, but it is at the very end and is irrelevant to the topic.
  • #22 16201492
    zmarta
    Level 9  
    Rectification and explanation:
    I checked where there is a notch on the block> there is a V-shaped notch on the gear wheel, according to my last photo, the setting is correct.

    Only the notch on the gear wheel is invisible, it is obscured by the car frame.

    Thank you to everyone for your willingness to help solve the dilemma. Maybe these tips will also be useful to someone.
  • #23 16574425
    Zbyniu123
    Level 12  
    Hello, can this tensioner be squeezed and put on even once? If you unblock it, it's just a garbage can ??
  • #24 16574693
    zmarta
    Level 9  
    the tensioner can be put on again. Press the tensioner pin in the vertical position, this operation should be performed very slowly.
    then block the tensioner with a pin / probably 2 mm / so that it fits in the holes for the blockade.
    We take out the locking pin at the very end, just like a new belt is installed in accordance with the assembly points
  • #25 19418845
    Didi1102
    Level 12  
    Oh, I think it has changed because I do not want to start after disconnecting the shaft sensor, it will fire I have to check points tomorrow because I bought a new sensor and unfortunately nothing :-(
  • #26 19576256
    maciekbill66610
    Level 1  
    Didi1102 wrote:
    Oh, I think it has changed because I do not want to start after disconnecting the shaft sensor, it will fire I have to check points tomorrow because I bought a new sensor and unfortunately nothing :-(


    Hello, did the car fire after replacing the sensor? But was the timing incorrectly set?

Topic summary

The discussion revolves around the timing belt replacement process for the Mazda 6, 2.0 Diesel. Users share a timing belt setup scheme and diagrams, emphasizing the importance of proper installation to avoid engine damage. Key steps include removing the timing cover, crankshaft pulley, and tensioner, with advice on handling the tensioner and ensuring correct alignment using reference marks. Some users express concerns about the complexity of the task and the potential for mistakes, while others share their successful experiences and tips for loosening the alternator belt tension. The conversation also touches on the timing shaft position and the necessity of using a new tensioner for optimal performance.
Summary generated by the language model.
ADVERTISEMENT