logo elektroda
logo elektroda
X
logo elektroda

[Solved] Activating AUX on Laguna III 2008 Cabasse Tronic Navi with Alpine Changer: How-To

tomato999 65637 24
ADVERTISEMENT
Treść została przetłumaczona polish » english Zobacz oryginalną wersję tematu
  • #1 10356591
    tomato999
    Level 9  
    Hi, I have a Laguna with Cabasse Tronic radio and company navigation. I wanted to hook up the changer to the mini ISO blue connector and possibly connect to the cable with the audio from the iPhone, but when I activate the changer (Alpine from Renault Espace) nothing happens, i.e. the radio does not see the changer. Please let me know if there is any way to activate the input, is the changer incompatible or something else? I should add that the changer is original Renault, the cable included fits into the socket on the radio (mini ISO blue).
    Maybe someone has another idea for connecting an MP3 to this radio (the radio has an inactive AUX). I'm not interested in a transmitter connection, the radio has Bluetooth but I think it's only for the phone, I've not been able to use it to listen to music.
  • ADVERTISEMENT
  • #5 10363882
    Foxtrott
    Level 34  
    Did you read the answers on the forum that I sent you well? There is a response that bothers you and applies to your radio. See also links from the main topic.
  • #6 10364666
    tomato999
    Level 9  
    Foxtrott wrote:
    Did you read the answers on the forum that I sent you well? There is a response that bothers you and applies to your radio. See also links from the main topic.


    Foxtrott I read and answered that on my radio there is no expert menu, the link is to another model, or what else I overlooked?
  • ADVERTISEMENT
  • #7 11875652
    jerk
    Level 11  
    I do not know if my friend has already solved the problem, but I know for sure that activate the aux input and the ability to connect the changer, you have to go to the Renault Dealership there, podepną under Clipa and activates these options. I have the same radio and I did it.
  • #8 14837284
    DyerMaker
    Level 9  
    tomato999 wrote:
    Foxtrott wrote:
    Did you read the forum replies well? I sent you? There is a response that bothers you and applies to your radio. See also links from the main topic.


    Foxtrott I read and answered that on my radio there is no expert menu, the link is to another model, or what else I overlooked?


    tomato999 - a long time has passed, but you may know or remember. Mam Carminata - http://nawigacjefabryczne.pl/pliki_do_pobrania/carminatinformee2bt.pdf - it looks like you have / had one.
    Do you know where the microphone for the hands-free kit comes in from behind? I have a problem, that I can not hear me when I phone my phone through Blue. I hear the interlocutor, the voice goes to the speakers, but the interlocutor does not hear me. I see this feler in the defect of the microphone. Do you know anything maybe?
    greetings
    Cuba
  • #9 14837563
    tomato999
    Level 9  
    the microphone is probably near the lamp (above the mirror) there are holes you need to get there and replace it because the loud-speaker set is not on the radio only rather under the board.
  • #10 14837941
    SZYMON BYDGOSZCZ
    Level 38  
    tomato999 wrote:
    because the loudspeaker set is not on the radio itself but rather under the board.


    He is on the radio.
  • ADVERTISEMENT
  • #11 19754842
    grabiasek
    Level 2  
    It's time to dig up the topic, Lord tomato999

    So far I am a happy owner of Laguna III, BT0H, 2.0 T 170KM, Radio TYPE: RAD02 , Navigation system level: NINAV6 , Vintage car 03.2008

    The main guest, that is: Radio Carminat Cabasse Tronic
    1: https://obrazki.elektroda.pl/5768834200_1639104842.jpg
    2: https://obrazki.elektroda.pl/6311704500_1639102129.jpg

    First of all, like the above-mentioned colleague, I have a radio in which there was no aux, and the aux mode could not be turned on from the EXPERT Menu (because it is not there), and you could only turn on the CLIP.
    Secondly, the subject of the yellow mini ISO cube [C1] was on the agenda. Well, a friend's plug on the radio, as in mine, is not plugged directly into the radio, but through ... I don't know what to call it - distance? In any case, the yellow bone has no electrical connection to the radio.
    3: https://obrazki.elektroda.pl/1558393700_1639105014.jpg

    I was tempted to see what would happen if I stepped on her directly. I did it and the AUX mode appeared on the display,
    and nothing more, silence, or rather the whistle of the engine in the speakers - it cannot be like that.
    I bought a Bluetooth module, but it came with a mini ISO [C2], which I don't even have anywhere to connect to the radio, I recommend buying a C1 plug with pins. This photo shows the factory fitted radio and info about my measurements.
    4: https://obrazki.elektroda.pl/3591515200_1639102918.jpg

    When we have a Bluetooth module and a yellow mini ISO plug [C1], we connect it as follows:
    We take the Bluetooth power supply from the mini ISO [C1] pin 6 ( photo 4 ) (and this is where the usefulness of this factory C1 harness ends), plug the mass into the thick black wire ( photo 4 ).
    The rest is the assembly of a new, own mini ISO bone [C1]
    5: https://obrazki.elektroda.pl/9625524800_1639105888.png

    Pins in the mini ISO [C1]:
    1 empty - no connection to the radio chip, it will show in the next photo ( photo 5 )
    2 ------ bridge with pin 5 ---------
    3 common audio
    4 Right audio
    5 ------ bridge with pin 2 ---------
    6 Left audio

    I hope that someone will find this information useful, because it is my weekly effort of free time, and that I will not be hit by the electrode bastard that "not this topic" or "read the regulations" etc ... I sweat this post with a good heart.
    I wanted well ...
  • ADVERTISEMENT
  • #12 19921689
    eLolek
    Level 16  
    It was useful, buddy, very much. Thank you for the description of the pins.
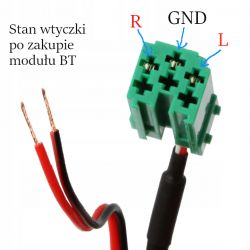
    Today, thanks to your description, I connected to such a radio the BT module purchased on Allegro for about PLN 50, unfortunately with a green plug in which the wires
    audio files were connected as in the figure below.
    Activating AUX on Laguna III 2008 Cabasse Tronic Navi with Alpine Changer: How-To

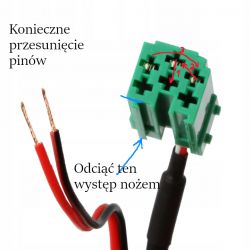
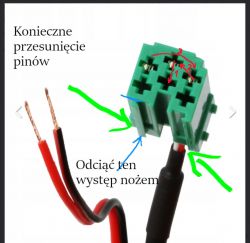
    Since the pinout pattern is different than that used in the CUBASSE TRONIC CARMINAT radio socket, I had to put the pins in the right places (as described in your description) and additionally cut off one of the longitudinal protrusions leading the plug with a wallpaper knife. The method of pin shifting and the place of cutting the leads are shown in the next photo.

    Activating AUX on Laguna III 2008 Cabasse Tronic Navi with Alpine Changer: How-To

    After inserting such a modified plug into the radio in place of the yellow one (and of course activating the AUX input), the module works properly and you can play music from the phone.
    In addition, the BT telephone connection still works (it was already working before the conversion).

    If someone finds it difficult to extract the pin from the plug and move it to another place, you can purchase a new plug with cables, which can be soldered to the output from the BT module. Such a green plug is available in electronics stores
    under the name ZRS-ISO-3-Z (green) for a dozen or so PLN. However, you still need to cut the corresponding protrusion with a knife.

    The issue of connecting the power supply of the BT module is probably obvious, so I do not mention it.
  • #13 20260214
    adytt2000
    Level 2  
    This is such detailed and great information I have found right here and I'm really grateful as I also own a Renault Laguna 3 with Cabase Tronic Navigation and bluetooth that only work as a handsfree and is not able to play music from my smartphone.
    I will use the information posted here in order to fit a new aftermarket bluetooth module just as eLolek used in order to be able to also play music from my smartphone, so please let me know if I understood the information posted here correctly:

    1 - Activate the AUX function by using Clip or DDT4all
    2 - Modify the green connector of the new bluetooth module by shifting the pins according to the schematics provided here - only 3 pins are used GND, LEFT, RIGHT
    3 - Insert the green connector in place of the yellow one on the back of the Cabase Tronic Navigation player
    4- Power the new bluetooth module as described in upper posts from the black thick wire for minus - and the positive + 12V white wire from the yellow mini iso harness that will no longer be connected to the player.

    Still I have 1 question I need and answer before I proceed in order to be sure I understood properly.
    - When modifying the green connector is there a need for inserting 2 more additional pins that needs to be bridged as for connecting to the pins 2 and 5 described in photo nr 5 https://obrazki.elektroda.pl/9625524800_1639105888.png or there is no need for such thing and everything works just fine as long as you have the AUX function activated by CLIP or DDT4All.

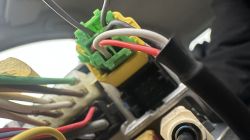
    -I ask this because on other forum there is something similar posted but it looks like there are 2 additional pins added inside the green connector that are bridged together. They also say that there is no need for activation via Clip or DDT4all as the aux function appears by itself in the menu as you plug in the green connector. Could that bridge between pins 2 and 5 inserted in the green connector be the reason for the AUX function activating itself and appearing inside the menu. Kindly see the picture attached bellow.
  • #14 20279336
    adytt2000
    Level 2  
    Indeed if you add those 2 more pins and bridge them you don't need to activate the AUX port by using Clip or DDT4All as it will appear by itself. It was tested by me and fully works. Thanks for all the great info guys.
  • #15 20577848
    mateuszstyrczula
    Level 1  
    It's going to bump things up a bit. First of all, I confirm that bridging two pins starts the aux from the machine. However, I have a question. I connected the Bluetooth module to the plus in the black cube going to the radio (carminat cd). However, this plus is a constant current, so the BT LED is blinking all the time, so it consumes electricity. I'm a little afraid that it will drain the battery. Do you know what cable to connect to so that the electricity disappears when the car is closed?
  • #16 20701481
    grabiasek
    Level 2  

    You will find the power supply after the ignition on the yellow cube (photo 4).
  • #17 21129767
    Zielony1786
    Level 1  
    Hello, a lot of these versions and I don't understand... 😉 and can anyone tell me where and on which pins to connect L and R channel and ground? Preferably some small drawing or photo, Radio EL-1255E-L, I had one try and I think the bluetooth module went to St Peter🫣 Aux I have active via Clip. Laguna 3 2.0 dci IP 08'
  • #18 21223581
    albinjoseph
    Level 3  
    Hi Guys,
    I would like to thank you all for sharing the above method to add Bluetooth. I have the same stereo in my car and I have followed all the steps mentioned above. Now I have succeeded and Bluetooth is working perfectly in my car and has nice sound quality.
    Also, I would like to add that the Bluetooth power is turning off when the car is locked.

    I would like to ask one question: does the CD input work normally with this Bluetooth? Or do I need to unplug the Bluetooth and connect the yellow plug back to make the CD drive work normally?

    Thank you again for your support.
  • #19 21369078
    emaildanielcovaci
    Level 3  
    adytt2000 wrote:
    This is such detailed and great information I have found right here and I'm really grateful as I also own a Renault Laguna 3 with Cabase Tronic Navigation and bluetooth that only work as a handsfree and is not able to play music from my smartphone.
    I will use the information posted here in order to fit a new aftermarket bluetooth module just as eLolek used in order to be able to also play music from my smartphone, so please let me know if I understood the information posted here correctly:

    1 - Activate the AUX function by using Clip or DDT4all
    2 - Modify the green connector of the new bluetooth module by shifting the pins according to the schematics provided here - only 3 pins are used GND, LEFT, RIGHT
    3 - Insert the green connector in place of the yellow one on the back of the Cabase Tronic Navigation player
    4- Power the new bluetooth module as described in upper posts from the black thick wire for minus - and the positive 12V white wire from the yellow mini iso harness that will no longer be connected to the player.

    Still I have 1 question I need and answer before I proceed in order to be sure I understood properly.
    - When modifying the green connector is there a need for inserting 2 more additional pins that needs to be bridged as for connecting to the pins 2 and 5 described in photo nr 5 https://obrazki.elektroda.pl/9625524800_1639105888.png or there is no need for such thing and everything works just fine as long as you have the AUX function activated by CLIP or DDT4All.

    -I ask this because on other forum there is something similar posted but it looks like there are 2 additional pins added inside the green connector that are bridged together. They also say that there is no need for activation via Clip or DDT4all as the aux function appears by itself in the menu as you plug in the green connector. Could that bridge between pins 2 and 5 inserted in the green connector be the reason for the AUX function activating itself and appearing inside the menu. Kindly see the picture attached below.

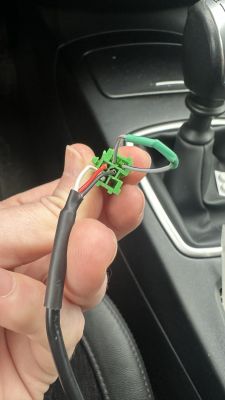
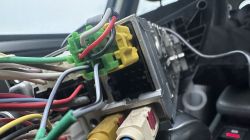
    I did exactly like in your photo and no aux menu showed 😢
    Close-up of a car's electrical wiring with a green and yellow connector inside the vehicle. The image shows a hand holding a plug with wires in a car.
  • #20 21370117
    emaildanielcovaci
    Level 3  
    After a sleep off I made a new configuration
    But still no success 🤯 Close-up of connectors and wires inside a car.
  • #21 21370123
    albinjoseph
    Level 3  
    Hi
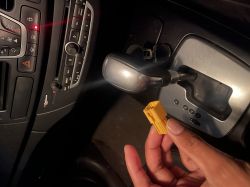
    you need to remove that yellow connector out of the unit and plug the bluetooth directly to the unit. It will work.

    Hand holding a yellow connector in front of a car console with gear shifter and control panels.
  • #22 21370140
    emaildanielcovaci
    Level 3  
    albinjoseph wrote:
    Hi
    you need to remove that yellow connector out of the unit and plug the bluetooth directly to the unit. It will work.

    Hand holding a yellow connector in front of a car console with gear shifter and control panels.


    after a cup of coffee I saw that
    now I have another problem, my connector is no good, it does not fit there
  • #23 21370154
    albinjoseph
    Level 3  
    I have pointed two sliding grooves with green arrow in the image. You need to cut off those grooves using a knife. Then it will fit.

    Green arrows indicate grooves to be cut on a green wire connector.
  • #24 21370174
    emaildanielcovaci
    Level 3  
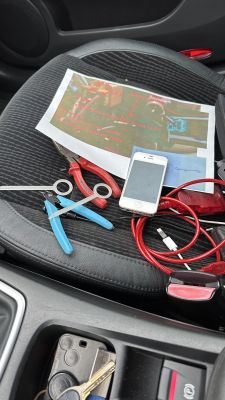
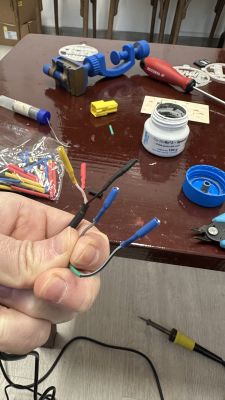
    I have done a more direct approach 😂 and yes now it works 🕺🏼🕺🏼🕺🏼
    The aux is there
    10q guys, have a great year 🙏
    Car seat with tools, a phone, and instructions. Person holding a set of wires with colorful insulation against a table with electrical tools.
  • #25 21370267
    damiancz
    Moderator of Car Radios
    Resolved = closed

Topic summary

The discussion revolves around activating the AUX input on a 2008 Renault Laguna III equipped with a Cabasse Tronic navigation system and an Alpine CD changer. Users share methods to enable AUX functionality, primarily through the Renault dealership using a diagnostic tool (Clip) or by modifying the wiring of a Bluetooth module. Some users report success by bridging specific pins in the connector, allowing for music playback from smartphones without needing to activate AUX through the expert menu. Additionally, there are inquiries about the proper pin connections for audio channels and concerns regarding power supply management for the Bluetooth module to prevent battery drain.
Summary generated by the language model.
ADVERTISEMENT