logo elektroda
logo elektroda
X
logo elektroda

Soldering Fatal1ty Creative Headphones: Replacing Cabling, 3.5mm Jack & Screen Cable Connection

rastman1491 82590 10
ADVERTISEMENT
Treść została przetłumaczona polish » english Zobacz oryginalną wersję tematu
  • #1 12735962
    rastman1491
    Level 9  
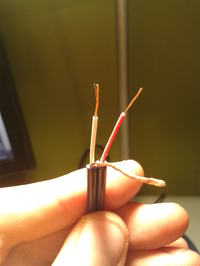
    Hello. Today I was going to repair my Fatal1ty creative headphones (replace all cabling) so I went to the store, I bought a 3.5mm jack and cable. The alleged seller told me a cable with a "screen" and here is the problem because I do not know how to solder it to the jack and loudspeaker in the headphones. I was looking in googles and nothing, there is no meaningful explanation. I would like to ask you for help and an explanation of how to combine it.
    greetings :) Soldering Fatal1ty Creative Headphones: Replacing Cabling, 3.5mm Jack & Screen Cable Connection
  • ADVERTISEMENT
  • #2 12736092
    Maciek051996
    Level 28  
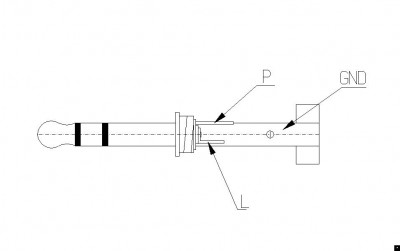
    Soldering Fatal1ty Creative Headphones: Replacing Cabling, 3.5mm Jack & Screen Cable Connection

    P- red
    L - White
    GND - ground

    Insert a photo of the inside of the headphones, I will tell you what and where to connect.
  • ADVERTISEMENT
  • #4 12736317
    rastman1491
    Level 9  
    So yes, there is a microphone board here, I do not care only about the headphones themselves.
    Of course, as you wrote @ Maciek051996, mass is this screen in my case?
    Soldering Fatal1ty Creative Headphones: Replacing Cabling, 3.5mm Jack & Screen Cable Connection Soldering Fatal1ty Creative Headphones: Replacing Cabling, 3.5mm Jack & Screen Cable Connection
  • ADVERTISEMENT
  • #5 12736512
    Maciek051996
    Level 28  
    If you don't care about the microphone then:

    -Solder the 2 blue wires together
    - solder them to the screen of the cable you bought
    -one yellow solder to a white vein
    - solder the second white to the red wire

    In the plug

    P- red
    L - White
    GND - ground
  • #6 12736645
    rastman1491
    Level 9  
    Maciek051996 wrote:
    If you don't care about the microphone then:

    -Solder the 2 blue wires together
    - solder them to the screen of the cable you bought
    -one yellow solder to a white vein
    - solder the second white to the red wire


    I don't understand a bit from what you wrote :( how could you step by step and exactly
  • ADVERTISEMENT
  • #7 12827674
    AhmadMurfatlar
    Level 2  
    Hi, I would like to join the topic because it has not been solved and I have a problem with the correct soldering of the cable to the headphones.
    Years later, I found an old, defective Sennheiser HD207 in a drawer and I would like to bring it back to life. The cable at the jack plug and one channel at the handset are damaged.

    I just had some Cordial CMK209 cable
    - signal - white braid
    - signal - red braid
    - mass - copper
    Due to the fact that the Senheiser 207 splits the cable to two headphones in this way -
  • #8 12827802
    grubs
    Level 32  
    AhmadMurfatlar wrote:

    I will be grateful for your help :)


    And where do you connect these bands because in the picture it looks like one cable from the jack (the 3-wire one went out) - I understand that two go there?
  • #9 12828400
    Polon_us
    Level 42  
    AhmadMurfatlar wrote:
    both headphones play when the panorama is set in the middle


    To be precise - by "panorama" you mean channel balance?
  • #10 12829026
    AhmadMurfatlar
    Level 2  
    grubs wrote:
    And where do you connect these bands because in the picture it looks like one cable from the jack (the 3-wire one went out) - I understand that two go there?


    Yes, there are only two that have been treated by me with heat shrink tubing. More precisely, with a thinner tube, which you can see as it enters the jack casing, and a piece of thicker one in the place where the cable is jammed, so that it sticks to the plug better


    Soldering Fatal1ty Creative Headphones: Replacing Cabling, 3.5mm Jack & Screen Cable Connection

    This is what it looks like when describing it vividly. The blue braids are actually white, but that doesn't matter at the moment. I marked the tube in green ;)
    The signal cables, i.e. the white + red braid, are also welded with a tube in both cables


    Polon_us wrote:
    To be precise - by "panorama" you mean channel balance?


    This is exactly what it is about
  • #11 12830978
    Polon_us
    Level 42  
    From the description of the symptoms, you get the impression that you were using the volume knob, not the balance knob :) It's so off the beaten track.

    I would suggest two things:
    1 - checking the headphones on other equipment that has the ability to adjust the balance

    2 - Hope you have access to a meter (digital multimeter). I am writing about it because by measuring the resistance seen from the plug, you can determine whether the connections are correct or locate any irregularities.

    Assuming you have access to such a meter, take the resistance (or resistance) measurements as follows:

    a - you need to know the resistance of the handset - if it is not known, unsolder one of the cables by the handset and measure the resistance in the place where you are soldering the wires. After the measurement, solder the wire back on.

    b - take measurements on the minijack plug. Note here - take measurements on the plug itself, not on the side where you soldered. For measurements, the plug should be folded, i.e. as in everyday use.

    1 - plug tip and ground - correct reading -> value that you measured on the handset
    2 - middle section of the plug and ground - as above
    3 - tip and middle section - correct reading -> doubled value of the handset resistance.

    If you enter the results, we'll see what's next.

Topic summary

The discussion revolves around repairing Fatal1ty Creative headphones by replacing the cabling, including the 3.5mm jack and screen cable connection. The user seeks guidance on soldering the new components, specifically how to connect the wires correctly. Responses provide detailed instructions on soldering, indicating that the red wire corresponds to the right channel, the white wire to the left channel, and the ground connection is made through the screen. Additional advice includes checking connections with a multimeter and ensuring proper cable management with heat shrink tubing. Users also share experiences with similar repairs on other headphone models, such as Sennheiser HD207, highlighting common challenges and solutions in headphone wiring.
Summary generated by the language model.
ADVERTISEMENT