Hello all. I am struggling all the time with a certain challenge, namely:
create your own room thermometer with the current time display.
For this project I used Arduino Uno and the basic elements contained in the so-called Starter Kit + 2x16 LCD display.
I would like to ask a question, ask for humble help on two issues, because I have not found the answer to this type of question anywhere.
But before that, I present exactly what I used to create this miracle.
1. MCP9700A thermistor
2. Shift register 74HC595 (LCD control)
3. LCD display 2x16 HD44780
For this, of course, buttons for setting the clock with 10kOhm resistors as well as a 10kOhm potentiometer for setting the LCD contrast as well as wires and a switch to turn the backlight on and off in the display.
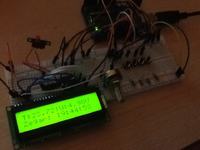
This is how it looks in reality:

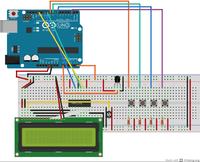
And here is the diagram (illustrative picture) created in the Fritzing program

Now to the point. What's the problem:
1. Temperature. Generally, the problem is that when the LCD backlight is on, the voltage drops from 5V to 4.98V or 4.97. This also gives the thermistor false results because the values are calculated from the formula:
according to the parameters of the sensor itself (all program code at the bottom of the post).
As you can see also in the whole program code, I tried to fight it somehow, instead of 5.0 (denoting the input voltage) some variable value in real time by real-time analysis of voltage on the contact plate. Unfortunately, miracles happened. At this point in the code there is an attempt to remedy this problem (I thought about subtracting from the temperature the difference that appeared, but it is probably not constant). In general, miracles on a stick, and none of that. And here is the question, what can you do about it? Has anyone encountered a similar problem or can read something more from the specifications of this thermistor that would help me?
2. Clock and Temperature. Suppose (purely theoretically) that everything is fine when it comes to temperature. Displayed normally, there is no voltage problem. I would like it not to be displayed every second (as it has been so far) and every 10-15 seconds, but I would also like the clock to continue to work and display values every second just every second and not every 10-15 minutes. I tried different ways, such as separating the clock with the thermometer and using the delay () function for both separately, but in the end it ended displaying every 10-15 seconds of the whole. What can you do to make the clock work correctly while displaying the temperature at longer intervals?
3. Clock and its work. This is more my fad, light coloring of the design. I would like to do so that after turning on the whole system, the time began to flow immediately at the time of setting with the possibility of setting the clock. I saw such a patent somewhere on YouTube and I wonder how you can do something like that. If someone has an idea, a ready project for something like this and would like to share with a less experienced programmer, I will gladly accept help.
Here is all the program code in Arduino:
create your own room thermometer with the current time display.
For this project I used Arduino Uno and the basic elements contained in the so-called Starter Kit + 2x16 LCD display.
I would like to ask a question, ask for humble help on two issues, because I have not found the answer to this type of question anywhere.
But before that, I present exactly what I used to create this miracle.
1. MCP9700A thermistor
2. Shift register 74HC595 (LCD control)
3. LCD display 2x16 HD44780
For this, of course, buttons for setting the clock with 10kOhm resistors as well as a 10kOhm potentiometer for setting the LCD contrast as well as wires and a switch to turn the backlight on and off in the display.
This is how it looks in reality:

And here is the diagram (illustrative picture) created in the Fritzing program

Now to the point. What's the problem:
1. Temperature. Generally, the problem is that when the LCD backlight is on, the voltage drops from 5V to 4.98V or 4.97. This also gives the thermistor false results because the values are calculated from the formula:
Spoiler:
temp = (5.0 * mcp) /1024.0;
temp = temp - 0.5;
temp = temp / 0.01;
temp = temp - 0.5;
temp = temp / 0.01;
according to the parameters of the sensor itself (all program code at the bottom of the post).
As you can see also in the whole program code, I tried to fight it somehow, instead of 5.0 (denoting the input voltage) some variable value in real time by real-time analysis of voltage on the contact plate. Unfortunately, miracles happened. At this point in the code there is an attempt to remedy this problem (I thought about subtracting from the temperature the difference that appeared, but it is probably not constant). In general, miracles on a stick, and none of that. And here is the question, what can you do about it? Has anyone encountered a similar problem or can read something more from the specifications of this thermistor that would help me?
2. Clock and Temperature. Suppose (purely theoretically) that everything is fine when it comes to temperature. Displayed normally, there is no voltage problem. I would like it not to be displayed every second (as it has been so far) and every 10-15 seconds, but I would also like the clock to continue to work and display values every second just every second and not every 10-15 minutes. I tried different ways, such as separating the clock with the thermometer and using the delay () function for both separately, but in the end it ended displaying every 10-15 seconds of the whole. What can you do to make the clock work correctly while displaying the temperature at longer intervals?
3. Clock and its work. This is more my fad, light coloring of the design. I would like to do so that after turning on the whole system, the time began to flow immediately at the time of setting with the possibility of setting the clock. I saw such a patent somewhere on YouTube and I wonder how you can do something like that. If someone has an idea, a ready project for something like this and would like to share with a less experienced programmer, I will gladly accept help.
Here is all the program code in Arduino:
Code: text


