logo elektroda
logo elektroda
X
logo elektroda

Toilet Flush Mechanism Repair: Loose Part in Cistern & Trigger Pull Issue (Photos Included)

Rammzes 33495 5
ADVERTISEMENT
Treść została przetłumaczona polish » english Zobacz oryginalną wersję tematu
  • #1 13125519
    Rammzes
    Level 9  
    Hello,

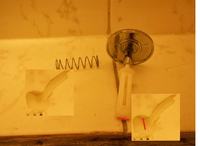
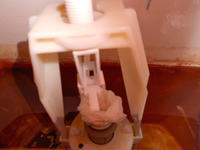
    when I flushed the toilet today I couldn't pull the trigger. After removing the cover, there was one element in the water (it is loose in the photo below). I have not had contact with this type of cistern and I cannot think of how this mechanism works ... Can anyone help and tell you where this part should be, or has any instructions on how this type of cistern works?

    Regards

    Toilet Flush Mechanism Repair: Loose Part in Cistern & Trigger Pull Issue (Photos Included)

    Toilet Flush Mechanism Repair: Loose Part in Cistern & Trigger Pull Issue (Photos Included)

    Toilet Flush Mechanism Repair: Loose Part in Cistern & Trigger Pull Issue (Photos Included)
  • ADVERTISEMENT
  • #2 13125546
    saskia
    Level 39  
    These photos are vague, but I think that the corrected parts should be adjacent to each other and the red marked lines (surfaces) should touch each other.

    Toilet Flush Mechanism Repair: Loose Part in Cistern & Trigger Pull Issue (Photos Included)
  • ADVERTISEMENT
  • #3 13125620
    robokop
    VIP Meritorious for electroda.pl
    You go to the nearest DIY store and buy the first better mechanism for PLN 20 and replace, or possibly the entire cistern for a hundred. If the understanding of how this mechanism works is too much for my colleague, then unfortunately.
  • ADVERTISEMENT
  • #4 13125753
    Rammzes
    Level 9  
    Unfortunately, these parts do not match the way you specified. I can connect them like this:

    Toilet Flush Mechanism Repair: Loose Part in Cistern & Trigger Pull Issue (Photos Included)

    But it shouldn't be like that, because if I put on the ceramic cover, I won't be able to connect these elements.


    Here I also have a photo of the mechanism from the back:


    Or maybe someone could take a photo at home and post?
  • ADVERTISEMENT
  • #5 13125790
    Volt-rom
    Level 14  
    The metal part must be unscrewed before attaching the ceramic cover, and then reattached after attaching it
  • #6 13125828
    saskia
    Level 39  
    Everything should be inserted before putting on the flush cover and only the silver disk-button is inserted (screwed in) after the cover and nut are put on.

    Unfasten the two hooks on which the mechanism is holding below the water level, fold the inner parts back and put them back on the hooks.
ADVERTISEMENT