logo elektroda
logo elektroda
X
logo elektroda

Junkers Cerapur Smart ZSB22-3c - faulty operation of the traversing valve?

Fidelis 6516 5
ADVERTISEMENT
Treść została przetłumaczona polish » english Zobacz oryginalną wersję tematu
  • #1 16367696
    Fidelis
    Level 16  
    Despite the end of the program every 30 minutes, the radiators were hot. I have the impression that this is a malfunction of the solenoid valve. I touch distribution copper pipes in the boiler at the valve, at the boiler outlet and at the same hot water tank, and I have the impression that the valve is strangely "blocked": some of the water is diverted to what some still goes to the hot water

    It's about the UCL63Z27 valve.

    Does anyone have any experience how to deal with this vulnerability? What exactly can the problem be? Is it dirty inside, does the coil malfunction? I see 4 screws.
    Please, give me some tips. The boiler operated without any problems for 5 years. I kept it myself after the season in accordance with the manufacturer's instructions.

    It seemed to me that 5 years ago the installer seemed to mention something, that this model can either hang up a solenoid or be damaged. I do not remember.
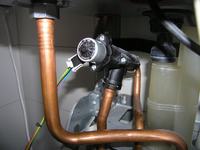
    Junkers Cerapur Smart ZSB22-3c - faulty operation of the traversing valve?
  • ADVERTISEMENT
  • #2 16368006
    serwisszulborski.pl
    Heating systems specialist
    Open one thermostatic valve at max. In the bathroom, for example, or install a by-pass valve to release the pressure preventing the 3D valve from moving properly. Temporarily switch off. It helps. All OK, only the distribution of pressures does not allow for proper clipping ... Of course, there may be other errors, eg mixed system, bad work of turnouts, etc.
  • ADVERTISEMENT
  • #3 16368068
    Fidelis
    Level 16  
    Does this reset cause pressure equalization? In a fit of "desperation" some time ago I just restarted the boiler and it is OK - the boiler started heating only hot water, that is according to the program. The tube at the exit of the 3D valve is literally cold, and ALWAYS it was ALWAYS warm when heating hot water. I thought it was normal that it was a matter of good copper conductivity. But probably not. It seems that the valve - as it seems to me - has always had trouble with proper stream management and did not close, but not as much as it happened today.

    I have 1-1.5 Bar on the boiler, i.e. as normal. However, I see that the pressure is measured on the tee under the pump. That is - as I understand it - it is the same in the entire installation (and what and hot water). Or so ? If so, where does the problem with "unloading" the pressure come from?

    On the occasion. Do you understand the thermostatic valves as a knob on the boiler? Both valves are set to max. But it seemed to me that running the weather controller disables the possibility of setting / changing parameters on the knobs of the boiler itself (central heating and hot utility water).
  • ADVERTISEMENT
  • #4 16369810
    serwisszulborski.pl
    Heating systems specialist
    The reason may be a check valve on the heating supply. or all radiators on thermostats closed. The defect of the 3D valve itself is rare and the exchange is ineffective. It helps to replace the plate (other control of the 3D valve) or changes in the hydraulics.
  • ADVERTISEMENT
  • #5 16370732
    Fidelis
    Level 16  
    In the whole installation, I have two check valves: behind the circulating pump and for supplying clean cold water to be completed in circulation. Some of the radiators are completely closed but the part is completely open, because I seem to be the intelligence of the weather regulator. The boiler also feeds without any obstacles and constrictions 150m2 floor heating. The installation has been operating for 5 years without any problem or modification. There are no "fancies".

    The constructional circumstances favoring the blocking of the 3D Junkers valve have been specified by several. No variant exists in my installation. It is mysterious that Junkers withdrew from this construction of the 3D valve and returned to the previous (probably based on the coil and not the stepper motor). I wonder why, if it worked well and the installation is guilty ...? ;-) I understand the small compressibility of water even at the length of these 2-3cm valve work, but maybe the valve is simply too weak or the orings are "blurred" for some reasons and in some solutions of installation structures. Certainly, I do not have certainty.

    I do not want to play the CD.
    After the season, I will release the pressure, unscrew the 4 screws and look inside. Do you have any photos or drawing / scheme of this valve? Did you dismantle this valve? Do you have to pay attention to something?

    And one more thing: do you know what the wires between the plate and the actuator are for? In the service diagram, I see only the expected correct impedance 170 Ohm between wires 1-2 (black-green), 2-3 (green - yellow), 4-5 (blue - orange) and 5-6 (orange - red). On the disc I can also see a gap of about 1mm between between 1 and 2 and the rest of the connectors. So I assume it's a 22VDC power supply. But I do not have certainty.
  • #6 21404050
    Fidelis
    Level 16  
    Given that I am still servicing the boiler myself, I will add to the topic.

    Well, the blocking of this valve in Junkers is somewhat standard.

    The motor shaft (actuator) in the ceramic seal of the 3D valve blocks. It blocks from impurities in the boiler water.

    For these reasons, expensive replacement of the valve with a new one is possible, but completely unnecessary and does not remove the source of the problem. That is, the situation when boiler water at 85 degrees C, starts to flow into the central heating circuit instead of the DHW tank shell.

    The valve (actuator shaft) should be cleaned regularly before/after the heating season and will last for many years.
    The valve does not have to be disassembled from the copper connections visible in the picture. It is sufficient to unscrew the actuator itself.

    1) unscrew the two screws in the background (the picture shows one right screw),
    2) pull out the actuator (the connection of the actuator to the valve armature can be further levered and "unbolted"),
    3) remove the other two screws, these are the ones with which the actuator/motor is fixed,
    4) after removing the actuator, in the first "window" in the body (on the actuator motor side) you can see a black plastic coupling connecting the plastic shaft of the actuator with a metal shaft. which, on the motor side, ends with a metal ball and, on the opposite side, with a rubber plug that plugs the appropriate holes in the valve (when switching circuits: central heating <-> hot water).
    You can see that the coupling is closed on one side and open on the other, so that the ball shaft can be removed (do not pull out along the axis or you will damage the coupling!). This opening allows further serviceable disassembly - disconnecting the metal shaft with the plug.
    5) Orient the motor by bending it (gently) so that the metal ball from the shaft "pops out" sideways from the plastic clutch. The ball "pops out" and no major force is needed to do so....
    6) Now we pull out the whole metal shaft ending in the plug,
    7) we clean the shaft and the inside of the ceramic seal in the body. Preserve the components (I use silicone spray lubricant, for example)
    8) Assemble in reverse order.

    And I think that's it.

    I, too, was due to replace the valve in 2017, but was instructed at the last minute before purchase that.... the new valve will also block from impurities and the cause of the blockage lies in contaminated boiler water from which sludge (manganese?) is deposited. And that is the charm of this valve.
    The cost of a new 3D valve is currently 500-800zł + the cost of replacement.

    Of course, before dismantling, remember to turn off the valves on the boiler stubs and/or drain the system so as not to flood the boiler room when the actuator/valve is removed.
    It is also good practice to cover the unscrewed and tilted boiler control plate with a piece of some sort of towel - as an extra precaution against flooding or accidental spraying of residual boiler water.

    Good luck to those who haven't let themselves get 'trumpeted'.
ADVERTISEMENT