logo elektroda
logo elektroda
X
logo elektroda

[Solved] Restoring Old Tenement House Floor: OSB Boards, Joists, and Leveling Tips for DIY Renovation

BelethBeny 27186 13
ADVERTISEMENT
Treść została przetłumaczona polish » english Zobacz oryginalną wersję tematu
  • #1 17198442
    BelethBeny
    Level 11  
    Hello

    If this forum is not, please delete this section immediately. ;-) I apologize for the problem.

    I would need to advise on the equation of "arranging" OSB floors, my mother has a flat with old boards on the floor, I don't want to play renovation, etc. because they are already too damaged. I was advised to fix the boards on them and in such a way make a "new" floor on which boards, tiles, etc. would eventually go.


    A question for you, do you make joists? Do you just screw these boards on old boards? (But then what about the level?) Any advice ?? All help will be welcomed, I want to somehow unburden my mother financially, I'm not a total moron when it comes to "repairs".
  • ADVERTISEMENT
  • #2 17198479
    helazbyś
    Level 16  
    I will step under the topic. In my apartment, the old floor creaks. How do I fix it? Will placing e.g. OSB on it silence it? Place the boards directly on the boards or give a sponge?
  • ADVERTISEMENT
  • Helpful post
    #3 17198512
    zimny8
    Level 33  
    BelethBeny wrote:
    I was advised to fix the boards on them and in such a way make a "new" floor on which boards, tiles, etc. would eventually go.

    If evenly, you can immediately put the panels on the sponge, apart from the OSB.
  • ADVERTISEMENT
  • #4 17198550
    rys57
    Moderator
    BelethBeny wrote:
    All help will be welcomed, I want to somehow unburden my mother financially, I'm not a total moron when it comes to "repairs"

    Technical support may not be but think about it. I saw the floor made of boards in an old tenement house, the boards were renovated in an amateur style. From the owner's account: the top layer was ground solidly, the cavities were filled with ready-made fillers adapted to the type of wood and the current color, for this varnish (at that time they were chemically cured). The result - something beautiful and unique.
  • #5 17198569
    keseszel
    Level 26  
    Boards better, but require more renovation work.
    It's easy - a sponge and a Swedish floor, a gap between the walls and skirting boards, you probably know.
    Check the level - you may have to cut the door.
  • #6 17198576
    Strumien swiadomosci swia
    Level 43  
    It depends on what level differences are on the boards.
  • #7 17198860
    saskia
    Level 39  
    helazbyś wrote:
    I will step under the topic. In my apartment, the old floor creaks. How do I fix it? Will placing e.g. OSB on it silence it? Place the boards directly on the boards or give a sponge?

    The boards themselves will not sound anything, squeaking is rubbing boards against each other and with nails that are loose.
    The basis for avoiding squeaking is to hammer nails at an angle of less than 60 °, or use screws.
  • #8 17198883
    BelethBeny
    Level 11  
    In general, I was in favor of leaving the old boards on top, unfortunately, but in places they are in a condition that is not suitable for it, I will finish them off to prevent creaking, which is not really the case.

    As of today, it will look like today I'm going to tear down one of the partition walls, there will be one large room 3.30m, I would align with OSB boards, I will put the wall again and hey with the rest.

    zimny8 wrote:
    If evenly, you can immediately put the panels on the sponge, apart from the OSB.
    - will nothing happen? The floor is gentle with places.


    Slabs are a cost, if you can avoid it, gladly .... if I am today after demolition, I will add a photo, it may somehow help, a tenement house from 1880.
  • Helpful post
    #9 17198899
    keseszel
    Level 26  
    A sponge alone may not be enough. You need to measure the level - board, string and waserwaga. Otherwise, you will get a curvature that will irritate in the future.
    I say this from personal experience. The small curvature I left at "the cost" later turned out to be a nightmare.
    Driving nails at an angle or screwdrivers - I would also consider.
    I write based on my own experience, you will do as you think.
    In general, I assume that such patches are more time consuming than putting something back on.
  • #10 17198925
    saskia
    Level 39  
    BelethBeny wrote:
    In general, I was in favor of leaving the old boards on top, unfortunately, but in places they are in a condition that is not suitable for it, I will finish them off to prevent creaking, which is not really the case.

    Today's look, it will look like today I'm going to tear down one of the partition walls, there will be one large room 3.30m, I would level the OSB boards, I will put the wall again and hey with the rest.

    zimny8 wrote:
    If evenly, you can immediately put the panels on the sponge, apart from the OSB.
    - will nothing happen? The floor is gentle with places.


    Slabs are a cost, if you can avoid it willingly .... if I am today after demolition I will add a photo, maybe it will help, tenement house in 1880.


    Old boards cleaned with a wire brush or other hard look nice, and the resulting grooves on the jars filled with varnish or resin to make it easier to wash or sweep.
  • ADVERTISEMENT
  • Helpful post
    #11 17199200
    zimny8
    Level 33  
    What does it mean that the floor works a bit? I understand that it is nailed on joists, so the boards only bend. Check the spacing between joists, you'll learn by the rows of nails.
    If it is more than 0.8m, it would have to be reinforced, if not the same position of the panels, although they seem thin, should be enough, because even such already distribute the weight.
  • #12 17199407
    BelethBeny
    Level 11  
    zimny8 wrote:
    What does it mean that the floor works a bit? I understand that it is nailed on joists, so the boards only bend. Check the spacing between joists, you'll learn by the rows of nails.
    If it is more than 0.8m, it would have to be reinforced, if not the same position of the panels, although they seem thin, should be enough, because even such already distribute the weight.


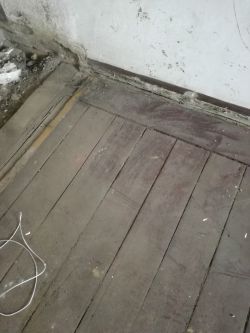
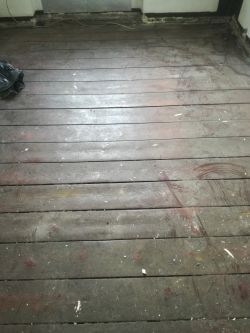
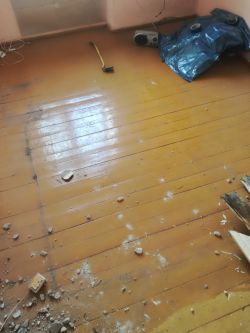
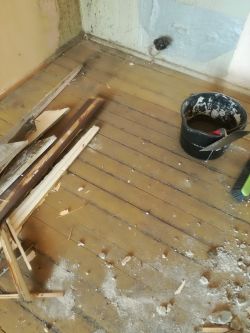
    In places it moves in places of nails driven in. Nailed on joists but nailed probably in 1880 and so to this day, the previous owner did nothing completely Restoring Old Tenement House Floor: OSB Boards, Joists, and Leveling Tips for DIY Renovation Restoring Old Tenement House Floor: OSB Boards, Joists, and Leveling Tips for DIY Renovation Restoring Old Tenement House Floor: OSB Boards, Joists, and Leveling Tips for DIY Renovation Restoring Old Tenement House Floor: OSB Boards, Joists, and Leveling Tips for DIY Renovation .

    that's how it looks today
  • #13 17199611
    DecoDominik
    Level 14  
    Hello.

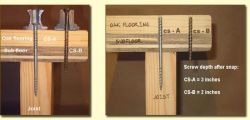
    There are special screws for refurbishing such a floor.

    Restoring Old Tenement House Floor: OSB Boards, Joists, and Leveling Tips for DIY Renovation


    Added after 6 [minutes]:

    A nice program.


  • #14 17204844
    BelethBeny
    Level 11  
    It stays with OSB, I unscrew the current floor in those most "movable" places, where it bends, I drill holes and fill them with low-pressure foam. At this soundproofing sponge, although I am still thinking about it and OSB boards screwed with long thick screws. You can keep your fingers crossed :-P

    Thank you for any advice ;-) !!!

Topic summary

The discussion revolves around restoring old tenement house floors using OSB (Oriented Strand Board) and addressing issues related to creaking and leveling. Users share experiences and advice on whether to place OSB directly over existing damaged boards or to use joists for better support. Recommendations include using screws instead of nails to minimize squeaking, ensuring proper leveling with tools like a string and level, and considering the condition of the existing boards before proceeding. Some participants suggest reinforcing the floor by filling gaps with low-pressure foam and using specialized screws for refurbishing. The importance of measuring joist spacing and addressing any significant level differences is emphasized to avoid future complications.
Summary generated by the language model.
ADVERTISEMENT