logo elektroda
logo elektroda
X
logo elektroda

[Solved] Repair Broken PCB Board Path: Fusing Damaged Path Possibility & Expert Advice Needed

asdros 16512 10
ADVERTISEMENT
Treść została przetłumaczona polish » english Zobacz oryginalną wersję tematu
  • #1 17204481
    asdros
    Level 10  
    I need the opinion of experienced colleagues as to the possibility of fusing the damaged path.
    I will have contact with the electronics only on Monday, but maybe advise if it makes sense at all.
    Repair Broken PCB Board Path: Fusing Damaged Path Possibility & Expert Advice Needed Repair Broken PCB Board Path: Fusing Damaged Path Possibility & Expert Advice Needed
  • ADVERTISEMENT
  • #2 17204498
    misiek1111
    Level 36  
    The path looks high, doesn't it?
    That would mean that the cause of the fault was elsewhere, and patching it up probably won't change anything.
    Electrolyte looks bulged?
  • Helpful post
    #3 17204512
    tomek_602
    Level 22  
    You can solder the wire in insulation between the points that this path connected. There are so small openings here that you would have to connect them with a kynar. The holes are covered with solder mask, so you need to clean them first as it may be too tight to drop solder into the hole instead.

    And in general, this path looks as if someone has already tried to patch it by tinning.
  • ADVERTISEMENT
  • #4 17204522
    asdros
    Level 10  
    There was a small patina bulge in the track which I decided to clean and solder. Unfortunately it was a mistake and the lack of skill caused this masquerade.

    tomek_602 that is, for an electronics professional who deals with it?
  • ADVERTISEMENT
  • #5 17204539
    tomek_602
    Level 22  
    Comprehensible for everyone who has already soldered something on a PCB.

    And your mistake was that you didn't have to tin-fill the whole track, just clean the track, lightly solder it and solder a piece of wire to it. You have to be careful not to overheat the paths, because it will detach from the laminate (just like yours).
    Finally, it is good to secure such patching with electrical insulating varnish.
  • #6 17204544
    Anonymous
    Level 1  
  • #7 17204556
    OldesMatuzalem
    Level 16  
    Hello,
    asdros wrote:
    I need the opinion of experienced colleagues as to the possibility of fusing the damaged path.
    I will have contact with the electronics only on Monday, but maybe advise if it makes sense at all.
    Repair Broken PCB Board Path: Fusing Damaged Path Possibility & Expert Advice Needed Repair Broken PCB Board Path: Fusing Damaged Path Possibility & Expert Advice Needed
    you can't see it in your photos, so I enlarged it:
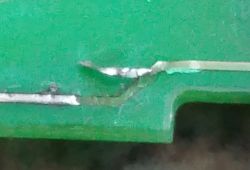
    Repair Broken PCB Board Path: Fusing Damaged Path Possibility & Expert Advice Needed
    this is just a very easy case to repair, but like you've never done it before, first practice on what PCB scrap.
    First, you need to use a gently warmed soldering iron tip - and, for example, with a medical needle (from a syringe) - to gently straighten the broken path and guide it to its proper place.
    Then - if it succeeds and the path does not tear elsewhere - you take some cyano-acrylic glue and put a small amount of it under the torn path.
    In order for the broken path to return to its place, you gently heat it with a soldering iron - it may have a lower temperature than for soldering - and use the mentioned needle.
    WARNING on the eyes and nose, hot cyano-acrylic adhesive gives off corrosive fumes :!:
    At the end, the path should be strengthened there, for this purpose you should look for a piece of copper wire and tinned - e.g. made of a line - with a diameter of about 0.1mm.
    You should put some liquid flux on the track (I can see that it is already tinned, but if there is still a Solder Mask on it, scrape it gently from the path, and then tin the path) and at an ol distance. 5mm from the break point, gently solder the wire in spots.
    Next, place the wire exactly above the track up to a distance of approx. 5mm on the other side of the gap and solder it to it.
    Solder quickly so that the solder does not melt along the entire length of the wire, otherwise the wire will "stick" to the tip of the soldering iron.
    I practically do it so that I hold the path with the above-mentioned needle (it does not touch the solder) in the place where it breaks, and solder on the sides, and finally - after removing the needle - I slightly correct the soldering in the middle.

    Good luck with the repair.

    Regards
  • #8 17204578
    tomek_602
    Level 22  
    OldesMatuzalem wrote:
    First, you need to use a gently heated soldering iron tip - and, for example, with a medical needle (from a syringe) - to gently straighten the broken path and guide it to its proper place ...

    But why so complicated?
    You propose an entire evening of an artistic church room for the conservation reconstruction of the path, and the electricity will not appreciate it anyway.
    All it takes is a piece of kynar from hole to hole.
  • #9 17204592
    OldesMatuzalem
    Level 16  
    tomek_602 wrote:
    OldesMatuzalem wrote:
    First, you need to use a gently heated soldering iron tip - and, for example, with a medical needle (from a syringe) - to gently straighten the broken path and guide it to its proper place ...

    But why so complicated?
    You propose an entire evening of an artistic church room for the conservation reconstruction of the path, and the electricity will not appreciate it anyway.
    All it takes is a piece of kynar from hole to hole.
    You write some rubbish you write out with this 'whole evening' ... :idea:
    And they say that "thinking has a future", but I do not see it here above.

    Such a repair - as you can see here - takes me less time than its description here, i.e. about two minutes.
    However, the proposed:
    tomek_602 wrote:
    a piece of kynar from hole to hole
    associated with removing the solder mask grommet from the eyelet, which will DEFINITELY take longer than the above suggested repair method.
  • ADVERTISEMENT
  • #10 17204610
    Seba319
    Level 24  
    There is no point in making your life difficult and creating some miracles with sticking! It is best to cut off the overheated part of the track completely so that it does not detach further. Later, as he wrote:
    Kraniec_Internetów wrote:
    Scratch off the solder mask (varnish) from the ends of the damaged fragment and solder a thin wire or a few there.

    It is best to take a thin conductor, carefully solder on one side, if the gap is small, then remove the shirt and solder the remaining wires to the other track. If the interruption is significant, it is best to leave the cable in a T-shirt. Scratch the solder mask carefully, then be sure to dip the tip in rosin / paste and try not to overheat the track. You have to definitely do it and not play with it for too long. The fault is very easy to repair, you only need a little practice.
  • #11 17213069
    asdros
    Level 10  
    I took it to a professional electronics engineer and the next day I had the circuit working. Thanks for showing interest.

Topic summary

The discussion revolves around the repair of a damaged PCB (Printed Circuit Board) path. The original poster seeks advice on the feasibility of fusing the damaged path. Responses suggest various methods for repair, including soldering a wire between connection points, cleaning the solder mask, and using cyano-acrylic glue to reposition the path. Some participants emphasize the importance of avoiding overheating the tracks to prevent further damage. Ultimately, the author reports that a professional electronics engineer successfully repaired the circuit, restoring functionality.
Summary generated by the language model.
ADVERTISEMENT