FAQ
TL;DR: To remove a bathroom radiator safely, cap the thermostatic valve and drain at the unions. Stat: antifreeze opens near 6°C; “the thermostatic valve will open” if it gets cold. Use a blind nut to prevent flooding. [Elektroda, roman 18, post #17762073]
Why it matters: This FAQ helps DIYers detach ladder radiators without leaks, avoid antifreeze-trigger floods, and choose clean pipe-closure options.
Quick Facts
- Thermostatic antifreeze opens around 6°C; cap the valve with a blind nut to avoid accidental flow. [Elektroda, roman 18, post #17762073]
- Basic removal: close the knobbed valve and lockshield (Allen key), then drain a few liters from bottom unions. [Elektroda, stanislaw1954, post #17761835]
- Alupex + eurokonus connectors: pry the clamping ring and pull the connector; cutting pipes can force wall work later. [Elektroda, DiGital_Butcher, post #17764664]
- Clean finish: disconnect at the manifold and cap outlets, or reuse connectors with 1/2-inch plugs or press caps (needs crimper). [Elektroda, DiGital_Butcher, post #17765072]
How do I remove a bathroom ladder radiator without flooding?
Close both valves first. Unscrew the lockshield’s hex cap, insert an Allen key, and close it gently. Place a tray under both bottom unions. Loosen unions to drain a few liters. Open the top vent to improve flow. When dripping stops, undo unions fully. Lift the radiator slightly and pull it from the wall. Expert tip: “Close both valves.” 1. Close supply and return. 2. Drain at unions, vent top. 3. Lift off brackets. [Elektroda, stanislaw1954, post #17761835]
What does the thermostatic valve’s antifreeze do, and why cap it?
Antifreeze opens the thermostatic valve around 6°C, allowing flow even when you think it’s off. That can flood an open circuit. Install a blind nut on the valve port after removal. That hardware block prevents accidental flow. Expert quote: “If the temperature in the room drops to about 6 degrees, the thermostatic valve will open.” Capping the port removes this failure path during cold snaps. [Elektroda, roman 18, post #17762073]
How do I close the return/lockshield valve with an Allen key?
Unscrew the lockshield’s hexagonal cover to reveal the internal hex. Insert the correct Allen key. Turn clockwise until it stops, then snug slightly. Do not force it. This seals the return side before you crack the unions. Finish by checking for drips while you start the controlled drain. [Elektroda, stanislaw1954, post #17761835]
My valve spins on the plastic pipe—what connector is this?
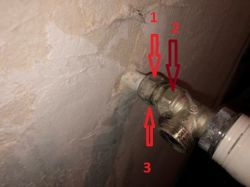
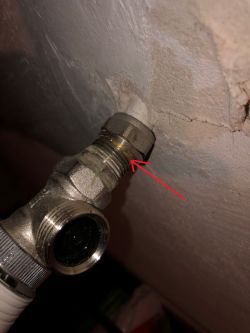
You likely have an Alupex pipe with a eurokonus connector. Pry off the clamping ring, then pull the connector from the pipe. Shift the connector sideways to release it. If you cut the pipes short now, you may need to break the wall to re-extend them later. [Elektroda, DiGital_Butcher, post #17764664]
Can I just cut the PEX/MLC pipes and plaster them over?
Better to isolate at the manifold. Identify the radiator circuit, unscrew it at the manifold, and cap those outlets. Then forge a small chase and cut pipes near flush. If the system uses tees, plug the line in the wall. You can reuse valve connectors with 1/2-inch plugs, or press caps if you have a crimper. [Elektroda, DiGital_Butcher, post #17765072]
I can’t drain the system—can I leave valves sticking out temporarily?
You can, but it is risky. With water still in the system, open unions will leak. Leaving valves protruding without a drain-down is “a bit dangerous.” If you must wait, keep both valves fully closed and capped. Schedule a system drain and proper capping soon. [Elektroda, ta_tar, post #17763795]
How do I plug the open valve ports after removing the radiator?
Install a blind nut on the thermostatic valve port after removal. This ensures the antifreeze function cannot feed water into the open circuit. Capping the port gives peace of mind during temperature drops and while the radiator stays off the wall. [Elektroda, roman 18, post #17762073]
I want the pipes flush with the wall—what are my options?
You can’t finish perfectly flush unless you open the wall. Cut a recess, set the plug deeper, and patch. The cleaner method is to isolate and cap at the distribution box (manifold). Then cut near the wall surface so nothing protrudes. [Elektroda, roman 18, post #17764748]
Which union should I undo first, and how do I hold things?
Hold the valve body with one wrench to counter-torque. Undo the union nut on the side you plan to plug. It’s better to loosen the union that lets you immediately install a cap or plug afterward. This controls drips and speeds cleanup. [Elektroda, ta_tar, post #17763829]
What tools and parts should I prepare beforehand?
Prepare an Allen key for the lockshield, two adjustable wrenches, a bucket or tray, rags, and a vent key. You’ll also want PTFE tape for re-sealing any unions you reseat. Set a towel under the radiator before you lift it off the brackets. [Elektroda, stanislaw1954, post #17761835]
I’m removing the radiator permanently—what’s the best closure method?
If you have a manifold, isolate the circuit there and cap those outlets. Forge a small chase and cut the wall pipes near flush. If your system uses tees, plug the line in the wall. You can reuse connectors with 1/2-inch plugs or use press caps with a crimper. [Elektroda, DiGital_Butcher, post #17765072]
Do I need a plumber, or can I DIY?
You can DIY the radiator removal if you can close valves and manage drainage. For manifold work, many call a pro. In this thread, the final solution was a plumber disconnecting the heater at the distribution box for a clean finish. [Elektroda, gregorsky123, post #17831547]


