DIY Kiosk - how to build your own electronics storage for components?
TL;DR
- Builds a DIY electronics storage kiosk: a wall-mounted bookcase for small components, tied to a PC catalogue and an ESP8266 shelf-lights controller.
- Uses numbered folders like 1_Electronics and 2_Chemistry in a React Vite + Electron Windows app, with ESP8266 and OLED to light the matching shelf location.
- The lighting hardware uses a WEMOS D1 mini, SSD1306 128x32 OLED, and a 200-pixel WS2812B strip driven from USB without external power.
- The software and firmware reached a final working version, with directory navigation, search, QR/code-scanner support, and colour-coded shelf highlighting.
- Early ESP8266 tests crashed when forcing actions from the web page, so refreshes were reduced to 30 Hz and blocking serial reads were replaced with a SerialBuffer.
Generated by the language model.
DIY Kiosk - or electronics magazine

During the construction phase...
Hello esteemed forumers.
The year 2025 is upon us and, as is customary, it is good to have some New Year's resolutions.
I decided that I would start the new year by putting my studio, and workshop, in order.
What was my surprise when I opened the book calendar for 2025, where the first entry was the New Year's resolution: "Clean up the studio".
So I opened the 2024 calendar and to my eyes appeared a similar entry.

I decided to act and cleaned up the workshop first.
However, on reaching the workshop, I realised that the main cause of the mess was the lack of organisation in the small electronics.
Over the last few years I have been buying bins and organisers, stuffing what I need in there and trying to find a place for it all.
There have been many ideas, but so far I haven't fully implemented any of them because there has always been an "BUT".

I thought that since 2025 brought us the development of AI, I would be able to find a solution to the problem using it.
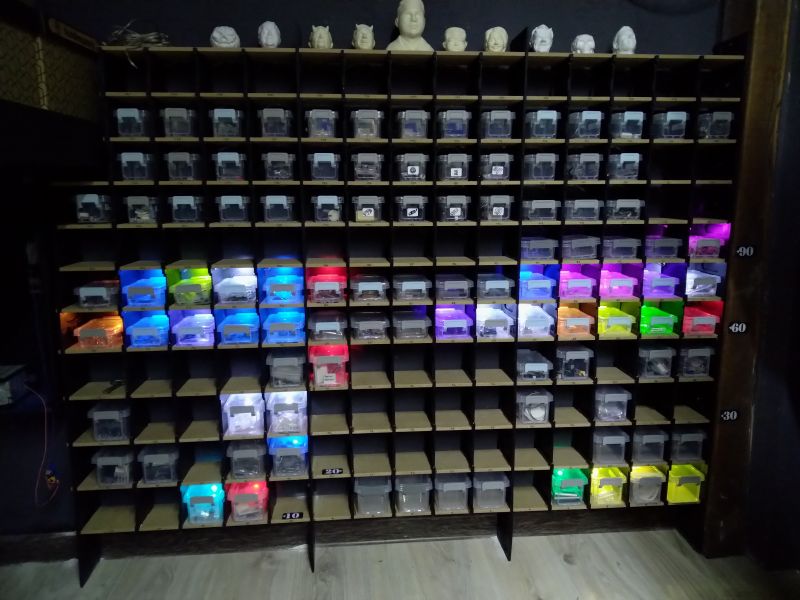
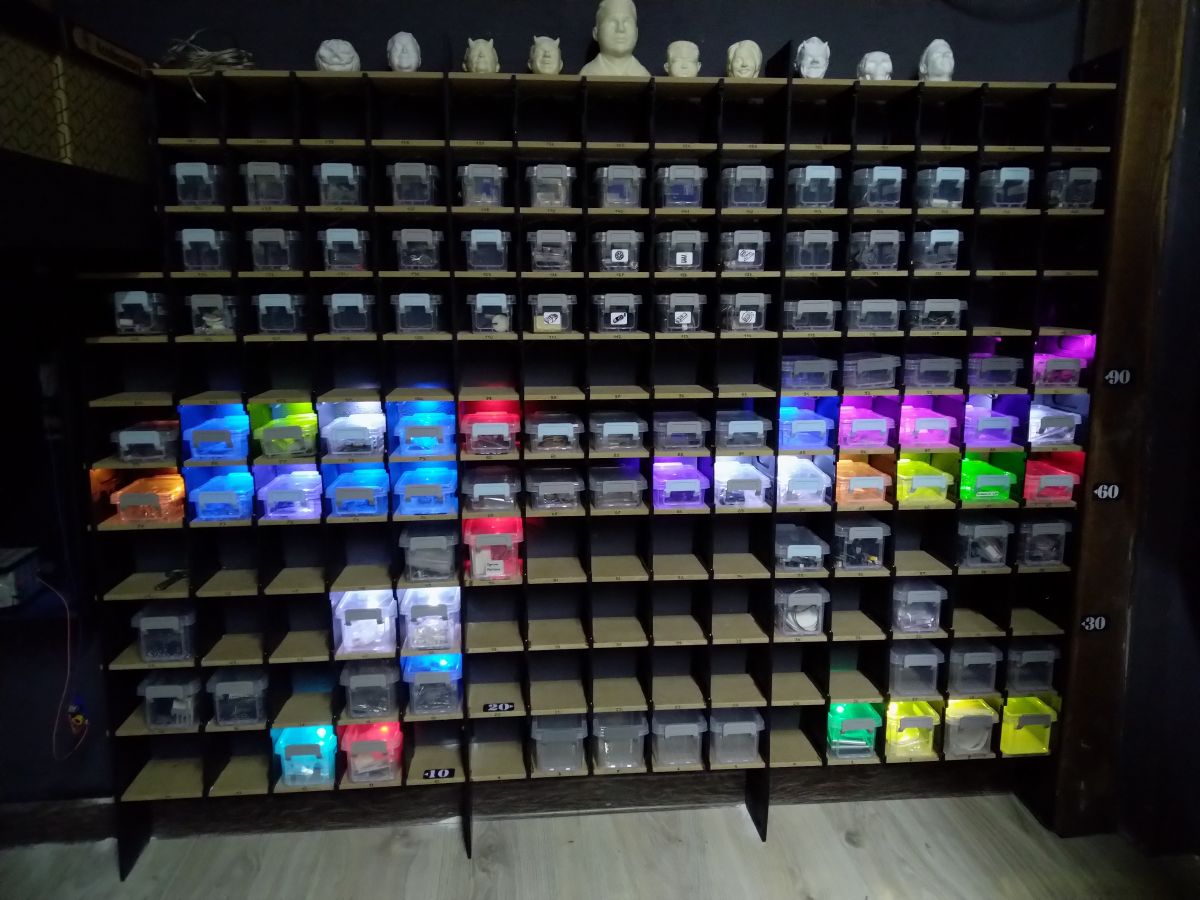
This is what happened. The best suggestion of many turned out to be to use a wall and build a shelving unit on top of it with small shelves for all the lockable containers in which I have most of the small things I often can't find.
However, further questions constantly arose as to how to group it all together and whether it couldn't somehow be linked to my database for electronic component parts I have on disk (File folders).
While browsing YouTube I came across an interesting project with a Raspberry PI and voice assistant combined with WS2812B LEDs.
I thought it wasn't worth copying someone else's ideas and it was worth catching up on two years' worth of work.
I set to work.
Project assumptions:
-Cheap to build
-Simple to use
Over the last few years I have weaned myself on microchip programming and 3D printing with React,which has proved to be a saviour.
So I decided to combine a PC-based catalogue database with lights on the shelf.
As a first step, I needed to catch up on my PC program development.
So I proceeded to create a program in the React Vite environment in combination with Electron for Windows directory support, and for a breath of fresh air use Tailwind.
Much of the syntax has unfortunately changed a lot, but with the help of AI I thought I'd get some training.
With two weeks of time over the Christmas period, I decided to split the project into three factions:
1. PC database (Executable .EXE file)
2. Program on ESP (I settled on ESP8266 version of Wemos D1 mini + OLED SSD1306 128x32 - I have some on hand)
3. Bookcase (Using 3D printing)
I started the design...
Both the studio (computer with 2 screens) and the workshop (computer with 2 touchscreens) had to get their storage environments. The difference being that in one system the electronics and in the other more mechanics and spare parts.
One PC runs on a 64 bit system, the other on an x86 system - it has to work on both.
At the outset, I set out to make the interface clear and fun to use, whether from a mouse, keyboard, touchscreen or code scanner (parsing required).
The layout had to be simple:
-Top bar (home location, back, path field access, search field, application MENU)
-Bottom bar (Location code display field, button to send code to ESP8266, QR code frame, "info" field, and exit)
-MENU (Database path indication field, port selection field for communication with ESP, option to change theme to dark)
-MAIN SCREEN (folders with prefix as tile, and files opened with default Windows applications {.pdf, .png...}


In order to keep everything consistent and not drifting apart, I have decided that the directories will be numbered with a prefix (1_Electronics, 2_Chemistry...).
In the program, however, we will show the name of the catalogue without the prefix, with the difference that the prefix will be used to navigate using the keyboard, or the attached code scanner on the boxes (in case you don't know where to put the code box)
Each directory with a prefix can contain other directories inside with a prefix as well (the so-called children of the parent directory)
An example of part of my directory structure:
As you can see, each successive directory is tabbed.
Generating such a structure is not at all complicated and can be done, for example, with a graphical program for Android (SimpleMind) and saved to a text file. The creation of all directories, on the other hand, is done by pasting the given structure into a created .ps1 executable file run from a terminal.
There is no great philosophy here, and after a few days of playing around and bug-fixing, the program was run in a version that finally satisfied me.

In the meantime, I have made a few dozen compilations for the ESP8266 with better or worse results.
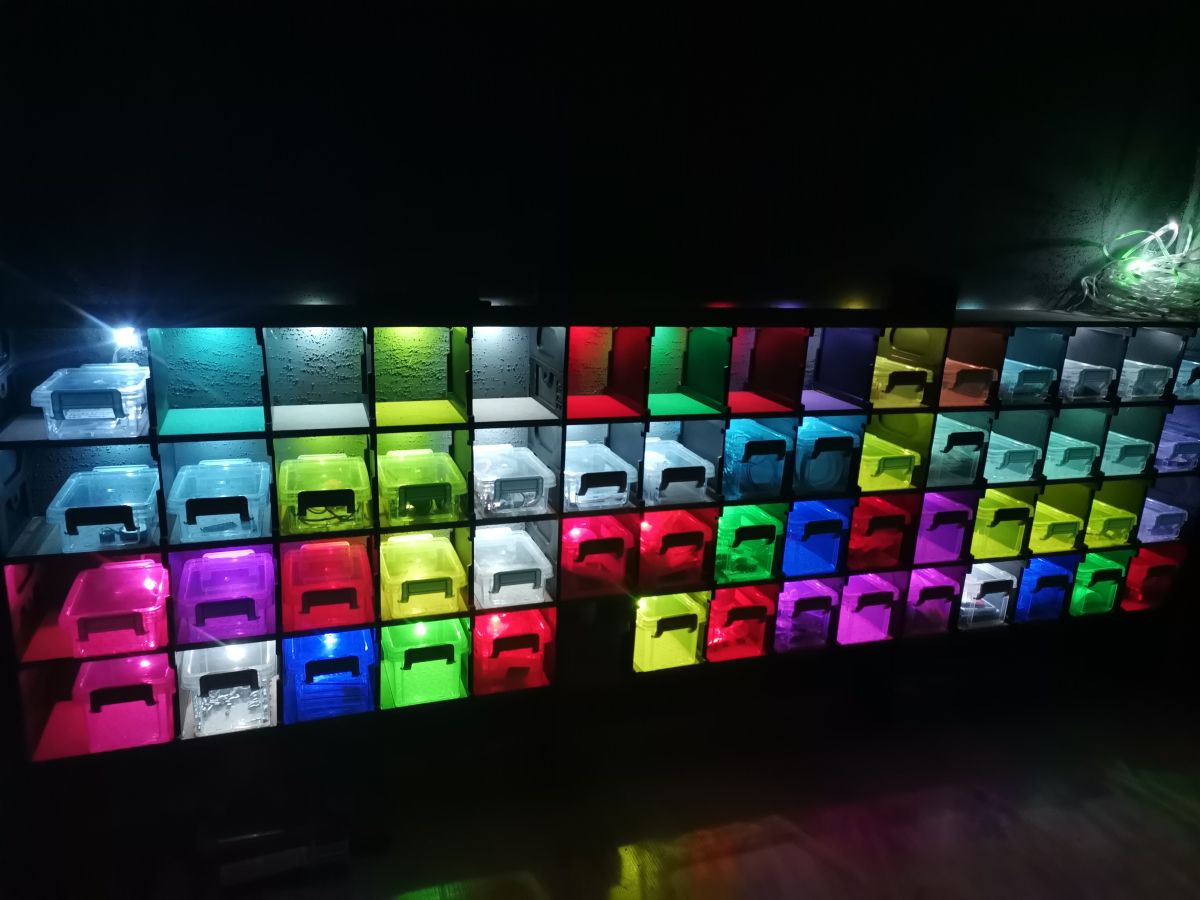
I was keen that, since the string of 200 WS2812B LEDs that served me last year as Christmas tree lights in the backyard under ESP8266 control and WLED batch on a 1 Ampere power supply, they should work on the computer's USB port alone, without external power.
This in turn means that we do not have to contend with operation over wifi, but operate the ESP via the serial port.
ESP configuration will be done via the WEB side of the device.
So I added Little FS, set the required memory parameters and....
Well it works, but during testing I found that when forcing the device from the WEB page, the device can crash (on the browser side - the rest was OK). I was a bit nostalgic for the ESP32, where I would simply separate the LED display animation and WEB and Serial page handling into two processes.
So I changed the OLED and WS2812B refresh to 30x per second and some other blocking options.
I removed the blocking Serial.readStringUntil() function and replaced it with a SerialBuffer, which collects characters in the background without stopping the CPU. Smart rendering and a few other small modifications were applied and so here we are on 4 January 2026 and the final version.
What remains are the shelves and assigning the appropriate colours, and animations.

In ESP, I used the option to display a location defined by a colour with the possibility to select one of the three available animations in the form of a following light to the target (from one end, the other, or both at the same time) - the METEOR Effect.
When we return in the application to the catalogue parent) illuminates all the items inside the catalogue in the defined colours, with the difference that we can define in the menu the effect of illuminating multiple fields simultaneously and specify the lighting time and power.
To make it easier to save the database, and to show e.g. LED RGB, I have also added a shimmering rainbow colour pixel assigned to absolute black in the colour palette (colour:000000)
The database is saved in a readable way, giving the possibility to be more ambitious, edit even from an EXCEL data sheet.
Example of database syntax:
{
"code": "12111",
"led": 1,
"r": 240,
"g": 0,
"b": 0,
"time": 5000,
"anim": 2,
"desc": "LED_THT_RED"
},
{
"code": "12112",
"led": 2,
"r": 0,
"g": 224,
"b": 15,
"time": 5000,
"anim": 2,
"desc": "LED_THT_GREEN"
},
There is no great philosophy here, and after a few days of playing around and bug-fixing, the program was run in a version that finally satisfied me.
In the meantime, I made a few dozen compilations for the ESP8266 with better or worse results.
I was keen that, since the string of 200 WS2812B LEDs that served me last year as Christmas tree lights in the backyard under ESP8266 control and a WLED batch on a 1 Ampere power supply, they should work on the computer's USB port alone, without external power.
This in turn means that we do not have to contend with operation over wifi, but operate the ESP via the serial port.
ESP configuration will be done via the WEB side of the device.
So I added Little FS, set the required memory parameters and....
Well it works, but during testing I found that when forcing the device from the WEB page, the device can crash (on the browser side - the rest was OK). I was a bit nostalgic for the ESP32, where I would simply separate the LED display animation and WEB and Serial page handling into two processes.
So I changed the OLED and WS2812B refresh to 30x per second and some other blocking options.
I removed the blocking Serial.readStringUntil() function and replaced it with a SerialBuffer, which collects characters in the background without stopping the CPU. Smart rendering and a few other small modifications were applied and so here we are on 4 January 2026 and the final version.
What remains are the shelves and assigning the appropriate colours, and animations.
In ESP, I used the option of displaying a location defined by a colour with a choice of one of three available animations in the form of a following light to the target (from one end, the other, or both at the same time) - the METEOR Effect.
When we return in the application to the parent catalogue, all the items inside the catalogue light up in the defined colours, with the difference that we can define in the menu the effect of lighting up many fields simultaneously and specify the lighting time and power.
To make it easier to save the database, and to show e.g. LED RGB, I have also added a shimmering rainbow colour pixel assigned to absolute black in the colour palette (colour:000000)
The database is saved in a readable way, giving the possibility to be more ambitious, edit even from an EXCEL data sheet.
Example of database syntax:
The shelf lighting controller itself is nothing more than a WEMOS D1 MINI + OLED + (WS2812B LED string 10cm raster - 200pix)
// Of course with a resistor depending on the length of the wire to the LED and a 1000uF capacitor.
I hope that the project will arouse interest.
With that, I wish you all the best for the new year 2026.


Programme operation on PC
WEB page operation on ESP8266
Google Drive downloads:
https://drive.google.com/drive/folders/1hnoxh2GpS30uNQiNsFQavRU_DW0FagfV?usp=sharing
During the construction phase...
Hello esteemed forumers.
The year 2025 is upon us and, as is customary, it is good to have some New Year's resolutions.
I decided that I would start the new year by putting my studio, and workshop, in order.
What was my surprise when I opened the book calendar for 2025, where the first entry was the New Year's resolution: "Clean up the studio".
So I opened the 2024 calendar and to my eyes appeared a similar entry.

I decided to act and cleaned up the workshop first.
However, on reaching the workshop, I realised that the main cause of the mess was the lack of organisation in the small electronics.
Over the last few years I have been buying bins and organisers, stuffing what I need in there and trying to find a place for it all.
There have been many ideas, but so far I haven't fully implemented any of them because there has always been an "BUT".

I thought that since 2025 brought us the development of AI, I would be able to find a solution to the problem using it.
This is what happened. The best suggestion of many turned out to be to use a wall and build a shelving unit on top of it with small shelves for all the lockable containers in which I have most of the small things I often can't find.
However, further questions constantly arose as to how to group it all together and whether it couldn't somehow be linked to my database for electronic component parts I have on disk (File folders).
While browsing YouTube I came across an interesting project with a Raspberry PI and voice assistant combined with WS2812B LEDs.
I thought it wasn't worth copying someone else's ideas and it was worth catching up on two years' worth of work.
I set to work.
Project assumptions:
-Cheap to build
-Simple to use
Over the last few years I have weaned myself on microchip programming and 3D printing with React,which has proved to be a saviour.
So I decided to combine a PC-based catalogue database with lights on the shelf.
As a first step, I needed to catch up on my PC program development.
So I proceeded to create a program in the React Vite environment in combination with Electron for Windows directory support, and for a breath of fresh air use Tailwind.
Much of the syntax has unfortunately changed a lot, but with the help of AI I thought I'd get some training.
With two weeks of time over the Christmas period, I decided to split the project into three factions:
1. PC database (Executable .EXE file)
2. Program on ESP (I settled on ESP8266 version of Wemos D1 mini + OLED SSD1306 128x32 - I have some on hand)
3. Bookcase (Using 3D printing)
I started the design...
Both the studio (computer with 2 screens) and the workshop (computer with 2 touchscreens) had to get their storage environments. The difference being that in one system the electronics and in the other more mechanics and spare parts.
One PC runs on a 64 bit system, the other on an x86 system - it has to work on both.
At the outset, I set out to make the interface clear and fun to use, whether from a mouse, keyboard, touchscreen or code scanner (parsing required).
The layout had to be simple:
-Top bar (home location, back, path field access, search field, application MENU)
-Bottom bar (Location code display field, button to send code to ESP8266, QR code frame, "info" field, and exit)
-MENU (Database path indication field, port selection field for communication with ESP, option to change theme to dark)
-MAIN SCREEN (folders with prefix as tile, and files opened with default Windows applications {.pdf, .png...}


In order to keep everything consistent and not drifting apart, I have decided that the directories will be numbered with a prefix (1_Electronics, 2_Chemistry...).
In the program, however, we will show the name of the catalogue without the prefix, with the difference that the prefix will be used to navigate using the keyboard, or the attached code scanner on the boxes (in case you don't know where to put the code box)
Each directory with a prefix can contain other directories inside with a prefix as well (the so-called children of the parent directory)
An example of part of my directory structure:
Code: C / C++
As you can see, each successive directory is tabbed.
Generating such a structure is not at all complicated and can be done, for example, with a graphical program for Android (SimpleMind) and saved to a text file. The creation of all directories, on the other hand, is done by pasting the given structure into a created .ps1 executable file run from a terminal.
Code: Powershell
There is no great philosophy here, and after a few days of playing around and bug-fixing, the program was run in a version that finally satisfied me.

In the meantime, I have made a few dozen compilations for the ESP8266 with better or worse results.
I was keen that, since the string of 200 WS2812B LEDs that served me last year as Christmas tree lights in the backyard under ESP8266 control and WLED batch on a 1 Ampere power supply, they should work on the computer's USB port alone, without external power.
This in turn means that we do not have to contend with operation over wifi, but operate the ESP via the serial port.
ESP configuration will be done via the WEB side of the device.
So I added Little FS, set the required memory parameters and....
Well it works, but during testing I found that when forcing the device from the WEB page, the device can crash (on the browser side - the rest was OK). I was a bit nostalgic for the ESP32, where I would simply separate the LED display animation and WEB and Serial page handling into two processes.
So I changed the OLED and WS2812B refresh to 30x per second and some other blocking options.
I removed the blocking Serial.readStringUntil() function and replaced it with a SerialBuffer, which collects characters in the background without stopping the CPU. Smart rendering and a few other small modifications were applied and so here we are on 4 January 2026 and the final version.
What remains are the shelves and assigning the appropriate colours, and animations.

In ESP, I used the option to display a location defined by a colour with the possibility to select one of the three available animations in the form of a following light to the target (from one end, the other, or both at the same time) - the METEOR Effect.
When we return in the application to the catalogue parent) illuminates all the items inside the catalogue in the defined colours, with the difference that we can define in the menu the effect of illuminating multiple fields simultaneously and specify the lighting time and power.
To make it easier to save the database, and to show e.g. LED RGB, I have also added a shimmering rainbow colour pixel assigned to absolute black in the colour palette (colour:000000)
The database is saved in a readable way, giving the possibility to be more ambitious, edit even from an EXCEL data sheet.
Example of database syntax:
{
"code": "12111",
"led": 1,
"r": 240,
"g": 0,
"b": 0,
"time": 5000,
"anim": 2,
"desc": "LED_THT_RED"
},
{
"code": "12112",
"led": 2,
"r": 0,
"g": 224,
"b": 15,
"time": 5000,
"anim": 2,
"desc": "LED_THT_GREEN"
},
There is no great philosophy here, and after a few days of playing around and bug-fixing, the program was run in a version that finally satisfied me.
In the meantime, I made a few dozen compilations for the ESP8266 with better or worse results.
I was keen that, since the string of 200 WS2812B LEDs that served me last year as Christmas tree lights in the backyard under ESP8266 control and a WLED batch on a 1 Ampere power supply, they should work on the computer's USB port alone, without external power.
This in turn means that we do not have to contend with operation over wifi, but operate the ESP via the serial port.
ESP configuration will be done via the WEB side of the device.
So I added Little FS, set the required memory parameters and....
Well it works, but during testing I found that when forcing the device from the WEB page, the device can crash (on the browser side - the rest was OK). I was a bit nostalgic for the ESP32, where I would simply separate the LED display animation and WEB and Serial page handling into two processes.
So I changed the OLED and WS2812B refresh to 30x per second and some other blocking options.
I removed the blocking Serial.readStringUntil() function and replaced it with a SerialBuffer, which collects characters in the background without stopping the CPU. Smart rendering and a few other small modifications were applied and so here we are on 4 January 2026 and the final version.
What remains are the shelves and assigning the appropriate colours, and animations.
In ESP, I used the option of displaying a location defined by a colour with a choice of one of three available animations in the form of a following light to the target (from one end, the other, or both at the same time) - the METEOR Effect.
When we return in the application to the parent catalogue, all the items inside the catalogue light up in the defined colours, with the difference that we can define in the menu the effect of lighting up many fields simultaneously and specify the lighting time and power.
To make it easier to save the database, and to show e.g. LED RGB, I have also added a shimmering rainbow colour pixel assigned to absolute black in the colour palette (colour:000000)
The database is saved in a readable way, giving the possibility to be more ambitious, edit even from an EXCEL data sheet.
Example of database syntax:
Code: C / C++
The shelf lighting controller itself is nothing more than a WEMOS D1 MINI + OLED + (WS2812B LED string 10cm raster - 200pix)
// Of course with a resistor depending on the length of the wire to the LED and a 1000uF capacitor.
I hope that the project will arouse interest.
With that, I wish you all the best for the new year 2026.


Programme operation on PC
WEB page operation on ESP8266
Google Drive downloads:
https://drive.google.com/drive/folders/1hnoxh2GpS30uNQiNsFQavRU_DW0FagfV?usp=sharing

dgproject wrote 183 posts with
rating 272 .
Live in city Brzeg.
Been with us since 2007 year.
Comments
Extra idea, illuminated boxes make finding components much easier. However, I would like to complain about the UI of the programme, which is modern but, in my opinion, overcomplicated - you have to... [Read more]
I made myself such an organiser based on some existing design some time ago and I highly praise it. In idle mode the Matrix effect. https://obrazki.elektroda.pl/9387268000_1767673433_thumb.jpg ... [Read more]
Sure, QR code parsing is implemented in the structure of the program and has the ability to not only guide you to a particular directory, highlighting the putaway box, but also refer to the documentation... [Read more]
Hello, a respectable and polished project, congratulations. I am already an old electronics technician and some 15 years ago I made a purge in the workshop, and what was left went to the computer database... [Read more]
Thank you for sharing the solution. Have you perhaps thought about using speech recognition? There is a free whisper model to run locally. The design is impressive, especially in terms of integrating... [Read more]
You're right, but it seems to me that electronics engineers just have it so easy when investing in more components they start piling everything up like hamsters 🤗 Added after 1 [hour] 3 [minutes]:... [Read more]
Very cool ideas/solutions Even earlier there was the idea of adding a code scanner or rfid readers? And there is actually a project for large volume/high storage warehouses? And full automation... [Read more]
Code parsing from the scanner is implemented in the PC program. Nothing prevents you from connecting an RFID tag reader with a fixed string and keyboard emulation to the USB port. The principle... [Read more]
I also wondered about the placement of the LEDs in the shelves and they eventually mount above the bins. I'll admit I've looked at your videos a few times and with this I've added another important feature,... [Read more]
Welcome. Now the repair time will go fast. Pole can do, idea Extra. Patent your idea, because Chinese people will pick up the idea. [Read more]
Well, I've made it easy for them, because I'm making the project available for free (link at the end of the first post) - I'll be developing the project systematically and making more versions available. I'm... [Read more]
Hi, idea and execution on 5+ :) Could one of my colleagues suggest/answer a solution to the following "problem": there is, let's say, an electronic circuit which consists of 200 parts, some of which... [Read more]
There are many ways to automate such a task, or at least make it easier. Two years ago I was making a couple of dozen MPPT controllers and for this I had to make a parts feeder in the form of a carousel... [Read more]
https://obrazki.elektroda.pl/3714899200_1768156128_bigthumb.jpg https://obrazki.elektroda.pl/2457209600_1768156283_bigthumb.jpg While I am still struggling with the PC kiosk and another... [Read more]
I abandoned the subject of ready-made kits about two years ago precisely because they were too time-consuming to assemble by hand. I could not find a reasonably priced solution that would at least make... [Read more]
I don't understand the idea of this project at all, apart from the wow effect and the educational effect for the creator, of course. If an electronics engineer came to my recruitment and said he had done... [Read more]
I used to be an electronics engineer...about 35 years ago, but back then I used mostly glued matchboxes, which had a lot left over. Currently, when I can't find something (some drill bits etc) I also buy... [Read more]
The idea is to make a program to manage different types of warehouses (from simple shelves to complex warehouse robotisation). At work, I use a Kardex Remstar type warehouse, which makes it very easy to... [Read more]
I forgot to add that for a while I had the opportunity to see a Cartesian robot (I think that's the correct name for it) in one warehouse. A great solution. The operator would enter the order and the... [Read more]