A seemingly prosaic matter, however, for many it seems complicated.
On the example of my laptop, I will show you how to safely disassemble your laptop, I will talk about what is what, how to take it out and put it in.
I will explain what is where, how to clean the cooling system when the laptop starts to overheat.
At the outset, you must remember each manufacturer has its own case design. Almost every model can have a different housing. I point out important details and guide you, but remember that you may be a bit different. This is especially true for the opening of the housing.
The patient is Packard Bell EasyNote MH35-U-073NL.
Intel Dual Core T2370 1.73GHz 1MB cache FSB 533MHz, SiS 672 chip, with integrated Mirage3 + graphics chip, 3GB DDR2 667MHz CL5 in 1 + 2GB MicronTech modules, Seagate Momentus 160GB SATA 5400RPM disk, DVDRW Matshita (Panasonic), 15.4 matrix "Diamond view, 104 keys keyboard, 4800mAh battery.
We open the housing.
I present the back of my laptop.
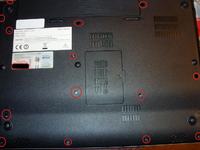
I marked in red circles where the screws are in my equipment. It is not a great effort to find them at home. Please note that e.g. 1 or more may be hidden, e.g. under a sticker or sealed. If the housing is stubbornly sticky somewhere, try to feel with your fingers if there is a dimple under the sticker, suggesting that there may be a screw.
Take out the battery.
You can also find screws under the battery:
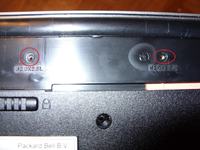
For me, there were two and in addition, the housing under the battery was latched.
The next stage is the screws holding the matrix hinges:
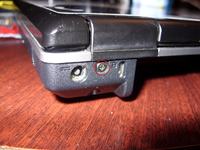
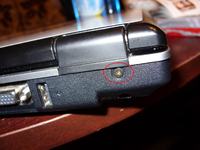
These are all the screws that held the housing in my case. As I suggested earlier, each model is different and may have more or less screws.
If you unscrewed all of them, you can slowly try to open the case. You don't need heavy equipment for this.
Gently pry the edges with your fingers. Note that you have to bend the casing slightly because it is held by sockets, e.g. USB or Audio.
If the housing gives way - patiently with that in your model there may be, for example, latches holding the whole thing in addition - do not tear it.
It is probably pinned to the motherboard with wires:
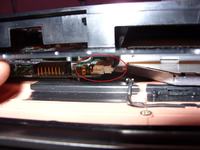
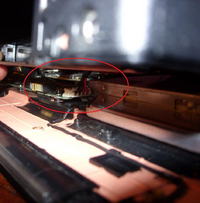
For me, there is only this one - from the charger socket. There may be more with you! So be careful and do not force it.
If you do everything carefully, you should have the cover removed after a while.
You will see the motherboard:
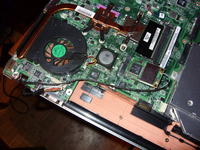
If you need to detach the matrix, pay attention to where it is connected to the motherboard.
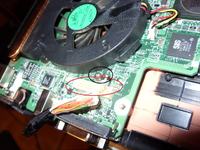
As I indicated in the photo, the cube is connected in red, while the black one is the screw with the ground wire.
If you have a need for e.g. matrix repair or it is necessary for free access to equipment, disconnect it.
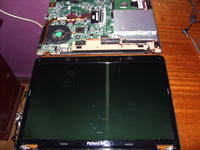
The matrix is detached. Depending on the housing structure, the die screws are also the housing screws or the die is screwed separately to the housing. As I mentioned earlier, it all depends on the model.
For me, unscrewing the bottom of the housing and the indicated hinge screws was all that was needed. After disconnecting the wires from the board, the matrix was free .
.
Since we are already disassembling the matrix, I indicate the hinges to those in need:
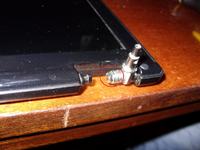
It happens that the hinges do not hold well and the die becomes loose and falls. Depending on the type and structure of the hinges, they can be tightened and thus strengthened. In my case, I marked the nut, you can, for example, be a screw responsible for it.
If there is a need to disassemble the matrix into parts, it is usually screwed together. They are hidden under rubber masking rings. Looking at the photos, you will notice them, for example, 4 can be seen in the photo of the entire matrix, one in the photo showing the hinges.
Cleaning the cooling
Laptop taken apart. Traditionally, like every computer and laptop, it is equipped with cooling. The photo of the motherboard shows a copper tube collecting heat from the chipset and processor and discharging it to the heat sink, cooled with a turbine, and the whole designed so that the hot air is directed outside the housing.
With these activities, the specificity of a given model once again comes to the fore. You may have a diametrically different cooling system.
How to disassemble it? For me it is fastening with screws. 2 screws hold the chipset cooler, the 3rd CPU cooler. We unscrew them all and thus the radiator with the heat-pipe is free. In my model, the turbine has been left in place - it is mounted separately. In yours, it can be connected to the heat sink and you will also need to unscrew the turbine to dismantle the whole thing.
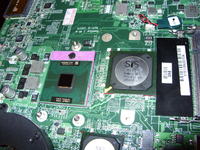
I will not describe how to clean the heat sink or fan. There are studies on this subject in the FAQ read.
Assembling components and modernizing a laptop.
Many components of the laptop are replaceable.
What it fits with depends on the model and the motherboard used. Therefore, if you decide to replace something, first read the manufacturer's website or ask Google if it will fit your model.
Processor.
Removing it is similar to a traditional computer. Unlocking the socket is done not like in the motherboard by the lever, but by turning the plastic lock.
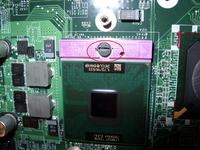
If you want to change the processor to a faster one, first read whether your laptop will support it. Also note that it must be on the same socket as your current processor.
RAM.
This is how the DDR2 SODIMM ram sockets look like:
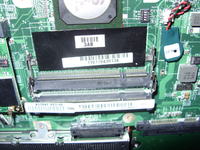
and DDR2 SODIMM memory.
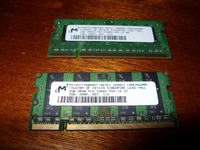
If you want to increase the amount of your memory and you have a free slot, it is best to add a module with the same frequency as your one. As for the module size, you need to check what your motherboard supports.
The modules are easy to assemble. You insert the module diagonally as shown in the photo and pay attention to the cutout in the module and in the socket.
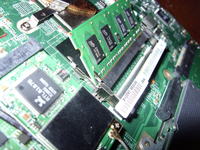
By gently pressing the module to the slot, you press it down and lay it flat, thus it will lock into the slot.
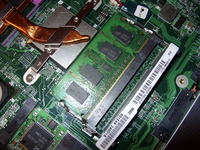
Metal catches on the sides of the module closed and blocked it. By tilting them to the sides you will push off the memory and you can take it out.
The case is the same with the second module.
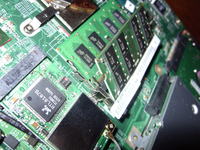
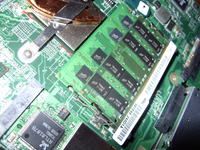
In newer models, manufacturers often adapt the housing to expand the memory, facilitating access to the sockets through the flap in the housing.
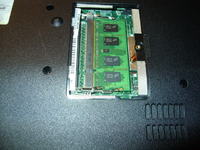
The memory mounting process is identical. If you have a flap, you don't have to take the entire laptop apart to add some memory.
WiFi card.
Depending on your model, it has (if any ) wifi card in miniPCI or miniPCIe slot. I have a miniPCIe:
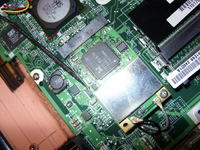
Its assembly is similar to the assembly of the ram memory. You insert it at an angle, press it flat and secure it with a screw. In my case, you can see a screw in the fixing screw, and next to it a hole for the second screw, which is also the housing screw.
You can also see two black and white wires. They are the wires of the wifi antenna.
Hard drive.
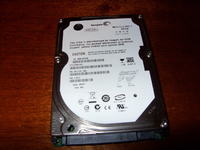
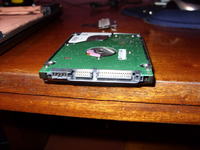
The photos show a drive with a SATA interface. The disk is mounted in the laptop without the use of cables, i.e. the sata sockets are connected directly to the board. Replacing the disk is hassle-free.
Mine is fastened with a flat plate and two screws. By unscrewing them, the mount is removed and the disk is ejected. The same is the case with the IDE disk. It also happens that the manufacturer used its own disk-to-plate connection. In this case, the disk is connected with its sockets to a special frame, and the whole frame with the disk is connected to the motherboard.
The disk that I see can be connected to a home PC with a SATA interface in a traditional way. The 2.5 "IDE disk to the PC is connected using an appropriate adapter.
Optical drive.
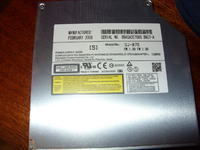
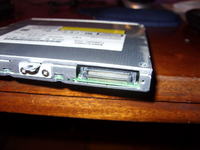
For the CD / DVD / RW drive, the procedure is very similar to the replacement or disassembly of the disk, so I will not be divorced.
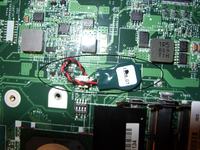
I should also mention the BIOS backup battery.
Assembling the laptop
When assembling the equipment, you proceed in the reverse order than when opening it.
Remember to connect the matrix wires, if you disconnected them, additional wires that make it difficult to open the housing, as I indicated for me, for example, the charging socket.
Be careful when closing the case. It can be based on the pins of external USB, Audio and external monitor sockets.
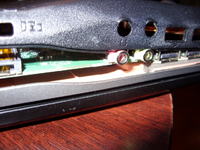
Nothing by force. If something does not fit, gently try to "stretch" the casing, or if it is much more difficult on one side, start installing the casing diagonally from this side.
If you fit everything nicely, the housing fits tightly, you can twist it again. Remember about the screws, e.g. under the battery.
If your model uses several sizes of screws, remember where they were larger and smaller.
If you put everything together, check if the equipment works.

As you can see mine is alive and well.
If you have screws left, something is not attached inside.
The whole process is not complicated. All you need is patience and precision. Common sense goes hand in hand with good organization of work (screws securely in the container so as not to get lost, etc.) and everything will be successful .
.
On the example of my laptop, I will show you how to safely disassemble your laptop, I will talk about what is what, how to take it out and put it in.
I will explain what is where, how to clean the cooling system when the laptop starts to overheat.
At the outset, you must remember each manufacturer has its own case design. Almost every model can have a different housing. I point out important details and guide you, but remember that you may be a bit different. This is especially true for the opening of the housing.
The patient is Packard Bell EasyNote MH35-U-073NL.
Intel Dual Core T2370 1.73GHz 1MB cache FSB 533MHz, SiS 672 chip, with integrated Mirage3 + graphics chip, 3GB DDR2 667MHz CL5 in 1 + 2GB MicronTech modules, Seagate Momentus 160GB SATA 5400RPM disk, DVDRW Matshita (Panasonic), 15.4 matrix "Diamond view, 104 keys keyboard, 4800mAh battery.
We open the housing.
I present the back of my laptop.

I marked in red circles where the screws are in my equipment. It is not a great effort to find them at home. Please note that e.g. 1 or more may be hidden, e.g. under a sticker or sealed. If the housing is stubbornly sticky somewhere, try to feel with your fingers if there is a dimple under the sticker, suggesting that there may be a screw.
Take out the battery.
You can also find screws under the battery:

For me, there were two and in addition, the housing under the battery was latched.
The next stage is the screws holding the matrix hinges:


These are all the screws that held the housing in my case. As I suggested earlier, each model is different and may have more or less screws.
If you unscrewed all of them, you can slowly try to open the case. You don't need heavy equipment for this.
Gently pry the edges with your fingers. Note that you have to bend the casing slightly because it is held by sockets, e.g. USB or Audio.
If the housing gives way - patiently with that in your model there may be, for example, latches holding the whole thing in addition - do not tear it.
It is probably pinned to the motherboard with wires:


For me, there is only this one - from the charger socket. There may be more with you! So be careful and do not force it.
If you do everything carefully, you should have the cover removed after a while.
You will see the motherboard:

If you need to detach the matrix, pay attention to where it is connected to the motherboard.

As I indicated in the photo, the cube is connected in red, while the black one is the screw with the ground wire.
If you have a need for e.g. matrix repair or it is necessary for free access to equipment, disconnect it.

The matrix is detached. Depending on the housing structure, the die screws are also the housing screws or the die is screwed separately to the housing. As I mentioned earlier, it all depends on the model.
For me, unscrewing the bottom of the housing and the indicated hinge screws was all that was needed. After disconnecting the wires from the board, the matrix was free
Since we are already disassembling the matrix, I indicate the hinges to those in need:

It happens that the hinges do not hold well and the die becomes loose and falls. Depending on the type and structure of the hinges, they can be tightened and thus strengthened. In my case, I marked the nut, you can, for example, be a screw responsible for it.
If there is a need to disassemble the matrix into parts, it is usually screwed together. They are hidden under rubber masking rings. Looking at the photos, you will notice them, for example, 4 can be seen in the photo of the entire matrix, one in the photo showing the hinges.
Cleaning the cooling
Laptop taken apart. Traditionally, like every computer and laptop, it is equipped with cooling. The photo of the motherboard shows a copper tube collecting heat from the chipset and processor and discharging it to the heat sink, cooled with a turbine, and the whole designed so that the hot air is directed outside the housing.
With these activities, the specificity of a given model once again comes to the fore. You may have a diametrically different cooling system.
How to disassemble it? For me it is fastening with screws. 2 screws hold the chipset cooler, the 3rd CPU cooler. We unscrew them all and thus the radiator with the heat-pipe is free. In my model, the turbine has been left in place - it is mounted separately. In yours, it can be connected to the heat sink and you will also need to unscrew the turbine to dismantle the whole thing.

I will not describe how to clean the heat sink or fan. There are studies on this subject in the FAQ read.
Assembling components and modernizing a laptop.
Many components of the laptop are replaceable.
What it fits with depends on the model and the motherboard used. Therefore, if you decide to replace something, first read the manufacturer's website or ask Google if it will fit your model.
Processor.
Removing it is similar to a traditional computer. Unlocking the socket is done not like in the motherboard by the lever, but by turning the plastic lock.

If you want to change the processor to a faster one, first read whether your laptop will support it. Also note that it must be on the same socket as your current processor.
RAM.
This is how the DDR2 SODIMM ram sockets look like:

and DDR2 SODIMM memory.

If you want to increase the amount of your memory and you have a free slot, it is best to add a module with the same frequency as your one. As for the module size, you need to check what your motherboard supports.
The modules are easy to assemble. You insert the module diagonally as shown in the photo and pay attention to the cutout in the module and in the socket.

By gently pressing the module to the slot, you press it down and lay it flat, thus it will lock into the slot.

Metal catches on the sides of the module closed and blocked it. By tilting them to the sides you will push off the memory and you can take it out.
The case is the same with the second module.


In newer models, manufacturers often adapt the housing to expand the memory, facilitating access to the sockets through the flap in the housing.

The memory mounting process is identical. If you have a flap, you don't have to take the entire laptop apart to add some memory.
WiFi card.
Depending on your model, it has (if any

Its assembly is similar to the assembly of the ram memory. You insert it at an angle, press it flat and secure it with a screw. In my case, you can see a screw in the fixing screw, and next to it a hole for the second screw, which is also the housing screw.
You can also see two black and white wires. They are the wires of the wifi antenna.
Hard drive.


The photos show a drive with a SATA interface. The disk is mounted in the laptop without the use of cables, i.e. the sata sockets are connected directly to the board. Replacing the disk is hassle-free.
Mine is fastened with a flat plate and two screws. By unscrewing them, the mount is removed and the disk is ejected. The same is the case with the IDE disk. It also happens that the manufacturer used its own disk-to-plate connection. In this case, the disk is connected with its sockets to a special frame, and the whole frame with the disk is connected to the motherboard.
The disk that I see can be connected to a home PC with a SATA interface in a traditional way. The 2.5 "IDE disk to the PC is connected using an appropriate adapter.
Optical drive.


For the CD / DVD / RW drive, the procedure is very similar to the replacement or disassembly of the disk, so I will not be divorced.
I should also mention the BIOS backup battery.

Assembling the laptop
When assembling the equipment, you proceed in the reverse order than when opening it.
Remember to connect the matrix wires, if you disconnected them, additional wires that make it difficult to open the housing, as I indicated for me, for example, the charging socket.
Be careful when closing the case. It can be based on the pins of external USB, Audio and external monitor sockets.

Nothing by force. If something does not fit, gently try to "stretch" the casing, or if it is much more difficult on one side, start installing the casing diagonally from this side.
If you fit everything nicely, the housing fits tightly, you can twist it again. Remember about the screws, e.g. under the battery.
If your model uses several sizes of screws, remember where they were larger and smaller.
If you put everything together, check if the equipment works.

As you can see mine is alive and well.
If you have screws left, something is not attached inside.
The whole process is not complicated. All you need is patience and precision. Common sense goes hand in hand with good organization of work (screws securely in the container so as not to get lost, etc.) and everything will be successful


