Old Vaillant stoves do not always have to be replaced with new ones, sometimes a simple cleaning is enough and they are still operational. In my VUW 182 (242, 282) oven, there was a problem with the flashing diode - hourglass, i.e. the message: no water.
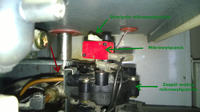
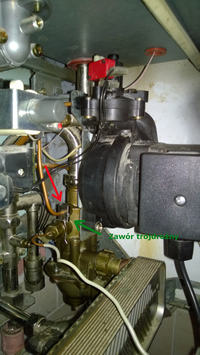
The stove, after turning off the central heating heating by a wall switch or manually, did not turn on again - neither for central heating nor domestic hot water. The problem was the microswitch, whose copper tube with an internal diameter of about 2 mm clogged with time at both ends, at the entrance to the water assembly of the microswitch and at the entrance to the 3-way valve - both places marked with a red arrow. When the pump is standing, the white microswitch lever should be down and against the red microswitch housing, when the pump turns on, the differential pressure raises the lever about 5mm. A clogged tube means that the lever either does not raise or lower properly when needed and the microswitch sends a signal that something is wrong with the pump and the electronics is blocking the stove.
Cleaning the copper tube itself is easy, because after removing the pins, you can pull it out by hand. However, the holes that the tube enters, i.e. the body of the water micro switch assembly and the body of the 3-way valve at the other end of the tube, may also be blocked. Then it is necessary to disassemble both elements and clean their interior. This can be done as follows.
remove the electric power plug from the socket.
we turn off the gas valve
we turn off the valve on the return flow
we turn off both service valves on the central heating input / output
we turn off the supply of cold water to the stove
we drain the water from the stove
remove the pins of the copper tube on the microswitch and the 3d valve
we take out the tube, clean it
we take out the microswitch, unscrew 3 screws, clean
we disassemble the pump (3 bolts)
remove the bearing plate for the pump connection
remove the cotter pin from the 3d valve and pull the pressure indicator wire out by hand
unscrew the fastening of the central heating return on the valve 3 d
unscrew the 3 screws securing the 3d valve to the water assembly and clean it.
When assembling the 3d valve back, I recommend that you especially check the matching of the 3d valve needle with the lever of the DHW microswitch below the valve, on the water unit (not to be confused with the pump microswitch, described above). After refilling water, the stove should run for many more years.


