logo elektroda
logo elektroda
X
logo elektroda

[Solved] De Longhi EAM 3100 S Machine: Coffee Grinder Failure - Causes and Fixes?

marius_01 45210 20
ADVERTISEMENT
Treść została przetłumaczona polish » english Zobacz oryginalną wersję tematu
  • #1 12104950
    marius_01
    Level 9  
    Hello and welcome.
    This is the first time I am using the courtesy of this Forum. I looked at some threads about DeLonghi Machines and had a very positive impression about the quality of the hints and tips presented here.
    I would like to ask for advice on a possible failure of the grinder in the De Longhi EAM 3100 SB machine.
    Situation description:
    As the coffee grinded, the grinder changed its normal noise to a whistling whistle while stopping the grinding. The coffee, however, was still strewn in the container intended for it.
    When I tried again, unfortunately the grinder was whistling and not a single grain was ground.
    The coffee machine has stopped working and indicator light 15 (sediment container) has started blinking.
    Coffee used: Moevenpick, 100% Arabica, Switzerland.
    Coffeemaker purchased in December 2009. Previous work - failure-free

    The machine works properly with the pre-ground coffee brewing option.

    I would like to clean the grinder / burr, however, I would need a hint on how to go about it. How to unscrew the grinder and then reinstall it. And whether it makes sense to do it with this type of symptom.

    I will be extremely grateful for the technical support in this regard.
  • ADVERTISEMENT
  • Helpful post
    #2 12105525
    Harley883
    Level 14  
    The ground coffee is too finely ground, it could get clogged up behind the burrs, there are some small paddles that push the coffee out of the grinder. If you clean after undressing, be careful not to break them. Try to turn the grinder knob clockwise, as the clock hands go. Then the grinder can grind thicker by itself. The grinder adjusts only when it is turned on and is running. this will help get you started
    cover, there is a good access to the grinder no philosophy, just mark how you will unplug the 2 wires from the grinder, where it is connected.
  • ADVERTISEMENT
  • Helpful post
    #3 12107226
    sid31
    Level 11  
    You unscrew the back, then remove the sides, slide them gently towards the back and fold them upwards. The grinder is under the charging hole. If cleaning does not help, the grinder is here http://divina-sklep.pl/index.php?podkat=134&site_no=9
    However, it looks muddy.
  • ADVERTISEMENT
  • #4 12109378
    marius_01
    Level 9  
    Harley883, sid31 - thank you for the hints. I will fight according to your indications and let me know.
  • #5 12114025
    marius_01
    Level 9  
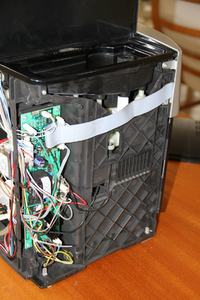
    After removing the cover, the grinder appeared. It is located as if inside the 'main structure'. How to get to him? From the top, or to unscrew the side 'grid' plastic plate? Or maybe from the forehead?
    De Longhi EAM 3100 S Machine: Coffee Grinder Failure - Causes and Fixes?

    I am asking for further support :)
  • #6 12114277
    Harley883
    Level 14  
    From the top, first you need to pry up and remove this plastic plug in the grinder adjustment knob because there is also a screw to unscrew and the rest as you see these screws
    wring it out. when you remove this coffee container, you will get to the rest of the screws. Remember how the grinder knob is positioned, and then how many teeth are
    set gears because it will be important during final folding.
  • #7 12114447
    marius_01
    Level 9  
    Understands that you need to remove the entire top cover with the ground coffee chutes, coffee beans and the heating panel. Only then will I be able to pull out the unscrewed hopper for coffee beans and further pull out / unscrew the grinder itself?

    Added after 41 [minutes]:

    ok Thanks for the hints.
    The grinder has been pulled out.
    The main point of the program, entitled 'Disassembling and cleaning the grinder' is approaching
    The plastic casing of the grinder is screwed to the metal plate, with the motor attached to the bottom. Do you unscrew these screws, or rather the nuts that are somehow in the axis of the burrs themselves?
  • Helpful post
    #8 12114753
    Harley883
    Level 14  
    From the bottom, do not unscrew anything, you have such a mushroom with two screws unscrewed.
    to the very end. There are two latches on the white plastic that covers the burr
    on both sides, then when you put this large rack to the end, there are two notches and this is where you just pull the burr up.
  • #9 12114961
    marius_01
    Level 9  
    okay
    I did just that. Now.
    Because a moment ago I started unscrewing the bottom part, luckily I just started and screwed it back on.
    Can this interior be sucked out with a vacuum cleaner (I have already pulled out the metal hemisphere of the burr)?
    Rather do not fumble for anything from the bottom?

    Added after 2 [hours] 13 [minutes]:

    Cleaning done! Not a single crumb was left in the querns or on the blades of the ring that distributes the coffee to the outlet.
    Folded.
    Fired up.
    Unfortunately, the effect is as before. Instead of the normal sound of a grinder crushing coffee beans, the whistle of a high-speed drill comes from the device. As if something is spinning inside, but it's not churning ...
    Well, I guess you'll need a new grinder. Unless you still have any ideas ....

    Harley883 - thanks a lot for the hints that allowed me to even get to the cleaning stage of the burrs. It would be hard without them, oh hard.
    I am surprised by this drill sound of the grinder, as if some clutch released and did not transfer rotation to the burr with the engine still spinning?

    Sid31 - thank you too.

    If a new grinder is necessary, I think I will put it on myself


    For now, I cordially greet you
  • Helpful post
    #10 12115788
    Harley883
    Level 14  
    Then unscrew it to the transmission, there is a clutch made of two balls, when you open it, you will know how it works.
  • Helpful post
    #11 12121528
    sccoty
    Level 11  
    or, on the underside of the screw, the rack that drives the grinder can get out
  • #12 12123577
    pawlikos9977
    Level 11  
    most likely something has fallen into the grinder open the lid of the coffee tank next to the liquid there are two screws unscrew and see if there is a pebble, etc.
  • ADVERTISEMENT
  • #13 12130855
    arekb81
    Level 30  
    If the grinder makes a slight rattling sound - tighten the grinder burr very tightly with the screw (torx) (left-hand thread). If it does not help - replace the grinder.
  • #14 12631863
    widuch sławomir
    Level 11  
    I am sticking to the topic, I would ask me to set the burr gears and this knob to set the grinding thickness of the coffee because when I unscrewed it, I did not mark the mutual position and now I am in ----
    I am asking for photos of the mutual settings of these gears

    Moderated By movzx:

    Please write more carefully and be a bit cautious.
    "I have a problem" should be enough.
    An e-mail address is also not needed to reply to the forum.

  • #15 12659608
    k2596
    Level 10  
    I also attach myself to the request of my colleague above.
    I need a description of how the grind adjustment gears are positioned
    Thank you in advance
  • #16 15542621
    kaaasia88
    Level 1  
    I took the coffee grinder apart to clean it, because among the coffee beans there was plastic that ended up in the grinder :( I have the grinder disassembled, but I have a problem with assembling it, first it is under the burrs (to be sure), first springs fall into the holes and then metal balls, i.e. probably bearings, right?

    Now I have to put on this plastic casing with internal guides and how to remove it by unscrewing it clockwise, but now how to "screw it"? because this plastic only enters in one position and this is where the problem arose, I tried to press and twist, but it does not go

    I also have a problem with setting the grinding grain size, when turning this knob, these springs stretch, tiny balls do not block them, which can be done with it.
    I would like to add that the website for submission wants PLN 180 :(
    Please help
  • Helpful post
    #17 15543783
    leotdipl
    Level 23  
    marius_01 wrote:
    Hello and welcome.
    I will be extremely grateful for the technical support in this regard.


    Welcome,

    De Longhi EAM 3100 S Machine: Coffee Grinder Failure - Causes and Fixes?

    In the photo you have the necessary one Repair Kit grinder.
    (Mahlkegel = Cone and Mahlring = Grinder Sleeve).

    The repair note states that TE items frequent
    get damaged as a result of getting into the grinder
    foreign body - most often stone.


    It is important that the Cone has 3
    ball grooves (as pictured below).

    De Longhi EAM 3100 S Machine: Coffee Grinder Failure - Causes and Fixes?
  • #18 15730861
    Igo40
    Level 1  
    Hello!
    My express was having exactly the same complaints. It turned out that there was a stone in the coffee! after unscrewing, I found out what is the reason for this whistle!
    The belt in one place became smooth and hence the whistle!
    So I bet on the belt!
    For clarity, my belt is 912 MXL
  • #19 16735705
    marius_01
    Level 9  
    leotdipl wrote:
    marius_01 wrote:
    Hello and welcome.
    I will be extremely grateful for the technical support in this regard.


    Welcome,

    De Longhi EAM 3100 S Machine: Coffee Grinder Failure - Causes and Fixes?

    In the photo you have the necessary one Repair Kit grinder.
    (Mahlkegel = Cone and Mahlring = Grinder Sleeve).

    The repair note states that TE items frequent
    get damaged as a result of getting into the grinder
    foreign body - most often stone.


    It is important that the Cone has 3
    ball grooves (as pictured below).

    De Longhi EAM 3100 S Machine: Coffee Grinder Failure - Causes and Fixes?


    Hello,

    Thanks again for the hints. I repaired the coffee machine for a relatively long time because I was not on the spot and the equipment could be used with ground coffee.
    Unfortunately, the grinder was "irreparable", because the failure was not caused by the metal burrs, but by the plastic gears, which I got to after unscrewing the bottom of the grinder. The rack (plastic) transmitting the drive was "worn". It was necessary to replace the grinder. It was sent to me from DeLonghi.

    WARNING! WARNING! It is very important to give them the type of grinder (I sent a photo of the nameplate and barcode) as the grinders have changed during quite a long production of this model.

    I attach photos (unfortunately I don't know how to put them in the right order - please use the file name as a guide) of the grinder replacement and illustrations of a broken gear. Maybe someone will need it someday?
    kisses
  • #20 16735755
    marius_01
    Level 9  
    sccoty wrote:
    possibly, from the bottom of the screw, the rack that drives the grinder can get out


    Hello,

    Yes, yes sccoty ... Teflon teeth of the rack are worn (it's on the photos). Not replaceable = new grinder. I did it myself, 2-3 times cheaper than in the service.
  • #21 17031762
    marius_01
    Level 9  
    The failure was solved by replacing the grinder. The grinder as such was not repairable - Teflon gears worn out, which are not used as spare parts.

Topic summary

The discussion revolves around a failure of the grinder in the De Longhi EAM 3100 SB coffee machine, characterized by a whistling noise and inability to grind coffee beans. Users suggest that the issue may stem from clogged burrs due to overly fine coffee grounds or foreign objects like stones. Cleaning the grinder and adjusting the grinder knob are recommended initial steps. If cleaning does not resolve the issue, users indicate that the grinder may need replacement, particularly if plastic gears are worn. Detailed instructions for disassembly and cleaning are provided, along with warnings about the importance of identifying the correct grinder type for replacement.
Summary generated by the language model.
ADVERTISEMENT