logo elektroda
logo elektroda
X
logo elektroda

Bosch GWS 14-125 CI: Disassembling Grinder, Replacing Bearings & Steps to Split Rotor

kołodziej25 16698 14
ADVERTISEMENT
Treść została przetłumaczona polish » english Zobacz oryginalną wersję tematu
  • #1 16439869
    kołodziej25
    Level 11  
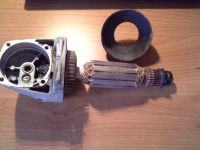
    I have a problem namely I can't split this grinder and I don't know what I'm doing wrong, and I want to replace all bearings because they have looseness. Bosch GWS 14-125 CI: Disassembling Grinder, Replacing Bearings & Steps to Split Rotor
    Maybe someone will advise me because I have no idea. On YouTube, the guy after unscrewing easily pulled out the rotor at this stage, and for me it is not possible.
  • ADVERTISEMENT
  • #2 16439914
    stanislaw1954
    Level 43  
    There is a nut on the rotor axis.
  • ADVERTISEMENT
  • #4 16440196
    stanislaw1954
    Level 43  
    kołodziej25 wrote:
    it is not possible for me.
    It looks like your rear bearing is stuck in the housing, if you followed the film, you removed the brushes and you can't slide the rotor out. Try to tap the housing with a hammer, or hitting it on the edge of the table, of course, so that it does not break. Unscrewing the nut mentioned in # 2 may succeed if you locked the rotor, e.g. in the place of the brushes, but it may damage the commutator. Unfortunately, then you will only get access to the bearing at the head.
  • #5 16440236
    teskot
    Level 37  
    Yesterday I was repairing a very similar grinder. I could not slide the rotor out of the stator even though the rear bearing could be extended. The problem was the deformed plastic of the stator carcass, which blocked the rotor when trying to eject. The tug helped, the stator coils luckily did not suffer, although the distal later had to be stiffened in the place of damage.
  • #6 16440358
    qadam12
    Level 27  
    Typically done not to repair.
  • #7 16440466
    kołodziej25
    Level 11  
    thank you, I can see that it will be similar to me: /
  • #8 16440557
    Topolski Mirosław
    Moderator of Electrical engineering
    qadam12 wrote:
    Typically done not to repair.

    I would not blame the manufacturer here (unless it's Chinese on poor materials) and the user for overloading the equipment or still working on the damaged one.
  • ADVERTISEMENT
  • #9 16440626
    BANANvanDYK
    Level 42  
    kołodziej25 wrote:
    and I want to replace all bearings because they have looseness.

    I am sorry, but this is not feasible on these Bosch models.
    Unscrewing the gears only with an impact wrench, and photo on a hydraulic press.
    If you have a speed controller / soft starter, you have a magnetic ring at the end of the rotor that needs to be replaced when the bearing is replaced.
    In principle, if the rotor is damaged, its price and repair at an authorized service point is unprofitable - at the same price you will buy a new grinder.
    It only pays to change the stator and brushes.

    And in terms of split - you have to undermine something between the aluminum head body and the plastic engine housing. It can hold the rubber that is applied to the bearing at the end of the impeller.
  • ADVERTISEMENT
  • Helpful post
    #10 16440869
    TomekB123
    Level 20  
    kołodziej25 wrote:
    I have a problem namely I can't split this grinder and I don't know what I'm doing wrong, and I want to replace all bearings because they have looseness.
    Maybe someone will advise me because I have no idea. On YouTube, the guy after unscrewing easily pulled out the rotor at this stage, and for me it is not possible.


    If you can't pull the rotor out, as colleagues have said before, you have an overheated stator.

    I assume you have a vise.
    Hold the grinder firmly by the aluminum head so that you can hit the plastic body with the hammer. So you have it in a vice. You twist the body slightly so that you have a pounding edge and bang with a hammer through e.g. a wood.

    You have to watch if the wires do not strain when knocking out. If the stator is badly welded, you will have to disconnect all cables from the electronics and brush holders so that the rotor comes out of the body together with the stator.

    Of course, the nut on the rotor is unscrewed with a wrench, not an impact wrench.

    If you do not damage the magnet, you do not need to replace it after each disassembly. It is pulled off together with the placenta.

    The bearing in the bearing flange is not replaceable (encapsulated in plastic). It is replaced in full. You need at least a hand press to pull the wheel.

    In general, don't go without it without the press.
  • #11 16442359
    kołodziej25
    Level 11  
    TomekB123 wrote:
    kołodziej25 wrote:
    I have a problem, namely I can not halve this grinder and I do not know what I am doing wrong, and I want to replace all the bearings because they have play.
    Maybe someone will advise because I have no idea anymore. On YouTube, the guy after unscrewing easily pulled the rotor at this stage, and for me it is not possible.


    If you cannot pull out the rotor, then, as colleagues have said before, you have an overheated stator.

    I assume you have at least a vice.
    In it, grab the grinder firmly by the aluminum head so that you can hit the plastic body with a hammer. So you have it in a vice. You turn the body slightly so that you have a pounding edge and hit it with a hammer through e.g. a piece of wood.

    You have to see if the wires get tense when knocking out. If the stator is strongly welded, you will have to disconnect all cables from the electronics and brush holders so that the rotor comes out of the body together with the stator.

    Of course, the nut on the rotor is unscrewed with an open-end wrench, not an impact wrench.

    If you do not damage the magnet, it does not need to be replaced after each disassembly. It is removed together with the placenta.

    The bearing in the bearing flange is non-replaceable (sealed in plastic). It is completely replaced. At least a hand press is required to pull the wheel off.

    Generally, without the press, don't do it.
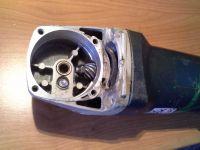

    NO, finally, a specific hint, not hitting posts that will not be commented on by he he
    Now I know why I had jumps in speed while working :P

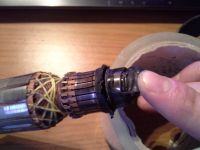
    Bosch GWS 14-125 CI: Disassembling Grinder, Replacing Bearings & Steps to Split Rotor
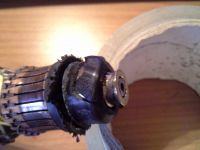
    Bosch GWS 14-125 CI: Disassembling Grinder, Replacing Bearings & Steps to Split Rotor
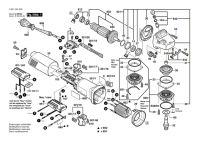
    Bosch GWS 14-125 CI: Disassembling Grinder, Replacing Bearings & Steps to Split Rotor

    The only question is whether to buy enough to buy a repair kit 813?
    Bosch GWS 14-125 CI: Disassembling Grinder, Replacing Bearings & Steps to Split Rotor
    Everything from the collar came out: /

    Of course a thumbs up for the TomekB123 THX!
  • #13 16442464
    TomekB123
    Level 20  
    Check that the bearing seat is not rendered.
  • #14 16442471
    robokop
    VIP Meritorious for electroda.pl
    I would consider - just in case - buying a rotor right away. This one not only has a filed, worn out commutator, it can still be seen on the "iron" traces of rubbing against the stator. It may turn out that it will die in a short time. It's so from practice.
  • #15 16443690
    kołodziej25
    Level 11  
    I close and thank you all for quick help

Topic summary

The discussion revolves around the challenges faced while disassembling the Bosch GWS 14-125 CI grinder to replace its bearings. The user is unable to split the grinder, particularly struggling with a stuck rotor and a nut on the rotor axis. Various suggestions are provided, including tapping the housing with a hammer, ensuring the rotor is locked before unscrewing the nut, and checking for deformation in the stator that may hinder rotor removal. It is noted that the rear bearing may be stuck, and if the rotor is damaged, it may be more cost-effective to purchase a new grinder rather than repair it. The conversation also touches on the necessity of a repair kit and the potential need to replace the rotor if it shows signs of wear.
Summary generated by the language model.
ADVERTISEMENT