I would like to share a few comments related to the disassembly of the pump, which in my case has a Flora PB850 sticker. This name is, in my opinion, a conventional thing, as this pump is a Chinese product and can have a sticker with any name.
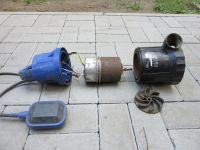
After 3 seasons of use, the pump stopped functioning properly - it turned off and started up after a short time, which would suggest the operation of the overcurrent switch. So I started to dismantle it. The lower suction covers are easily removed by unscrewing 3 screws with a cross slot. The first problem was to unscrew the nut securing the impeller of the pump. The nut is stainless, but the motor shaft is very rusty. WD's fluid or other means didn't help, so I gave it up temporarily. To separate the cover of the pump part from the cover of the electrical part (here, blue from black cover), remove the 4 screws with tri-wing notches. This is the second hurdle, because a tri-wing screwdriver is not a popular household tool. I dealt with the usual pliers, grabbing the screw heads on the side. The separation of the two shields was no

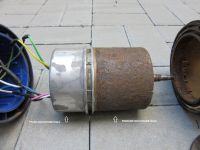
 A real problem, which, however, is not due to the use of an extremely tight gasket, as some people believe. The reason is prosaic - a box called "front shaft mounting" (swollen from rust) (item 12 in the manual). After the rust is peeled off the surface of this can, the black cover loosely detaches from the top cover, revealing the o-ring that seals between the water and electrical parts of the pump. After removing the engine from the blue housing, I noticed a drop of water (which should not be there) in it. I exclude leakage through the above-mentioned o-ring and through the cable glands, but there is still a mechanical seal - item 13 in the manual, which I will want to replace, because it can let water into the engine.
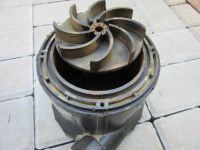
I will come back to the disassembly of the pump impeller. The black pump casing cannot be removed without first disassembling the impeller, as its diameter is slightly larger than the opening in this casing (greetings to the pump designers). I just sanded this rotor around the circumference (about 1.5mm) and removed that black housing which allowed me to grasp the motor shaft freely and unscrew the nut holding the rotor. Removal of the rotor made it possible to slide the mechanical seal off the shaft.
I didn't find a thermal switch anywhere. Could it be installed in the float? Or maybe somewhere in the stator, access to which is difficult, because it is pressed into the box of the front shaft mounting.
After 3 seasons of use, the pump stopped functioning properly - it turned off and started up after a short time, which would suggest the operation of the overcurrent switch. So I started to dismantle it. The lower suction covers are easily removed by unscrewing 3 screws with a cross slot. The first problem was to unscrew the nut securing the impeller of the pump. The nut is stainless, but the motor shaft is very rusty. WD's fluid or other means didn't help, so I gave it up temporarily. To separate the cover of the pump part from the cover of the electrical part (here, blue from black cover), remove the 4 screws with tri-wing notches. This is the second hurdle, because a tri-wing screwdriver is not a popular household tool. I dealt with the usual pliers, grabbing the screw heads on the side. The separation of the two shields was no


 A real problem, which, however, is not due to the use of an extremely tight gasket, as some people believe. The reason is prosaic - a box called "front shaft mounting" (swollen from rust) (item 12 in the manual). After the rust is peeled off the surface of this can, the black cover loosely detaches from the top cover, revealing the o-ring that seals between the water and electrical parts of the pump. After removing the engine from the blue housing, I noticed a drop of water (which should not be there) in it. I exclude leakage through the above-mentioned o-ring and through the cable glands, but there is still a mechanical seal - item 13 in the manual, which I will want to replace, because it can let water into the engine.
 I will come back to the disassembly of the pump impeller. The black pump casing cannot be removed without first disassembling the impeller, as its diameter is slightly larger than the opening in this casing (greetings to the pump designers). I just sanded this rotor around the circumference (about 1.5mm) and removed that black housing which allowed me to grasp the motor shaft freely and unscrew the nut holding the rotor. Removal of the rotor made it possible to slide the mechanical seal off the shaft.
I didn't find a thermal switch anywhere. Could it be installed in the float? Or maybe somewhere in the stator, access to which is difficult, because it is pressed into the box of the front shaft mounting.


