Hello,
I would like to share information on how to deal with the "crushing" Fiat Panda 2 gearbox and then with the sliding clutch (in my case, first was the "crumbling" of the box and then slipping the clutch).
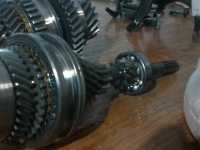
The gearbox was damaged due to the damaged roller bearing, which has 7 balls. It is the most delicate bearing of this car's box, although in my case it went up to 270,000. kilometers. It is located on the side of the gearbox housing, called the bell of the box, just at the exit of the shaft on the clutch disc. Damage to the bearing has its basket, which is made of plastic. The elements of this basket, therefore, are not so harmful to the work of the other elements of the box (its sprockets, synchronizers). I personally dismantled the entire gearbox to replace it. After checking the elements of the box (watchmaker's loupe): gears, synchronizers, including its remaining bearings, it turned out that they are in perfect condition and do not have to be replaced. Some experts, however, recommend replacing all bearings. In my opinion, there is no need to expose yourself to additional costs of repairing the box (the cost of all Fiat Panda gearbox bearings is about 700 to 800 PLN). The cost of damaged, in my chest, SKF bearing in ASO is about 100 PLN. And it is worth to put them on. There are such Polish production bearings with 8 balls and a plastic basket for about PLN 15 (most likely intended for the Fiat Seicento gearbox), but I do not recommend them. I watched both of these bearings under the watchmaker's magnifying glass and SKF is more accurately made and mounted. You can also set up a roller bearing of the French company SNR matching the Fiat Panda box, mounted, among others in boxes eg Fiat Doblo. Its cost is also about PLN 100, but it is supposedly more durable. I do not know how loud it would work in the box compared to the original ball, so I did not assume it.
The box was working loudly, because you could hear yourself bumping the bearings in which the basket was damaged. There were also metal rubbing noise from the metal coming from the friction of the shaft of the attacking roller against the metal part of the shaft's simering as a result of the play in the damaged bearing.
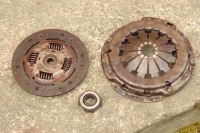
However, the proper reason for gearbox regeneration was the slipping clutch. The reason for this was getting onto the clutch disc of oil from the box by unsealed simering due to the beating of the shaft, which was the result of damage to the bearing, which was loose. It was impossible to drive. With such a slipping clutch, I passed a week until I started repairing. On the occasion of repairing the box, I exchanged all its simering and o-rings, simering the crankshaft from the clutch side (it was necessary to unscrew the flywheel) and replaced the clutch, ie clutch plate, impression and impression bearing. I exchanged the clutch in my car during this work for the first time since the news. Therefore, 270,000 traveled. kilometers and you could really ride it, because the clutch plate was quite well, the impression bearing was also, but the impression feathers were too much worn from the impression bearing. I've replaced the whole clutch. When replacing the gearbox selector, it is necessary to buy a wedge that broke in half when punching. It serves to attach in a suitable place the sliders of the selector, pushing the cradle of the crate, on the shaft / axis of the selector..
From my observations, during these works it appears that one could risk and not undress the entire gearbox, what is being done from the 5th gear in the dome. As I wrote above, the basket of the damaged bearing is made of plastic and, as a rule, its remains, even if they fell deeper into the chest, should not cause damage to other components - gears, synchronizers. There were all 7 balls in it - none of them disintegrated and did not threaten damage to other elements of the crate, and other bearings are massive. Also, despite the "crunching" of the box, the fact that its components (except for the mentioned damaged bearing and simering) are okay can be assumed after properly switching on (putting in) all the gears. Therefore, to get only to the mentioned, the most delicate, damaged bearing and oil permoring, it would be enough to unscrew the bell of the box and there are damaged parts available immediately for exchange, as on the palm of your hand. Of course, in this way we will not check the condition of the other elements of the chest and we will not rinse it thoroughly, but we will do less for it. Here I must point out that my chest was not so dirty inside that it would be necessary to clean it. The box requires external cleaning before it is dismantled. In this case, it would also not be necessary to replace counter nuts on both rollers, i.e. attacker and intermediate (cost 2 x 11 zlotys = 22 zlotys), twisting all gears, synchronizers and other bearings together so that they do not move because they would not be unscrewed. These nuts are in a sense one-off, because their sides are bent in two places so that they do not unscrew.
Here, I betray to unscrew the nuts that counter the shafts of the box, it should be locked both of them by throwing two gears. I did it with the gear selector removed.
By doing this repair, you do it at your own risk.
I emphasize here that I did not try to disassemble the chest from the side of the bell and I do not know if it is possible at all (I was just curious and undressed it all). I saw, however, a picture of the chest with its bell dismantled on one of the Forums. I give him a link:
http://fiatpunto.com.pl/post375002.html.
Speech is there about the Fiat Punto II, which is very similar to Fiat Panda. The picture shows a roller bearing on the shaft attacking from the side of the bell, with which I had a problem, only mine was ball. Link to the photo:
http://fiatpunto.com.pl/largeimg,IMG_4c0579837fe7f820.jpg.
In this case, during such disassembly, along with the bell of the chest would have to go out, bolted to it, a reverse gear stick, which would have to descend from the reverse gear rack and perhaps this back rack will come with it. In addition, the reverse slider would have to descend from the ball pusher, which is located on the axis of the other race sliders. I do not know how it would go, the reverse process, i.e. the assembly of the chest. I think, however, that it is worth a try and I personally would try to disassemble the chest (from the bell's side) during the next refurbishment.
When assembling the crate, I used a torque wrench and the screws, on the glue that prevents them from loosening, I tightened with the recommended moments.
The repair costs are less than PLN 500 - the same spare parts, including the entire Valeo clutch, simering (Corteco), O-rings, SKF bearing, counter nuts of both gear shafts, hub fixing nuts for the drive bolts, mass cable because I damaged it during disassembly and maybe something yet. The costs of repair do not include the purchase of tools in Biedronka, Lidl, Kaufland, Castorama, which I used during the repair. When I repair something myself, I allocate a part of the cash for the purchase of tools, because I do not pay for the repair service that I have done myself and are useful for the next.
I have not written anything yet about the dismantling and assembly of the box. I did these works under the house, next to the garage, without a channel! Yes, without channel !!! It's good that it was not raining! Everyone was surprised how I did it, I have a gentle belly, so to speak, and they wondered how I fit in under my car. And I raised it quite well in the front and put it on Lidl's trestles. I put one hydraulic jack with Biedronka under the oil sump of the engine. The second hydraulic lift from Biedronka is a chest. This second lift for the chest, you do not need it and you can do everything only one thing. Because Panda's chest is not that heavy, but you have to somehow protect it from falling down, it helped me with the help of a rope a little son who does the muscles in the gym. I unscrewed the appropriate bolts with the keys from Biedronka, Lidl, Kaufland and the chests pulled out from the left front wheel. First of all you had to unscrew the nuts holding the hubs to the driveshafts (here you need a massive key, because they are twisted 240 Nm torque and additionally baked, you need to hold the foot on the brake when unscrewing - I borrowed the key from the neighbor, but then I bought one myself) , wheels, bolts fixing shock absorbers to the hub mechanism (no other need to unscrew). Before extracting the driveshafts, drain the oil from the box so that it does not leak. After removing the outer joints of the semi-axles from the hubs, one should pull out the inner joints of the axle shaft from the box, eg with the side part of the wood chisel - that's what I did. The joints of the internal driveshafts leave the box without a problem. You do not need to download the gums of the joints here! Then the need was to disassemble the battery and the basket in which it is located. The built-in battery and basket facilitate access to the screws with which the box is bolted to the engine. Under the basket there is also a screw, which box with the engine is bolted by a rubber cushion to the engine compartment of the car body. The screw should also be removed. Do not forget to unscrew the screws from the chest lollipop, which is located underneath the car. The chest lollipop is one of the three elements that fix the entire engine with the gearbox to the car's body on the rubber (the engine leg is the last of these three elements, I mentioned the box cushion earlier). After unscrewing the bolts burning the engine box, do not forget to secure the starter, which is kept only on the power cables, so as not to get hit by them. The starter does not need to be completely removed, it can be placed on the suspension elements. Installation should be carried out in reverse order for disassembly and here I used torque wrenches purchased in Castorama and Kaufland when turning.
After repair the car works as if it has just left the salon.
I would like to point out here that I did this work alone (with the delicate help of my son and my closest friend) and for the first time in my life and it was possible thanks to the numerous information on the Internet forums..in. also on Elektrodzie. I did not ask any mechanics about how to do it. And here I can write that I acquired, through this repair, in a sense the skills (powers) of a motor vehicle mechanic, although I am not a profession of it, of which I am very happy and satisfied.
If I helped someone with my subject, please click on this post: "Helpful post?" at the top of the text on the left, possibly with a gift of a point. Pressing "Helpful post?" you only charge 0.2 points.
greetings
jbek
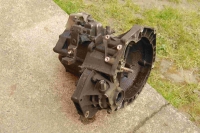
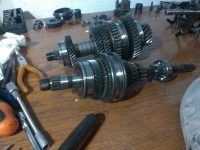
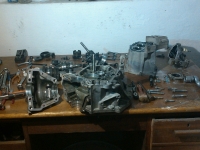
Pictures of my chest:
I would like to share information on how to deal with the "crushing" Fiat Panda 2 gearbox and then with the sliding clutch (in my case, first was the "crumbling" of the box and then slipping the clutch).
The gearbox was damaged due to the damaged roller bearing, which has 7 balls. It is the most delicate bearing of this car's box, although in my case it went up to 270,000. kilometers. It is located on the side of the gearbox housing, called the bell of the box, just at the exit of the shaft on the clutch disc. Damage to the bearing has its basket, which is made of plastic. The elements of this basket, therefore, are not so harmful to the work of the other elements of the box (its sprockets, synchronizers). I personally dismantled the entire gearbox to replace it. After checking the elements of the box (watchmaker's loupe): gears, synchronizers, including its remaining bearings, it turned out that they are in perfect condition and do not have to be replaced. Some experts, however, recommend replacing all bearings. In my opinion, there is no need to expose yourself to additional costs of repairing the box (the cost of all Fiat Panda gearbox bearings is about 700 to 800 PLN). The cost of damaged, in my chest, SKF bearing in ASO is about 100 PLN. And it is worth to put them on. There are such Polish production bearings with 8 balls and a plastic basket for about PLN 15 (most likely intended for the Fiat Seicento gearbox), but I do not recommend them. I watched both of these bearings under the watchmaker's magnifying glass and SKF is more accurately made and mounted. You can also set up a roller bearing of the French company SNR matching the Fiat Panda box, mounted, among others in boxes eg Fiat Doblo. Its cost is also about PLN 100, but it is supposedly more durable. I do not know how loud it would work in the box compared to the original ball, so I did not assume it.
The box was working loudly, because you could hear yourself bumping the bearings in which the basket was damaged. There were also metal rubbing noise from the metal coming from the friction of the shaft of the attacking roller against the metal part of the shaft's simering as a result of the play in the damaged bearing.
However, the proper reason for gearbox regeneration was the slipping clutch. The reason for this was getting onto the clutch disc of oil from the box by unsealed simering due to the beating of the shaft, which was the result of damage to the bearing, which was loose. It was impossible to drive. With such a slipping clutch, I passed a week until I started repairing. On the occasion of repairing the box, I exchanged all its simering and o-rings, simering the crankshaft from the clutch side (it was necessary to unscrew the flywheel) and replaced the clutch, ie clutch plate, impression and impression bearing. I exchanged the clutch in my car during this work for the first time since the news. Therefore, 270,000 traveled. kilometers and you could really ride it, because the clutch plate was quite well, the impression bearing was also, but the impression feathers were too much worn from the impression bearing. I've replaced the whole clutch. When replacing the gearbox selector, it is necessary to buy a wedge that broke in half when punching. It serves to attach in a suitable place the sliders of the selector, pushing the cradle of the crate, on the shaft / axis of the selector..
From my observations, during these works it appears that one could risk and not undress the entire gearbox, what is being done from the 5th gear in the dome. As I wrote above, the basket of the damaged bearing is made of plastic and, as a rule, its remains, even if they fell deeper into the chest, should not cause damage to other components - gears, synchronizers. There were all 7 balls in it - none of them disintegrated and did not threaten damage to other elements of the crate, and other bearings are massive. Also, despite the "crunching" of the box, the fact that its components (except for the mentioned damaged bearing and simering) are okay can be assumed after properly switching on (putting in) all the gears. Therefore, to get only to the mentioned, the most delicate, damaged bearing and oil permoring, it would be enough to unscrew the bell of the box and there are damaged parts available immediately for exchange, as on the palm of your hand. Of course, in this way we will not check the condition of the other elements of the chest and we will not rinse it thoroughly, but we will do less for it. Here I must point out that my chest was not so dirty inside that it would be necessary to clean it. The box requires external cleaning before it is dismantled. In this case, it would also not be necessary to replace counter nuts on both rollers, i.e. attacker and intermediate (cost 2 x 11 zlotys = 22 zlotys), twisting all gears, synchronizers and other bearings together so that they do not move because they would not be unscrewed. These nuts are in a sense one-off, because their sides are bent in two places so that they do not unscrew.
Here, I betray to unscrew the nuts that counter the shafts of the box, it should be locked both of them by throwing two gears. I did it with the gear selector removed.
By doing this repair, you do it at your own risk.
I emphasize here that I did not try to disassemble the chest from the side of the bell and I do not know if it is possible at all (I was just curious and undressed it all). I saw, however, a picture of the chest with its bell dismantled on one of the Forums. I give him a link:
http://fiatpunto.com.pl/post375002.html.
Speech is there about the Fiat Punto II, which is very similar to Fiat Panda. The picture shows a roller bearing on the shaft attacking from the side of the bell, with which I had a problem, only mine was ball. Link to the photo:
http://fiatpunto.com.pl/largeimg,IMG_4c0579837fe7f820.jpg.
In this case, during such disassembly, along with the bell of the chest would have to go out, bolted to it, a reverse gear stick, which would have to descend from the reverse gear rack and perhaps this back rack will come with it. In addition, the reverse slider would have to descend from the ball pusher, which is located on the axis of the other race sliders. I do not know how it would go, the reverse process, i.e. the assembly of the chest. I think, however, that it is worth a try and I personally would try to disassemble the chest (from the bell's side) during the next refurbishment.
When assembling the crate, I used a torque wrench and the screws, on the glue that prevents them from loosening, I tightened with the recommended moments.
The repair costs are less than PLN 500 - the same spare parts, including the entire Valeo clutch, simering (Corteco), O-rings, SKF bearing, counter nuts of both gear shafts, hub fixing nuts for the drive bolts, mass cable because I damaged it during disassembly and maybe something yet. The costs of repair do not include the purchase of tools in Biedronka, Lidl, Kaufland, Castorama, which I used during the repair. When I repair something myself, I allocate a part of the cash for the purchase of tools, because I do not pay for the repair service that I have done myself and are useful for the next.
I have not written anything yet about the dismantling and assembly of the box. I did these works under the house, next to the garage, without a channel! Yes, without channel !!! It's good that it was not raining! Everyone was surprised how I did it, I have a gentle belly, so to speak, and they wondered how I fit in under my car. And I raised it quite well in the front and put it on Lidl's trestles. I put one hydraulic jack with Biedronka under the oil sump of the engine. The second hydraulic lift from Biedronka is a chest. This second lift for the chest, you do not need it and you can do everything only one thing. Because Panda's chest is not that heavy, but you have to somehow protect it from falling down, it helped me with the help of a rope a little son who does the muscles in the gym. I unscrewed the appropriate bolts with the keys from Biedronka, Lidl, Kaufland and the chests pulled out from the left front wheel. First of all you had to unscrew the nuts holding the hubs to the driveshafts (here you need a massive key, because they are twisted 240 Nm torque and additionally baked, you need to hold the foot on the brake when unscrewing - I borrowed the key from the neighbor, but then I bought one myself) , wheels, bolts fixing shock absorbers to the hub mechanism (no other need to unscrew). Before extracting the driveshafts, drain the oil from the box so that it does not leak. After removing the outer joints of the semi-axles from the hubs, one should pull out the inner joints of the axle shaft from the box, eg with the side part of the wood chisel - that's what I did. The joints of the internal driveshafts leave the box without a problem. You do not need to download the gums of the joints here! Then the need was to disassemble the battery and the basket in which it is located. The built-in battery and basket facilitate access to the screws with which the box is bolted to the engine. Under the basket there is also a screw, which box with the engine is bolted by a rubber cushion to the engine compartment of the car body. The screw should also be removed. Do not forget to unscrew the screws from the chest lollipop, which is located underneath the car. The chest lollipop is one of the three elements that fix the entire engine with the gearbox to the car's body on the rubber (the engine leg is the last of these three elements, I mentioned the box cushion earlier). After unscrewing the bolts burning the engine box, do not forget to secure the starter, which is kept only on the power cables, so as not to get hit by them. The starter does not need to be completely removed, it can be placed on the suspension elements. Installation should be carried out in reverse order for disassembly and here I used torque wrenches purchased in Castorama and Kaufland when turning.
After repair the car works as if it has just left the salon.
I would like to point out here that I did this work alone (with the delicate help of my son and my closest friend) and for the first time in my life and it was possible thanks to the numerous information on the Internet forums..in. also on Elektrodzie. I did not ask any mechanics about how to do it. And here I can write that I acquired, through this repair, in a sense the skills (powers) of a motor vehicle mechanic, although I am not a profession of it, of which I am very happy and satisfied.
If I helped someone with my subject, please click on this post: "Helpful post?" at the top of the text on the left, possibly with a gift of a point. Pressing "Helpful post?" you only charge 0.2 points.
greetings
jbek

Pictures of my chest:


