FAQ
TL;DR: For Hörmann sectional doors, panel creaks have 3 options: replace seals, use the right spray, or wait; “No special distances are applied.” [Elektroda, tmtch, post #16902524]
Why it matters: This FAQ helps DIY owners fix post–spring-replacement lockups and noisy panels fast, without unsafe trial‑and‑error.
Quick Facts
- Spring pre-tension noted by users: 9.5 turns; door should balance around ~1 m with drive disconnected. [Elektroda, krzysztofh, post #16830788]
- Safety lock must be manually released during the first spring turns after replacement. [Elektroda, tmtch, post #16831282]
- Some Hörmann models use a cotter pin to block spring-break protection during service. [Elektroda, lamerb, post #16831744]
- Typical hinge adjustment clearance cited: approx. 2–3 mm. [Elektroda, krzysztofh, post #16900997]
- Seal lip height observed: approx. 1–2 mm; rubbing here can cause crackling on open/close. [Elektroda, krzysztofh, post #16900997]
What is the spring-break safety lock on a Hörmann sectional door?
It is a simple lock that prevents the door from dropping if a spring fails. After fitting new springs, you must manually release it for the first revolutions so the mechanism can re-engage under tension. It is often mistaken for a brake. [Elektroda, tmtch, post #16831282]
Why won’t my door close after replacing springs?
Your drive may hit overload because a drum lock or linkage blocks rotation. Users reported rattling from a drum and stalling on descent after spring work. Check that both drums are fully unlocked and the connecting rod aligns correctly before reattaching the drive. [Elektroda, krzysztofh, post #16830788]
How do I unblock the mechanism after winding new springs?
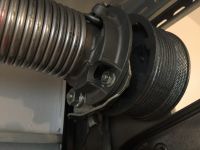
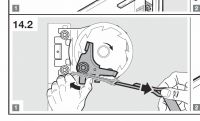
Set the mechanism so the small screw sits above the manual release “wing,” then release the lock and tension the springs. After correct positioning, the door operates normally.
How-To:
- Position the screw above the release wing.
- Manually release the drum lock.
- Apply the specified spring turns and recheck movement. [Elektroda, krzysztofh, post #16832428]
Where is the “emergency brake,” and do I need to unlock it?
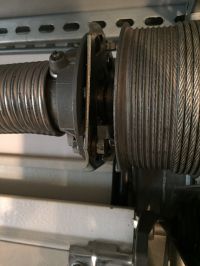
Installers describe a gear with wedge-shaped teeth and a hammer-like pawl. This acts as the spring-break protection. Before testing the door after spring work, ensure this lock is disengaged so the drums can rotate freely. [Elektroda, lamerb, post #16830870]
How should the M6 screw and brass sleeve be installed on the spring holder?
Fit the cylindrical-head M6 so its head can slide in the drum’s slotted element, and place the brass sleeve to avoid interference with manual release. Incorrect sleeve placement can lock the drum, preventing any opening. Refit so the head moves freely in the slot. [Elektroda, krzysztofh, post #16830950]
Does my Hörmann model use a cotter pin to block the spring protection?
Some Hörmann instructions show a removable pin used to block the safety lock during service. Not every model has it, but if yours does, remove the pin before testing. Misassembly can also mimic a blocked lock. [Elektroda, lamerb, post #16831744]
What spring pre-tension and balance should I expect?
A user-reported nameplate specified 9.5 turns. With the drive disconnected, the door should move lightly and stabilize around 1 meter from the floor. If it shoots up or drops, recheck turns and locks before motor setup. [Elektroda, krzysztofh, post #16830788]
How do I diagnose rattling from a right or left drum after spring work?
Rattle plus motor overload suggests the drum lock engages or the connecting rod binds. Test with springs wound and drive disconnected. Both drums must rotate freely when correctly unlocked; otherwise, re-seat the linkage and release mechanisms. [Elektroda, krzysztofh, post #16830788]
Do I need spacers between panels to stop creaking?
No. “No special distances are applied.” For creaks, options are: replace the gaskets, use a suitable preparation instead of WD‑40-type sprays, or let them bed in. “They will eventually get there.” [Elektroda, tmtch, post #16902524]
Why did my door start crackling after washing the panels?
Cleaning can increase friction where the upper panel’s lip seal meets the lower panel. A 1–2 mm seal can rub and crackle as panel angles change during opening. Light silicone on cloth did not help in one case. [Elektroda, krzysztofh, post #16900997]
Are the panel seal lips replaceable?
One owner observed the lip appears integrated and color-matched to the panel, suggesting it is not a simple user-replaceable strip on that door. If yours looks integral, consider professional service for replacements. [Elektroda, krzysztofh, post #16903949]
What hinge clearance should I set between panels?
Users report an available hinge adjustment of about 2–3 mm. This may slightly increase the panel gap, especially on lighter panels, but it is not a dedicated spacer system. Adjust only to remove binding. [Elektroda, krzysztofh, post #16900997]
What if drums won’t rotate when the connecting rod is fitted?
That edge case points to locks still engaged. With the rod installed, unlocking only one side may not free the shaft. Release both drum locks, then verify free rotation before motor reconnection. [Elektroda, krzysztofh, post #16830788]
How long do springs last before failure?
A reported failure occurred after 11 years of service. Lifespan varies by cycle count and environment. When one breaks, replacing both springs together helps restore balance and reliability. [Elektroda, krzysztofh, post #16830788]


