logo elektroda
logo elektroda
X
logo elektroda

DIY Lightweight PC Case: Choosing Putty & Paint for 100% Plastic Housing, Resin Canvas, & 2mm Gaps

moher40 5082 13
ADVERTISEMENT
Treść została przetłumaczona polish » english Zobacz oryginalną wersję tematu
  • #1 17017461
    moher40
    Level 3  
    Constructs a computer case. 100% plastic housing. From the inside, the elements are put together and glued with a canvas with resin. The priority in construction is the final weight of the whole. There is a lot of putties on the market, but I don't know which one to use exactly. The housing works during handling, lifting, etc., so ordinary putty is too hard. I saw that there are some kind of pseudo-flexible plastics (bumpers, etc.) but I don't know which one to buy so that it won't crack in the future. Gaps to be filled with max. 2mm, slot width max. 2mm and the material is plastic, similar to the printer housing, etc. It cannot be glued hot because you make powder and it breaks easily, hence the resin.

    The housing will be painted (white mat + black mat). I know that I will cover the plastic with a plaster, but what about the putty?

    Another question: mass!
    Does the motherboard in mounting places (screwed in) have to have mass?
    Do the contact points between the motherboard and the housing have to be massaged in any way, e.g. with the power supply?

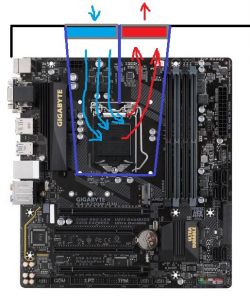
    Another thing: cooling
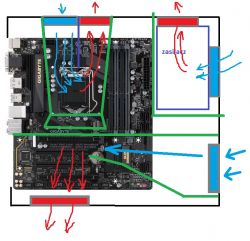
    I'm going to do something like this:
    DIY Lightweight PC Case: Choosing Putty & Paint for 100% Plastic Housing, Resin Canvas, & 2mm Gaps

    Made of canvas and resin as a tunnel cover for the CPU and heat sink.
    Two fans are mounted on the wall of the housing (one draws in cold air from the outside and the other pushes out warm air).
    Something like this will pass ??
  • ADVERTISEMENT
  • #3 17017993
    moher40
    Level 3  
    I wonder if this welding would do anything. Tomorrow I will risk sticking something on and we'll see if it will work. I am also surprised that the resin reacts only with the canvas. If I fill the cracks with resin, I can wait forever for it to dry. In truth it will dry up, but it is flexible and rubber. And as for plastic, a long time ago I had something like a regular putty in my hand. It was almost black in color. The method of preparation and application is identical to that of a regular putty. They wrote on the tin that it was for bumper finishing repairs. And it worked because I checked it myself. When the putty was dry, you could bend the bumper as much as you wanted and it did not break anyway. The processing was also identical to that of a regular putty. I'm looking for it in stores and it's gone.
  • ADVERTISEMENT
  • #4 17018029
    gumisie
    Level 43  
    moher40 wrote:
    I am also surprised that the resin reacts only with the canvas.
    Friend, who told you such nonsense. :?:
    In order not to elaborate on, this is how it relates to resins, e.g. two-component or UV-curable resins.
    It would be worth reading.
    greetings

    edit.

    You might ask a question:
    Why and for what purpose in reinforced concrete structures, e.g. steel bars are used? :cry:
  • #5 17018264
    Radiokiller
    Level 30  
    If you are going to paint the housing, the color of the filling does not matter. I would try products such as Poxilina, Octopus, to be obtained at Tesco or Imym Kaufland.
    After painting and complete drying, it is worth protecting this work with a clear varnish with a HARDENER
  • ADVERTISEMENT
  • #6 17018369
    i.marciniak
    Level 14  
    If the resin, after "drying", is pliable and rubbery then:
    -it was mixed in wrong proportions
    - is out of date
    -or has such properties.
  • #7 17018626
    moher40
    Level 3  
    What are the ratios of hardener in relation to resin? They do not write on the packaging and I just keep an eye on it, so that the resin is not "pink".

    DIY Lightweight PC Case: Choosing Putty & Paint for 100% Plastic Housing, Resin Canvas, & 2mm Gaps
    DIY Lightweight PC Case: Choosing Putty & Paint for 100% Plastic Housing, Resin Canvas, & 2mm Gaps

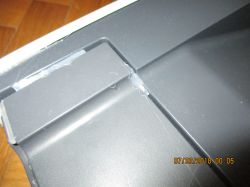
    It's about the gaps as in 1 photo. Before the gluing with the resin, the warm glue is temporarily present to fit the elements together.

    Added after 5 [minutes]:

    Radiokiller wrote:
    If you are going to paint the housing, the color of the filling does not matter.
    This is exactly what it is. The casing will be black and white in the mat so it does not matter what color or what is under the varnish.
  • #8 17020871
    i.marciniak
    Level 14  
    If you are using polyester resin and it is soft after setting, you did not use enough hardener. I think you are using a sheet metal repair kit. Unfortunately, in this case you have to accept that the color will be slightly pink. If it bothers you a lot and, for example, silver suits you, then before mixing the resin with the hardener, add aluminum dust to it and mix thoroughly. You can also color black, I do it by adding powdered graphite.
  • #9 17020933
    moher40
    Level 3  
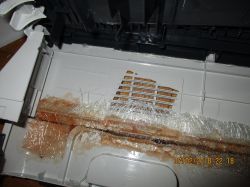
    Today I had a little fun with my fresh purchase, because the resin I had at home, I don't even remember when it was bought, and it turned out that the last one has expired. This time she glues the plastic like crazy. There is no way to tear the canvas off by force. It's hard as a rock. I admit that I thought ... chemistry is life long :-) and I was wrong.

    DIY Lightweight PC Case: Choosing Putty & Paint for 100% Plastic Housing, Resin Canvas, & 2mm Gaps
    DIY Lightweight PC Case: Choosing Putty & Paint for 100% Plastic Housing, Resin Canvas, & 2mm Gaps

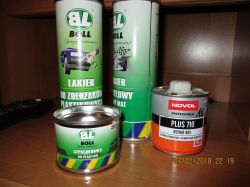
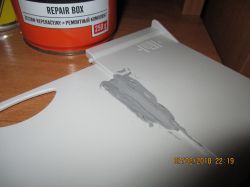
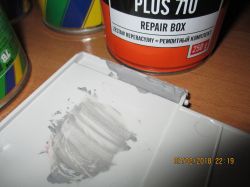
    for the rest, there is a white mat for plastic and a black mat for bumpers. I've already tried it and it's good. And as for the putty, I found something like the photo in the store:

    DIY Lightweight PC Case: Choosing Putty & Paint for 100% Plastic Housing, Resin Canvas, & 2mm Gaps

    I also tried it:
    DIY Lightweight PC Case: Choosing Putty & Paint for 100% Plastic Housing, Resin Canvas, & 2mm Gaps DIY Lightweight PC Case: Choosing Putty & Paint for 100% Plastic Housing, Resin Canvas, & 2mm Gaps

    I can bend this plastic in the place of putty by more than 30-35 ° and it is fine.
    Nothing breaks, nothing is chipped and smeared over 5mm.

    I would already take the first photos of the new housing :-) but during the work I realized that it was still too high and I took it apart again for cutting for tomorrow. At the moment it is 17cm but it will be 13cm. 1x 5.25, 3x 3.5, matx and a specific power supply (without housing) will easily fit there.

    At the moment it looks tragic because I'm making what I have, but ...
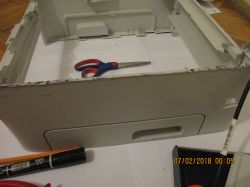
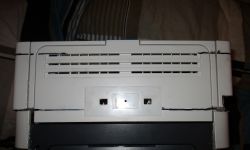
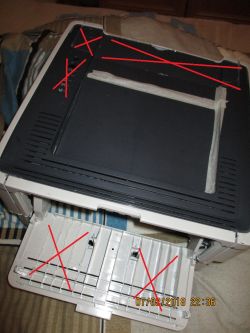
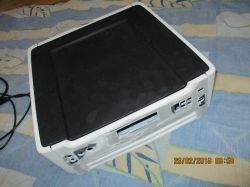
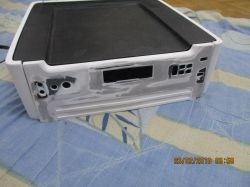
    Top from the printer, sides from another, front from the scanner, back from another printer :-)

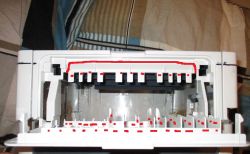
    Today, the design has also changed. I decided to fit the front to this housing from the back of the printer. The flap that opens looks cool and all those ventilation grilles. I started to play with the front panel and it was a massacre. I need a lot of ports on the front (card reader, usb3.1, mic, audio, sata power, sata plugs on extensions, BR drive ... and when I put it together, it was a tragedy, so there will be a flap and all that in.

    DIY Lightweight PC Case: Choosing Putty & Paint for 100% Plastic Housing, Resin Canvas, & 2mm Gaps DIY Lightweight PC Case: Choosing Putty & Paint for 100% Plastic Housing, Resin Canvas, & 2mm Gaps DIY Lightweight PC Case: Choosing Putty & Paint for 100% Plastic Housing, Resin Canvas, & 2mm Gaps

    Everything that is marked in red will disappear and on the front there will be a panel with HDD / PWR LEDs and PWR buttons (and a reset and Bios reset behind the flap). I am also thinking about fitting the display:

    DIY Lightweight PC Case: Choosing Putty & Paint for 100% Plastic Housing, Resin Canvas, & 2mm Gaps
  • #10 17022532
    Anonymous
    Level 1  
  • ADVERTISEMENT
  • #11 17022567
    Radiokiller
    Level 30  
    Self-adhesive aluminum foil to obtain in DIY stores.
    A roll 5 cm wide, cost several zlotys.
  • #12 17064414
    moher40
    Level 3  
    These foils are not conductive. I have checked all the pseudo aluminum foils in many stores. The meter is set to the "conduction / short circuit" test and does not beep. I have to look for something else in automotive (copper foil?)

    And the housing at the moment looks like this:

    DIY Lightweight PC Case: Choosing Putty & Paint for 100% Plastic Housing, Resin Canvas, & 2mm Gaps DIY Lightweight PC Case: Choosing Putty & Paint for 100% Plastic Housing, Resin Canvas, & 2mm Gaps

    The plan changed during the works. There will be no memory card reader on the front. I wanted USB3.0 and microSD without an adapter and I will not give PLN 70-120 for the reader at the time when a year ago they were PLN 35 (Modecom CR1XX), so I gave up. At the front there will be a ventilation grille divided into two channels (left inlet for graphics, right inlet for the power supply and outlets on the sides). The processor has an inlet on the right side and the outlet will be at the top. 2 x USB3.1 front, POWER Button, Reset (Bios), Audio + MIC on the left, LCD in the middle + relocated LCD control buttons on the right.
    I didn't have anything to get the keyboard from, I took it from an old calculator. It will look nice. The numbers from the buttons on the calculator have come off under the diluent and the OK button is turquoise. I managed to get the display for PLN 10 for olx and I got the same as I used to have:

    DIY Lightweight PC Case: Choosing Putty & Paint for 100% Plastic Housing, Resin Canvas, & 2mm Gaps

    This is my case from 9 years ago and the display differs from this:
    DIY Lightweight PC Case: Choosing Putty & Paint for 100% Plastic Housing, Resin Canvas, & 2mm Gaps

    the fact that it has something that the latter lacks, i.e. a battery that supports an hour, and it is in color. The time is displayed even when the PC is disconnected from the socket and the screen is then in negative.
    The entire housing without the base currently weighs 390 grams. The result I expected. In the power supply section, there will also be a surge protector inside the housing, and on the back of the housing there will be a possibility to connect 2.3 devices (monitor, printer).

    During work, I also decided that I did not need a DVD drive and it would be a waste of space for flaps and other creations. I have a SATA / USB grommet, so I will connect the drive separately to download photos and others once a year. Thanks to this, I gained the possibility of making a much lower lining, as the original plan envisaged.

    I have already tested the board in the middle and on the unfinished project (i.e. without sealing the cooling tunnels) the temperature (average) i5-7600 after a whole day of work (internet office) ranges from 33 to 35C. However, there must be an additional fan of cold air from outside.
    CPU climbs during 10min. 3DMark and similar tests max. 45C with fans at 50% (1800RPM). Real silence, but this is not the end, because the tunnels were not sealed and the ventilator drew heat from the power supply which worked only on its own fan (it pushed the heat inside the PC because it is mounted on the right side in the front). When I'm done, it seems to me that the set will be able to run on the minimum settings in UEFI (fans 1200-1300rpm).

    All the fun will take a while longer. I think a month's minimum. I am just experiencing the fact that plastic in Poland is more expensive than steel. I have a problem with getting a cheap PLEKSI with a minimum size of 35x35 and I need 2 pieces with a thickness of 3.5> 5.0mm. The housing was supposed to be "cheap!" So I will not give PLN 25 for a piece of plastic and two more times.

    Oh, one more thing. A can of black varnish, which can be seen in the # 1 post, was enough for 3 times of coating with a thin layer of the element visible above. The black hatch measures 35 X 35 cm. I sprayed it three times and the polish was over. If someone will ever make a similar project with painting plastics, do not hesitate even a minute before adding paint on your own. At the first better varnisher who makes extra varnishes in spray cans, the fun will leave about PLN 35-40, but a year ago when I made a bumper in the car, I painted it twice for the PLN 40. It seems to me that there was not even 50g of varnish in this can that I bought for the housing. I do not recommend!!
  • #13 17064444
    krakarak
    Level 42  
    My opinion about this "project" is negative. You have a very ugly and non-functional design. You do not have a printer or a PC case. You can't make a nice design without giving anything to buy the materials.
  • #14 17064467
    moher40
    Level 3  
    Krakarak, what you see is only 20% of the project. The work is not finished. Why do you think the structure is not functional? You see . The project is typically for "yourself and for yourself", so for third parties it may seem that the housing is not functional, but I see it quite differently:

    1.weight !!!! Very often I am forced to transport a PC and I am tormented by the weight of a classic tin can!

    2.Dimensions !!!! 35x 35x16cm versus 45x55x29cm
    Currently, it fits everywhere and takes up very little space and the top stand in the docu ment recess is appropriate. He is standing on a desk with plastic boxes with documents on it. Due to the height of the case (16cm), the computer cannot be seen :-) The current PC is housed in a large ladybug bag :-)

    3.The inside of the PC has:
    a) Standard mATX board comes in
    b) standard power supply (but without housing and fan in a different place)
    c) 2 x 3.5 "for disks (they are suspended at the top)
    d) 1 x 2.5 "for the small disk I have
    e) LowProfile graphics cards (currently GT1030)

    Cooling:
    a) the processor has 2 fans (1 draws, 2 exhausts), there is a very large heatsink of the height of the entire graphics card, so it can be up to 5.6 times larger than the standard Intel (under G4560)
    b) the power supply takes in cold air from the right front and pushes it out with the right side
    c) the graphic draws in cold air from the left front and pushes it out with the left side

    LCD front and "important" temperatures, reset, power, 2 x usb 3.1; audio / mic;
    On the right side, 4 x USB3.0, eSATA, 2 x SATA Express

    When it comes to ugly ... it's hard to talk about tastes, especially when it's not finished. You have to wait a month to get the final opinion.
    What you can see is the ground coat, so it has the right to seem almost disgusting.
    Once the housing has the right colors, GIGABYTE badges, nVidia and Intel stickers, buttons, LCD and lots of others, then you will be able to judge its final appearance.

    However, I remind you that the priority is not the appearance but:
    a) weight
    b) dimensions

    Oh, the interior. I'll take pics over time. The interior is also sanded and varnished. Everything on the edge. Resin, canvas and the like will not be visible in the final product. The interior will also be polished. Just got a 3.5 and 2.5 plastic sled from HP :-)

    DIY Lightweight PC Case: Choosing Putty & Paint for 100% Plastic Housing, Resin Canvas, & 2mm Gaps

Topic summary

The discussion revolves around constructing a lightweight DIY PC case using 100% plastic housing, with a focus on filling 2mm gaps using flexible putty and resin. Users share experiences with various putties, including those designed for bumper repairs, which maintain flexibility after curing. Concerns are raised about the proper mixing ratios of resin and hardener to avoid a rubbery texture. Recommendations include using products like Poxilina and Octopus for filling, and applying a clear varnish for protection after painting. The conversation also touches on the importance of mass in mounting the motherboard and the use of aluminum foil for insulation, with some users expressing skepticism about the effectiveness of available foils. The project aims to create a compact, lightweight case suitable for transport, with specific dimensions and internal configurations.
Summary generated by the language model.
ADVERTISEMENT