logo elektroda
logo elektroda
X
logo elektroda

[Solved] Siemens EQ.5 TE503201RW / 10 coffee maker - continuous message Clean brewing uni

grzesiek.bartosik 89640 11
ADVERTISEMENT
Treść została przetłumaczona polish » english Zobacz oryginalną wersję tematu
  • #1 17307335
    grzesiek.bartosik
    Level 11  
    Hello forum users,

    I am the owner of the Siemens EQ.5 (model TE503201RW / 10). It worked flawlessly for a long time, but after a while the message Clean brewer started to appear. Operation was standard, i.e. removing the washing and lubricating the brewing unit seals. After some time, this action was repeated, so again washing, lubrication, but unfortunately helped for a few coffees and again the same until finally the freshly washed brewer immediately shouted with the message Clean the brewing unit and in a moment the service needed defect. For this reason, the machine once landed on the site, where, in addition to the piston seal, the micro-switch was also replaced (according to the repair documentation, only so much is written, so I do not know what it is exactly). He returned, worked for several months and the problem returned in the same form. The standard washing of the brewing machine did not help, so I was tempted to its larger service consisting of complete unscrewing, washing, lubrication of seals and movable guides (as in this video https://www.youtube.com/watch?v=gkdTm1-zDLQ, to lubrication I used OKS 1110 grease), but unfortunately also no results.

    Below all the data from the service menu, maybe someone will see something in them? By the way, I will share my knowledge on how to get to it, because it also took a while to find such information.

    PROD DATA:
    MAIN SW 1.04 01.04.12
    MAIN HW 1.0 31.05.12
    DISP. SW 1.01 20.10.10
    DISP. HW 1.0 07.06.12

    SENSOR TEST:
    All OK. As we move individual elements, the counters change.

    ERROR LOG:
    BMU 3903
    M01F07H02

    BMD 3903
    M00F00H00

    ERROR MEMORY:
    OVER VOLT. 0
    UNDER VOLT. 0
    NTC OUT 0
    NTC SURF 0
    BU TO 19
    BU OVER I 131
    CV TO 0
    PUMP TO 1
    OVER TEMP. 132
    SHUTDOWN 8
    GRIND OVER I 0

    COMP TEST:
    PUMP 50 ML
    FL: 0ML / S -> shows 61-63 ml / s during the test, water appears in the tray, shows no errors

    GRINDER 5S
    AVG: -> grinds coffee, doesn't show any errors

    HEAT 0: 40
    3 SEC S: 38 -> heats up to 55, shows no errors

    BU DOWN -> after pressing START it leaves the brewing unit, shows no errors
    BU UP -> after pressing START raises the brewing unit, shows no errors

    LEDN ON -> something is flashing, but it probably doesn't matter
    AUTO OFF -> works, the espresso machine switches off

    CV STEP
    POSITIONS: -> nothing happens here after pressing START, I don't know if anything should happen

    Entering the service menu and other hidden options:
    Service menu: Pressing OFF + START + top knob in the RINSE position when turning the machine on
    Service menu Selecting (ENTER) option: OFF
    Service menu Return from (ESC) option: PAIR
    Factory Reset: Pressing OFF + PARA when switching on the coffee machine
    Demo mode: Pressing START + STEAM + drawer outside when turning the machine on

    Thanks in advance for your help.
  • ADVERTISEMENT
  • #2 17308240
    nioop

    Home appliances specialist
    You have a problem reading the bottom position of the brewing block ..
    I would suggest replacing the microswitch in the drive - it happens that they are functional after pressing but they have slack in the pressing mushroom.
    If this does not help, then the problem is somewhere with the reading on the electronics.
  • #3 17308341
    grzesiek.bartosik
    Level 11  
    Thanks for the suggestion. I will try to look at it today.

    Added after 2 [hours] 13 [minutes]:

    nioop wrote:
    You have a problem reading the bottom position of the brewing block ..
    I would suggest replacing the microswitch in the drive - it happens that they are functional after pressing but they have slack in the pressing mushroom.

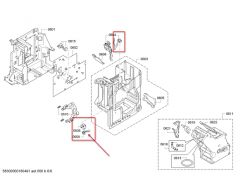
    Is this the microswitch from the picture below marked with an arrow?

    Siemens EQ.5 TE503201RW / 10 coffee maker - continuous message Clean brewing uni

    Or maybe the ones below?

    Siemens EQ.5 TE503201RW / 10 coffee maker - continuous message Clean brewing uni

    PS. The above photo comes from this post.
  • ADVERTISEMENT
  • Helpful post
    #4 17309140
    nioop

    Home appliances specialist
    This is a multivalve ..
    It's about the brewing unit drive ... Next, a bit lower ...
    Its disassembly is a lot of patience
  • #5 17309328
    grzesiek.bartosik
    Level 11  
    nioop wrote:
    Its disassembly is a lot of patience

    Indeed Today I opened the coffee machine and wondered how to get there. Surely you need to start with 3 (or 4) screws from the brewing block side, but pulling out this drive will probably not come out without pulling out other elements, and it is a bit.
    The question then: What are the approximate costs of repairing something like this on the site?
  • ADVERTISEMENT
  • #6 17323224
    jesionen
    Level 11  
    Hello, was the problem solved because I have the same problem?
  • #7 17323257
    grzesiek.bartosik
    Level 11  
    Unfortunately not, because, as nioop wrote ... disassembly of this is a pile of warmth ... and I ran out of time with the lack of time in the evenings ;-) . For now, I wrote an email to one of the websites in Lublin asking for a quote for such repair, specifying exactly what the exchange is. I received information that parts are 174 PLN + 200 PLN labor. A bit much 174 as the cost of the microswitch, but maybe you can't replace it by yourself and you need to come with a drive. I will find out more.
  • Helpful post
    #8 17323262
    jesionen
    Level 11  
    When it comes to dismantling and removing this drive, that's what I did not so terrible, after replacing the micro switches I still do the same :( , let me know if you managed to fix the fault. greetings
  • ADVERTISEMENT
  • #9 17323285
    grzesiek.bartosik
    Level 11  
    From what I see it is a whole drive up to PLN 200 ( link ) so in this valuation there was probably a replacement of the whole drive, but I will wait what they will answer.

    Added after 10 [minutes]:

    nioop wrote:
    (..)
    I would suggest replacing the microswitch in the drive - it happens that they are operational after (..)

    Is this the micro switch itself or does it need to be replaced?
  • Helpful post
    #10 17323437
    jesionen
    Level 11  
    There were two of me
  • #11 17323465
    grzesiek.bartosik
    Level 11  
    jesionen wrote:
    There were two of me

    Where can you buy something like this? Do you have any link? Or stationary in stores with household appliances?
  • #12 17355291
    grzesiek.bartosik
    Level 11  
    [b: 6b168f6f60] Thread summary [/ b: 6b168f6f60]
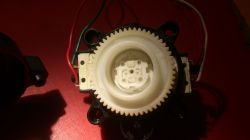
    As suggested by nioop, I focused on the microswitch in the brewing block drive. Thanks to ash, I was able to disassemble the espresso machine because you need to know what, where and in what order to disassemble to get to the brewing unit drive. After removing the drive, disassembly is a simple matter, you just need to be careful not to break the catches. For me, one of the microswitches was defective.

    I bought 2 pieces of such https://www.tme.eu/pl/details/1050.2202/mikroprzelaczniki-snap-action/marquardt/.
    After replacement, the machine works correctly.
    Below the drive after removal and dismantling with a view of the microswitches.
    Of course, it wasn't without a good cleaning of coffee, because it was everywhere. And when assembling decent lubrication of the worm gear and gears. I used technical vaseline.
    [Img: 40e04e7278] https://obrazki.elektroda.pl/5141660400_1532852079_thumb.jpeg [/ img: 40e04e7278] [Img: 40e04e7278] https://obrazki.elektroda.pl/2003666600_1532852098_thumb.jpeg [/ img: 40e04e7278] [Img: 40e04e7278] https://obrazki.elektroda.pl/4977440800_1532852097_thumb.jpeg [/ img: 40e04e7278]

    [b: 40e04e7278] Short instructions for dismantling the coffee machine [/ b: 40e04e7278]
    That was the biggest problem with that, so let me sum it up because it may be useful to someone.

    1. We start with the housing and follow the instructions available on YT


    Of course, in the film everything looks easy and pleasant, and in fact it is not quite so. The general rule is to lift each part of the housing slightly upwards and it should work. Be careful of the very delicate fastening latches on the top of the grinder.
    2. Then loosen the front with one hook at the top and bottom. There is no need to disassemble the milk frother, you only need to loosen the front panel.
    3. Disassemble the bottom of the coffee machine. First, put the right side (the one on the brewing block side), to unscrew one TORX 20 screw on the back and slide the entire "floor" forward. On the sides there are two latches that you can help free yourself. In my case, the floor was a bit "glued" to the body of the coffee machine with the ubiquitous "coffee slurry" so you need to help it a bit with a thin flat screwdriver.
    4. We return with the coffee maker to the vertical position and there are 4 TORX 20 screws to unscrew. NOTE: You need to have a long, thin TORX key, because you can't do it using replaceable bits, you just can't fit the bit
    [Img: 40e04e7278] https://obrazki.elektroda.pl/3052271200_1532853105_thumb.jpeg [/ img: 40e04e7278]
    5. After tightening the screws, the coffee machine is "split in half", i.e. to the right and left looking at it from the front, and we have easy access to the inside.
    [Img: 40e04e7278] https://obrazki.elektroda.pl/3366639700_1532853206_thumb.jpeg [/ img: 40e04e7278]
    When unfolded in half, they can be blocked by cables from the micro-switches responsible for verifying the closing of the flap and the ground coffee shaft. To make it easier, I dismantled them (two TORX 10 screws from above).

    And that was all.
    I also unscrewed the heater (two TORX 10 screws from the brewing block side) to get to the drive. After loosening the heater, the drive can be unscrewed (3 TORX 10 screws on the brewing block side).

    According to information from ash, decent brewing unit cleaning helped him. To make everything in one thread I add a link to the movie on YT as you can do it.
    PS. In my case, reinstalling the springs was not so fast, but the moment of the fight and I succeeded.


Topic summary

The Siemens EQ.5 coffee maker (model TE503201RW / 10) is experiencing recurring issues with the "Clean brewing unit" message despite regular maintenance, including washing and lubricating the brewing unit seals. Users suggest that the problem may stem from a faulty microswitch in the brewing block drive, which can lead to incorrect readings by the machine's electronics. Disassembly of the coffee maker is required to access the microswitches, and users have reported successful repairs after replacing defective microswitches. Repair costs for parts and labor have been discussed, with some users opting for DIY repairs after obtaining necessary components. Proper cleaning and lubrication during reassembly are also emphasized to ensure optimal performance.
Summary generated by the language model.
ADVERTISEMENT