Open-source hardware enthusiasts widely love Arduino applications. Today, we introduce an interactive Arduino RFID musical instrument, perfect for relaxation and entertainment. This project utilises RFID and MP3 modules to play specific notes from data collected by the RFID module, creating an interactive music game suitable for children's entertainment.In electronic projects, besides RFID modules, inductors are also commonly used. By using an inductor color code, we can quickly identify key parameters such as inductance and tolerance, which is crucial for precise circuit design. For example, if you plan to add a filter circuit to this musical instrument project in the future, understanding inductor colour codes will make it easier to select the appropriate inductor.
Step 1: Content Demonstration
RC522 Mini RFID RF IC Card Sensing, Reading, Writing, and Swiping Module, Small Size, 13.56 MHz
The module used in this project.
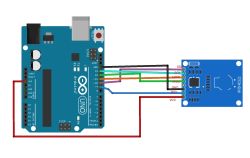
This is the RFID wiring diagram
Step 2: Hardware setup
1.Arduino Uno 1
2.RFID module RC522 1
3.RFID tags 7
4.DF MP3 module 1
5.8-ohm speaker 1
Step 3:
Post some hardware photos to give people a visual understanding
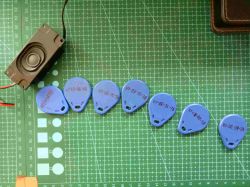
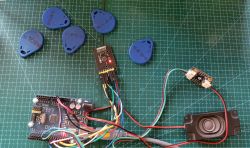
Locate the encoding for each tag via the Arduino serial port. Specifically, open the Arduino example files, navigate to the RFID folder, open the cardread file, and upload it. Then scan the RFID tag with the RFID reader and check the encoding for each tag in the serial port.
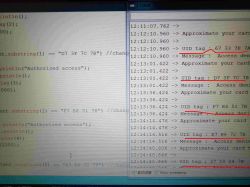
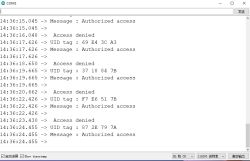
View the tag encoding after scanning the tag in the serial port
Step 4: Wiring diagram
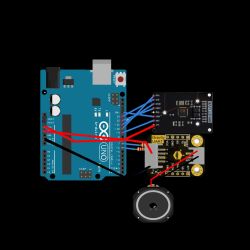
Step 5: Design the code section
Step 1: Content Demonstration
RC522 Mini RFID RF IC Card Sensing, Reading, Writing, and Swiping Module, Small Size, 13.56 MHz
The module used in this project.

This is the RFID wiring diagram
Step 2: Hardware setup
1.Arduino Uno 1
2.RFID module RC522 1
3.RFID tags 7
4.DF MP3 module 1
5.8-ohm speaker 1
Step 3:
Post some hardware photos to give people a visual understanding


Locate the encoding for each tag via the Arduino serial port. Specifically, open the Arduino example files, navigate to the RFID folder, open the cardread file, and upload it. Then scan the RFID tag with the RFID reader and check the encoding for each tag in the serial port.


View the tag encoding after scanning the tag in the serial port
Step 4: Wiring diagram

Step 5: Design the code section
include <spi.h>
include <mfrc522.h>
include “Arduino.h”
include “SoftwareSerial.h”
unsigned char order[4] = {0xAA,0x06,0x00,0xB0};
define SS_PIN 10
define RST_PIN 9
MFRC522 mfrc522(SS_PIN, RST_PIN); // Create MFRC522 instance.
SoftwareSerial Serial1(7, 6); // RX, TX
//============SETUP================
void setup()
{
Serial1.begin(9600);
volume(0x1E);//Volume settings 0x00-0x1E
Serial.begin(115200); // Initiate a serial communication
SPI.begin(); // Initiate SPI bus
mfrc522.PCD_Init(); // Initiate MFRC522
Serial.println(“Approximate your card to the reader…”);
Serial.println();
}
void loop()
{
// Look for new cards
if ( ! mfrc522.PICC_IsNewCardPresent())
{
return;
}
// Select one of the cards
if ( ! mfrc522.PICC_ReadCardSerial())
{
return;
}
//Show UID on serial monitor
Serial.print(“UID tag :”);
String content= “”;
byte letter;
for (byte i = 0; i < mfrc522.uid.size; i++)
{
Serial.print(mfrc522.uid.uidByte[i] < 0x10 ? “ 0” : “ “);
Serial.print(mfrc522.uid.uidByte[i], HEX);
content.concat(String(mfrc522.uid.uidByte[i] < 0x10 ? “ 0” : “ “));
content.concat(String(mfrc522.uid.uidByte[i], HEX));
}
Serial.println();
Serial.print(“Message : “);
content.toUpperCase();
if (content.substring(1) == “69 E4 3C A3”) //change here the UID of the card/cards that you want to give access
{
Serial.println(“Authorized access”);
Serial.println();
play(0x01);//Specify playback: 0x01-file 0001
delay(1000);
}
if (content.substring(1) == “67 33 7E 7A”) //change here the UID of the card/cards that you want to give access
{
Serial.println(“Authorized access”);
Serial.println();
play(0x02);//Specify playback: 0x02-file 0002
delay(1000);
}
if (content.substring(1) == “D7 3F 7C 7B”) //change here the UID of the card/cards that you want to give access
{
Serial.println(“Authorized access”);
Serial.println();
play(0x03);//Specify playback: 0x03-file 0003
delay(1000);
}
if (content.substring(1) == “F7 E6 51 7B”) //change here the UID of the card/cards that you want to give access
{
Serial.println(“Authorized access”);
Serial.println();
play(0x04);//Specify playback: 0x04-file 0004
delay(1000);
}
if (content.substring(1) == “E7 B6 72 7B”) //change here the UID of the card/cards that you want to give access
{
Serial.println(“Authorized access”);
Serial.println();
play(0x05);//Specify playback: 0x05-file 0005
delay(1000);
}
if (content.substring(1) == “37 18 84 7B”) //change here the UID of the card/cards that you want to give access
{
Serial.println(“Authorized access”);
Serial.println();
play(0x06);//Specify playback: 0x06-file 0006
delay(1000);
}
if (content.substring(1) == “87 2E 79 7A”) //change here the UID of the card/cards that you want to give access
{
Serial.println(“Authorized access”);
Serial.println();
play(0x07);//Specify playback: 0x07-file 0007
delay(1000);
}
else {
Serial.println(“ Access denied”);
delay(1000);
}
}
//==========FUNCTION==========
void play(unsigned char Track)
{
unsigned char play[6] = {0xAA,0x07,0x02,0x00,Track,Track+0xB3};//0xB3=0xAA+0x07+0x02+0x00,that is, the last digit is the checksum

Serial1.write(play,6);
}
void volume( unsigned char vol)
{
unsigned char volume[5] = {0xAA,0x13,0x01,vol,vol+0xBE};//0xBE=0xAA+0x13+0x01,that is, the last digit is the checksum
Serial1.write(volume,5);
}
```</mfrc522.h></spi.h>

