DIY 3D printer on Ramps 1.4 + Arduino Mega2560
TL;DR
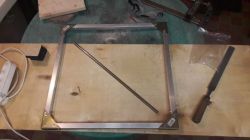
- A DIY Cartesian FDM 3D printer was built from scratch on a 20x20x2 mm aluminium-profile frame with roughly a 50x50x50 cm overall size.
- X and Y run on GT2 6 mm belts, Z uses two T8 trapezoidal screws, and the electronics use an Arduino Mega2560 clone, Ramps 1.4, and A4988 stepsticks.
- The printer offers about 30 cm of X/Y working area and 40 cm on Z, with five Nema 17 motors and an LCD controller for standalone operation.
- The build is running and already producing test prints, but some outputs still look poor and the Chinese hotend is blamed for the defects.
- Parts cost totaled 818zł, although the builder says the real expense was a bit higher because of wrong shipments and broken parts.
Generated by the language model.
Hi, today I wanted to present you my construction of a 3D printer from start to finish designed and made by me! I'll start with the construction, at the end I'll summarise the costs  I got interested in 3D printing through the 3D printing circle in my department at university, as I had just finished high school it would be worthwhile to get involved in something like this, but instead of participating in the life of the circle I was more interested in the machines themselves, which is why I decided to build one myself (to this day I am not in this circle, and all the knowledge about 3D printing I owe to the Internet and experience)
I started by understanding how such a printer works and it's quite simple, there are three axes controlled by XYZ stepper motors and a head which heats up and through it the filament is "pushed" for printing. If anyone wants more information the internet is a huge source.
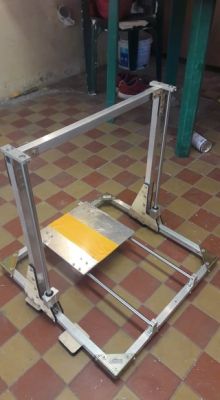
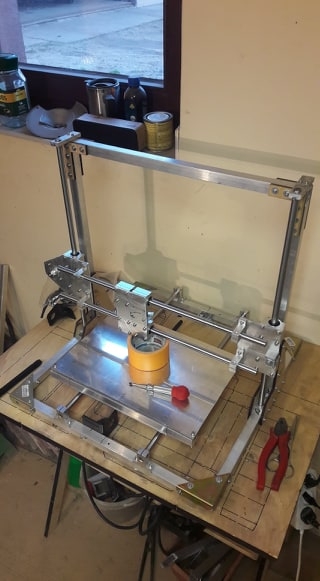
My printer is of the FDM type i.e. three axes in a Cartesian system. The frame is made of 20x20x2mm aluminium profiles (about 5-6m) and quite a few allen head screws (M3 and M4 of various lengths). The dimensions are about 50x50x50cm, the working area is about 30cm in the x and y axes and 40 in the Z axis.
I started by building the base of the printer, which is simply the bottom frame:
and assembling the roller guides to the printer table (Y axis).
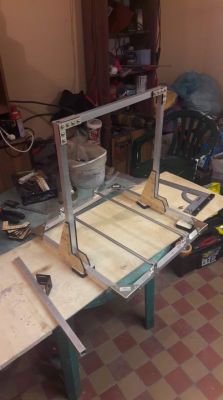
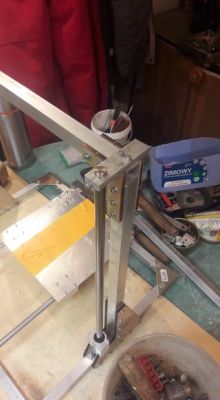
The first problem arose when I tried to make the so-called gate, well I didn't know how to connect quite stably to the previously built frame. I initially wanted to buy ready-made connectors, but they were not available anywhere in the shape I wanted, and it was a waste of money to mill them in aluminium. I took a bit of a risk and cut the connectors out of wood using a laser.
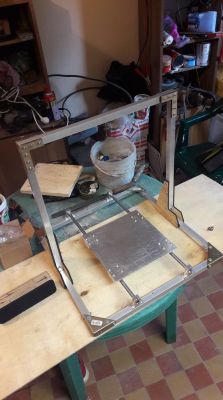
This is what the connectors and my printer looked like. The next step was to mount the table on bearings (Y axis).
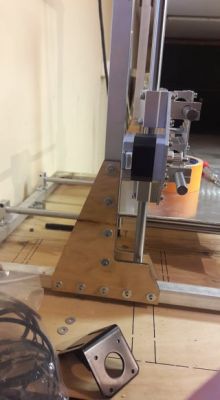
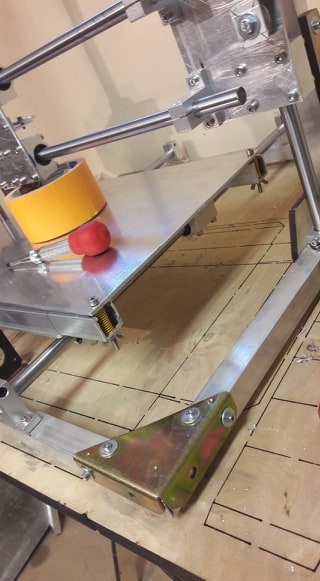
So now that I have the Y axis base I need to get on with the X and Z axes, the next step was to assemble the guides for the Z axes, I made the roller holders from an 8mm thick and 20mm wide piece of aluminium suitably drilled and threaded by me.
Unfortunately I stopped taking photos during this stage of the build and only have further photos once I have all the axles fitted, and it looks like this:
At this point the table was already mounted on springs so that it will be possible to adjust its height and level, and it looks like this:
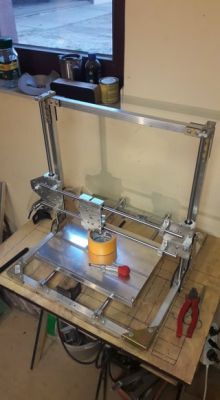
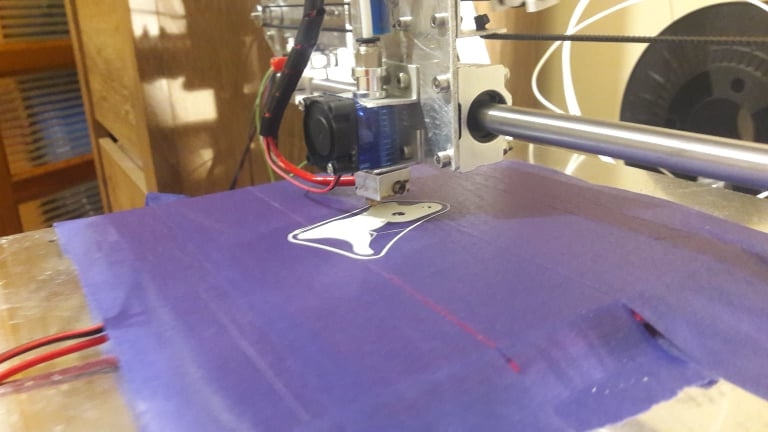
The assembly of the head remains and the toy is practically finished. I probably didn't mention, but the Y and X axes are driven by GT2 6mm belts and the Z axis by two trapezoidal screws with T8 threads (the X and Y axes have one motor each, while the Z axis has two motors). After assembling the head, the first prints took place.

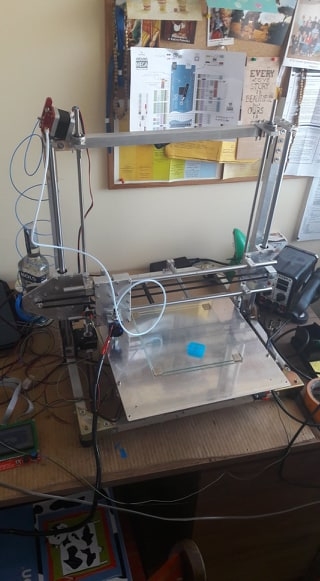
Here a picture from a week ago, since then I have added a heated table and arranged the cables (a little). Now the printer is almost finished and ready to play with.


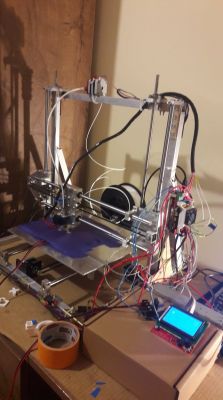
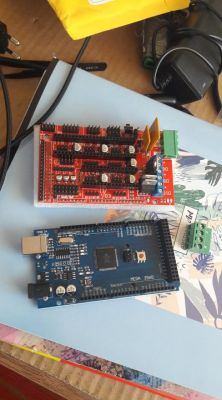
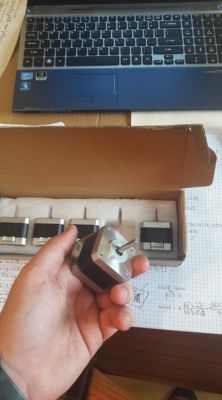
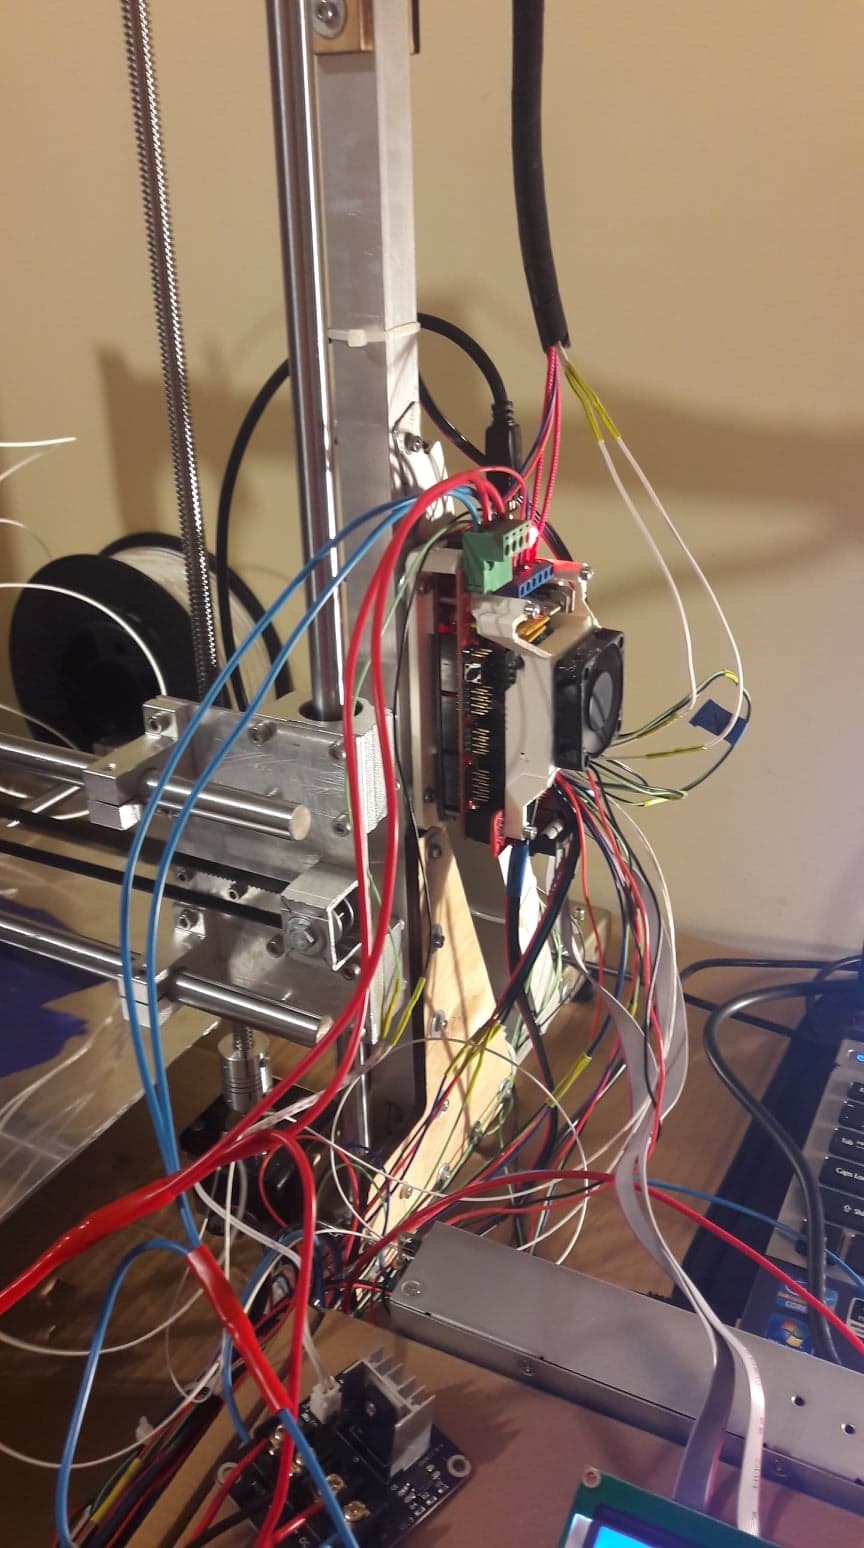
As far as the electronics are concerned, I used a fairly common solution which is an arduino mega2560 (clone) with a ramps 1.4 overlay (+stepsticks A4988 for the stepper motors). The stepper motors are the well-known nema 17 (no point in packing bigger ones). The addition here is an LCD controller that allows the printer to work without a computer.

Forgive me for such a short description, it's quite late, I will answer any questions tomorrow
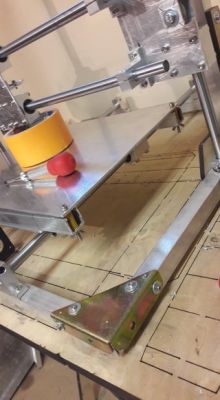
Example prints:


I must sadly add that unfortunately still not every print comes out nicely, I blame this on the Chinese head and I am trying to buy an original e3d head
The cost of such a play:
- 20x20x2m aluminium profiles and 3mm sheet - 100zl
- Screws, nuts, washers - 100zl (a lot left over)
- Slides (12mm shafts) 6pcs - 75zl
- Bearings 12pcs - 100zl
- Holders for slides 8pcs - 40zl
- Bearings for trapezoidal screws 2pcs - 10zl
- Trapezoidal screws T8 500mm with cap 2szt - 30zl
- Flexible couplings 2pcs - 20zl
- Motor mounts 3pcs - 20zl
- GT2 6mm belt for 5m - 8zł
- Gears for the belt (several different ones) - 20zl
- Nema 17 motors 5pcs - 140zl
- Arduino mega2560 clone - 40zl
- Ramps 1.4 - 15zl
- Stepsticks A4988 4pcs - 10zł
- LCD - 40zl
- MK8 extruder - 20zl (filament feeder)
- E3D clone head - 20zl
- Limit switches - 10zl
Total - 818zł
Things such as cables and other fuckers I skip because I had at home,
i do not remember more, if something is please ask
The costs were certainly a little higher but that was because sometimes the wrong thing was sent or something just broke.
If anyone wants to ask if it's worth it, it's honestly rather not. It's rare for a person to print anything bigger than 20x20x20cm and for the amount I spent you can get a decent printer for hobby printing. On the other hand, if someone wants to try their hand at it and have great satisfaction then I recommend it, super fun.
If someone decides to build a 3D printer I will be happy to help start this adventure, so feel free to write.
Greetings and good night
I started by understanding how such a printer works and it's quite simple, there are three axes controlled by XYZ stepper motors and a head which heats up and through it the filament is "pushed" for printing. If anyone wants more information the internet is a huge source.
My printer is of the FDM type i.e. three axes in a Cartesian system. The frame is made of 20x20x2mm aluminium profiles (about 5-6m) and quite a few allen head screws (M3 and M4 of various lengths). The dimensions are about 50x50x50cm, the working area is about 30cm in the x and y axes and 40 in the Z axis.
I started by building the base of the printer, which is simply the bottom frame:

and assembling the roller guides to the printer table (Y axis).
The first problem arose when I tried to make the so-called gate, well I didn't know how to connect quite stably to the previously built frame. I initially wanted to buy ready-made connectors, but they were not available anywhere in the shape I wanted, and it was a waste of money to mill them in aluminium. I took a bit of a risk and cut the connectors out of wood using a laser.


This is what the connectors and my printer looked like. The next step was to mount the table on bearings (Y axis).

So now that I have the Y axis base I need to get on with the X and Z axes, the next step was to assemble the guides for the Z axes, I made the roller holders from an 8mm thick and 20mm wide piece of aluminium suitably drilled and threaded by me.
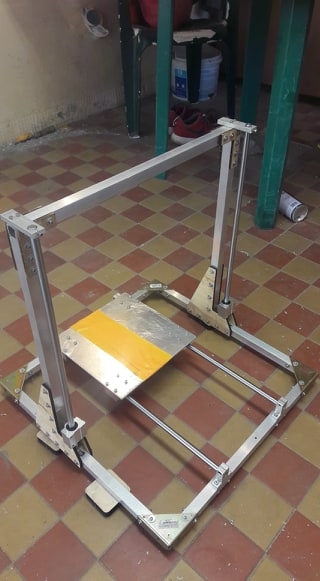

Unfortunately I stopped taking photos during this stage of the build and only have further photos once I have all the axles fitted, and it looks like this:
At this point the table was already mounted on springs so that it will be possible to adjust its height and level, and it looks like this:
The assembly of the head remains and the toy is practically finished. I probably didn't mention, but the Y and X axes are driven by GT2 6mm belts and the Z axis by two trapezoidal screws with T8 threads (the X and Y axes have one motor each, while the Z axis has two motors). After assembling the head, the first prints took place.
Here a picture from a week ago, since then I have added a heated table and arranged the cables (a little). Now the printer is almost finished and ready to play with.

As far as the electronics are concerned, I used a fairly common solution which is an arduino mega2560 (clone) with a ramps 1.4 overlay (+stepsticks A4988 for the stepper motors). The stepper motors are the well-known nema 17 (no point in packing bigger ones). The addition here is an LCD controller that allows the printer to work without a computer.


Forgive me for such a short description, it's quite late, I will answer any questions tomorrow
Example prints:
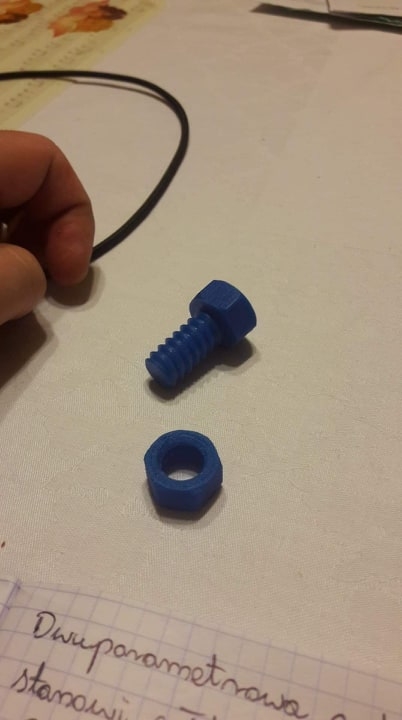
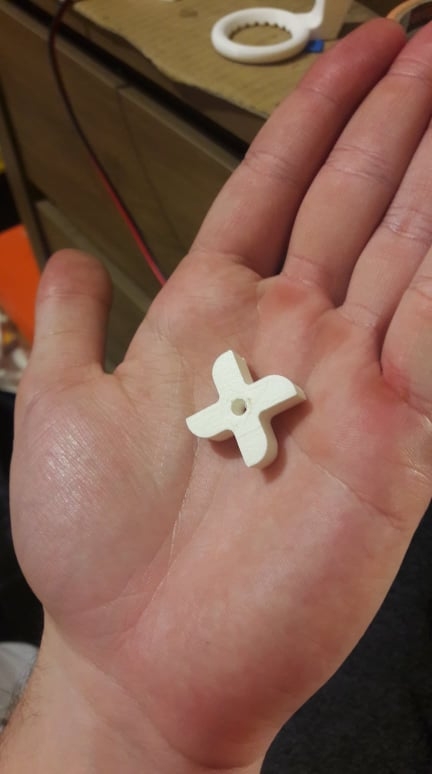
I must sadly add that unfortunately still not every print comes out nicely, I blame this on the Chinese head and I am trying to buy an original e3d head
The cost of such a play:
- 20x20x2m aluminium profiles and 3mm sheet - 100zl
- Screws, nuts, washers - 100zl (a lot left over)
- Slides (12mm shafts) 6pcs - 75zl
- Bearings 12pcs - 100zl
- Holders for slides 8pcs - 40zl
- Bearings for trapezoidal screws 2pcs - 10zl
- Trapezoidal screws T8 500mm with cap 2szt - 30zl
- Flexible couplings 2pcs - 20zl
- Motor mounts 3pcs - 20zl
- GT2 6mm belt for 5m - 8zł
- Gears for the belt (several different ones) - 20zl
- Nema 17 motors 5pcs - 140zl
- Arduino mega2560 clone - 40zl
- Ramps 1.4 - 15zl
- Stepsticks A4988 4pcs - 10zł
- LCD - 40zl
- MK8 extruder - 20zl (filament feeder)
- E3D clone head - 20zl
- Limit switches - 10zl
Total - 818zł
Things such as cables and other fuckers I skip because I had at home,
i do not remember more, if something is please ask
The costs were certainly a little higher but that was because sometimes the wrong thing was sent or something just broke.
If anyone wants to ask if it's worth it, it's honestly rather not. It's rare for a person to print anything bigger than 20x20x20cm and for the amount I spent you can get a decent printer for hobby printing. On the other hand, if someone wants to try their hand at it and have great satisfaction then I recommend it, super fun.
If someone decides to build a 3D printer I will be happy to help start this adventure, so feel free to write.
Greetings and good night
Comments
Nice printer. What kind of heating table did you use? Did you compile the software yourself or adopted from somewhere? It's worth thinking about a MOSfet, RAMPS can melt on the power socket after a... [Read more]
PLN818... It's a bit past the cost-effectiveness of buying a new printer. [Read more]
Show some nice printer to 818zł then we will determine whether it passes or does not pass :) Congrats on your enthusiasm and it worked out quite nicely for you :) I would also add an Auto leveling... [Read more]
The table is a popular heatbed on the internet https://obrazki.elektroda.pl/6121394600_1552126233_thumb.jpg Software: - software is Marlin 1.1.9 configured for my printer - slicer to cura -... [Read more]
The printer you have built works using FDM technology, which involves extruding molten filament and laying it down layer upon layer to build a 3d model. http://swiatdruku3d.pl/fdm-fused-deposition-modeling/ There... [Read more]
For example, the Creality Ender 3. I bought (from a Polish warehouse) in a promotion for about 780zł. The only downsides to the subject author's printer are one motor in the Z axis and less flash in the... [Read more]
I wrote at the beginning of the post :) but thanks for elaborating :) [Read more]
I have the impression that you are confusing the concepts of printing technology with the type of construction of the device. :) [Read more]
You are correct, I return the honour :) [Read more]
This design has little rigidity, it is not the head that is bad but the nozzle, on top of that the extruder is a failure. How many steps per mm do you have 90? with a knurl fi 12mm. Print extra support... [Read more]
Respect for your own approach to construction. I'll stick with the wood. Laser cutting these brackets out of stainless steel, aluminium or even plain steel would cost a good 20PLN and it would look much... [Read more]
Replace the fuses in the ramps with some automotive ones, as what are there often cause problems. Also knock out the connectors from the power supply and heaters and either solder the cables to the board... [Read more]
Do you think the oval tolerance of the rollers is relevant here, which is in the hundreds of mm? They are more likely to bend. Neoprene straps? That's an even more flexible material. Here, the author has... [Read more]
For the contraption I'm planning stiffeners. The steps I have about 95 per mm, the extruder goes to change in the near future. As for the electronics, the 8bit mega must stay for financial reasons. The... [Read more]
Looks awfully noisy, haven't you thought about V-slot profiles and rollers instead of shafts and linear bearings? There are quite a few clones of the ender3, e.g. alfawise u30 for a bit around 600zl,... [Read more]
The printer despite appearances is quiet, unfortunately you can only hear the squeaks of the motors which is probably due to the stepsticks. My idea was to do it as cheaply as possible, the cost of V... [Read more]
Mrxnnx would you be able to give the exact dimensions of the structure what I have indicated, unless you were guided by a specific design. https://obrazki.elektroda.pl/9332655000_1552840497_th... [Read more]
The design is mine, I had sketches on paper somewhere, I'll look for it. The dimensions according to your marking are: - A, E and D are 50cm - C and B are 24cm the "gate" is right in the middle of... [Read more]
Thank you very much. I wanted to do something similar only with steel profiles. [Read more]