logo elektroda
logo elektroda
X
logo elektroda

Refrigerator compressor using 3D printing

kaeltaz  26 5010 Cool? (+10)
📢 Listen (AI):

TL;DR

  • A mini air compressor uses a refrigerator compressor unit, a 24 L tank, and 3D-printed mounts and covers.
  • PLA parts on a modified Ender 5 secure the fridge unit to the tank, while a brake line connector and M10-to-1/4-inch reduction create a rigid air path.
  • The setup uses a 24 L tank and shuts the compressor off at 8 bar.
  • An electro-valve and non-return valve bleed pressure between the tank and compressor, letting the fridge compressor restart without back pressure.
  • The original pressure switch lacked a pressure relief valve, so it was kept as-is.
Generated by the language model.


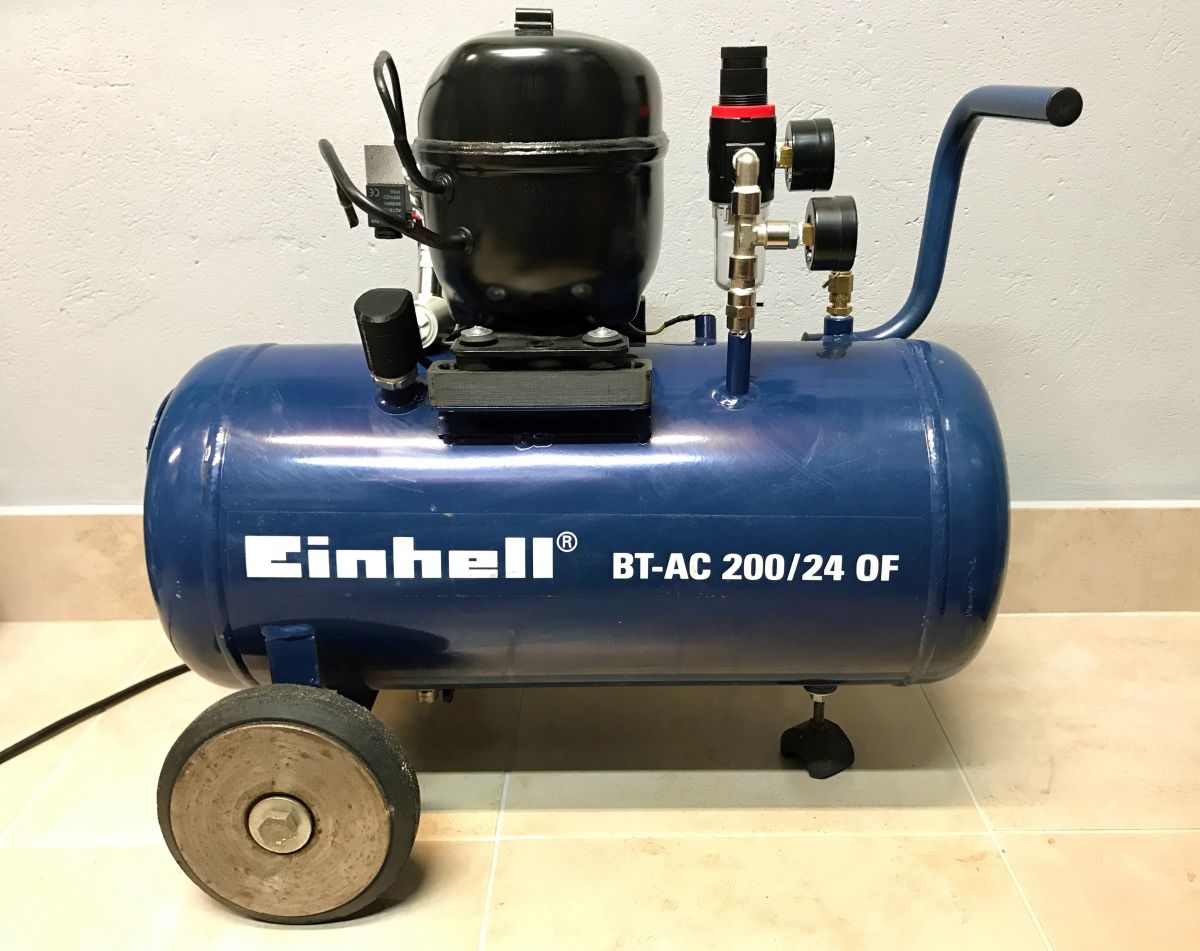
Presenting a mini air compressor made by me using the unit from a refrigerator.

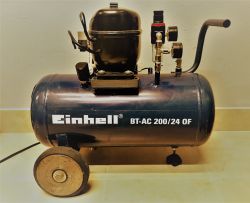
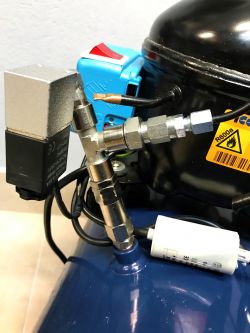
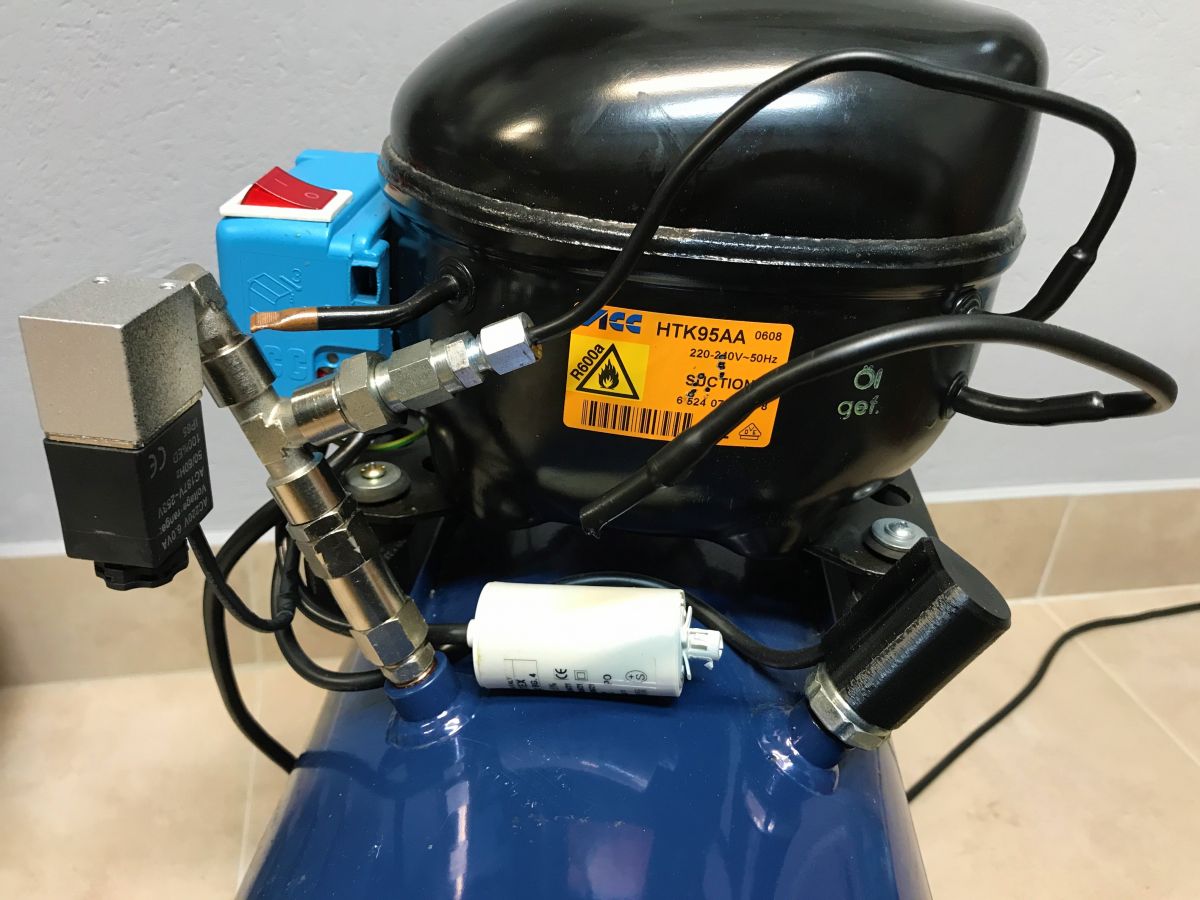
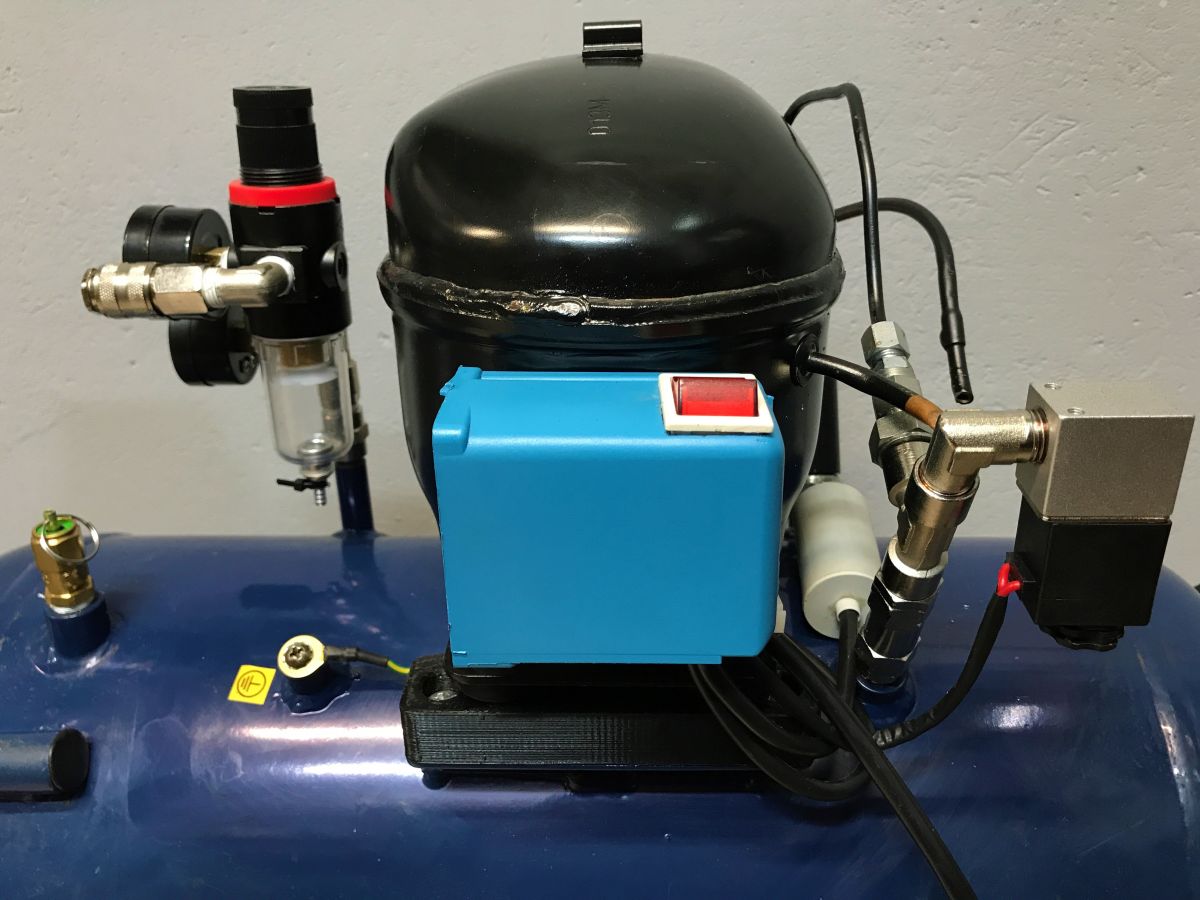
The heart of the compressor is the genset pulled from an old fridge, which due to corrosion was only suitable to be given away for scrap. The 24 L tank was given to me as a gift from a friend; it came from an oil compressor (model pictured). :)

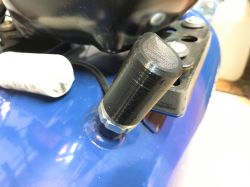
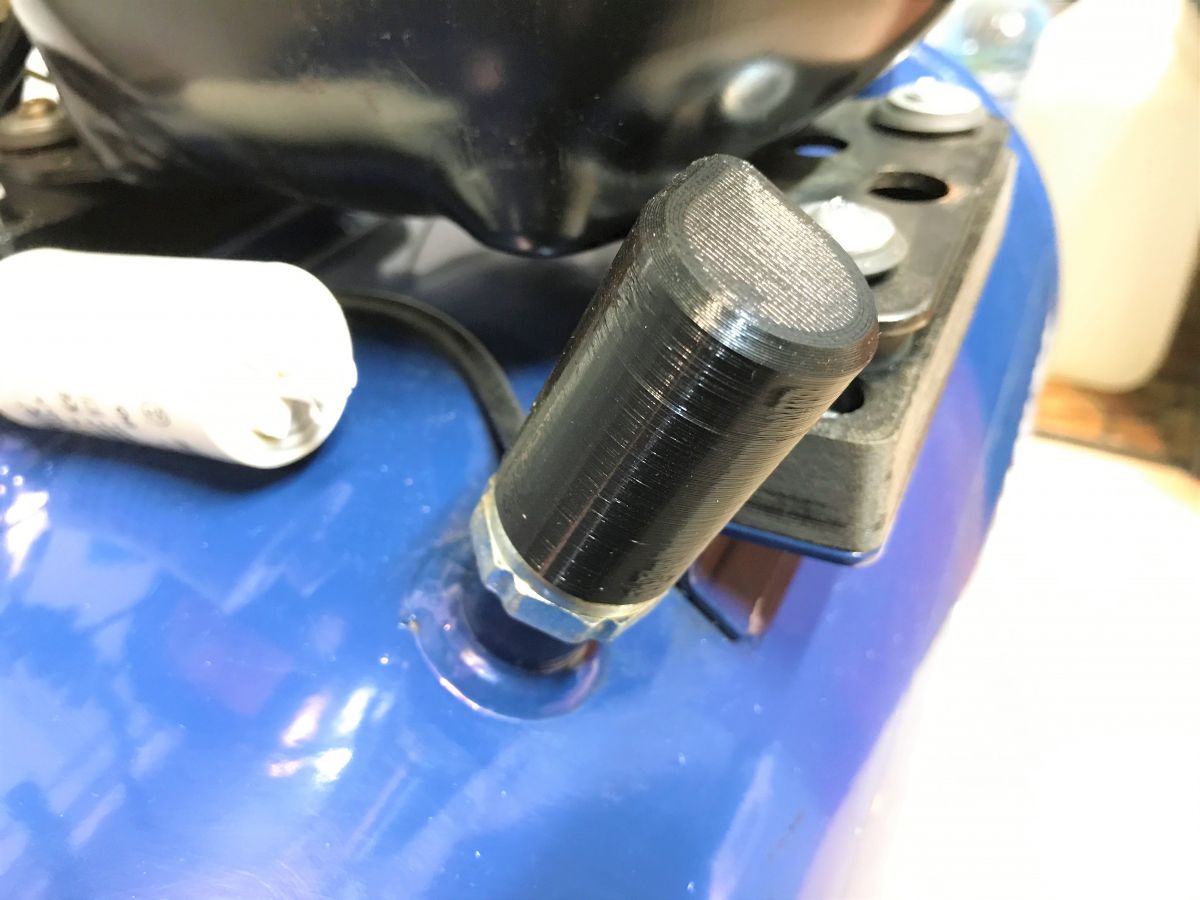
I started by designing the parts with which I mounted the unit in place of the original compressor, these are two plastic parts sized to fit the mounting holes on the tank and the unit. The adapters were printed with PLA filament on my modified Ender 5 printer.


The next printed item is a pressure switch cover to protect against electric shock. I got the pressure switch or pressure switch together with the tank from a friend.


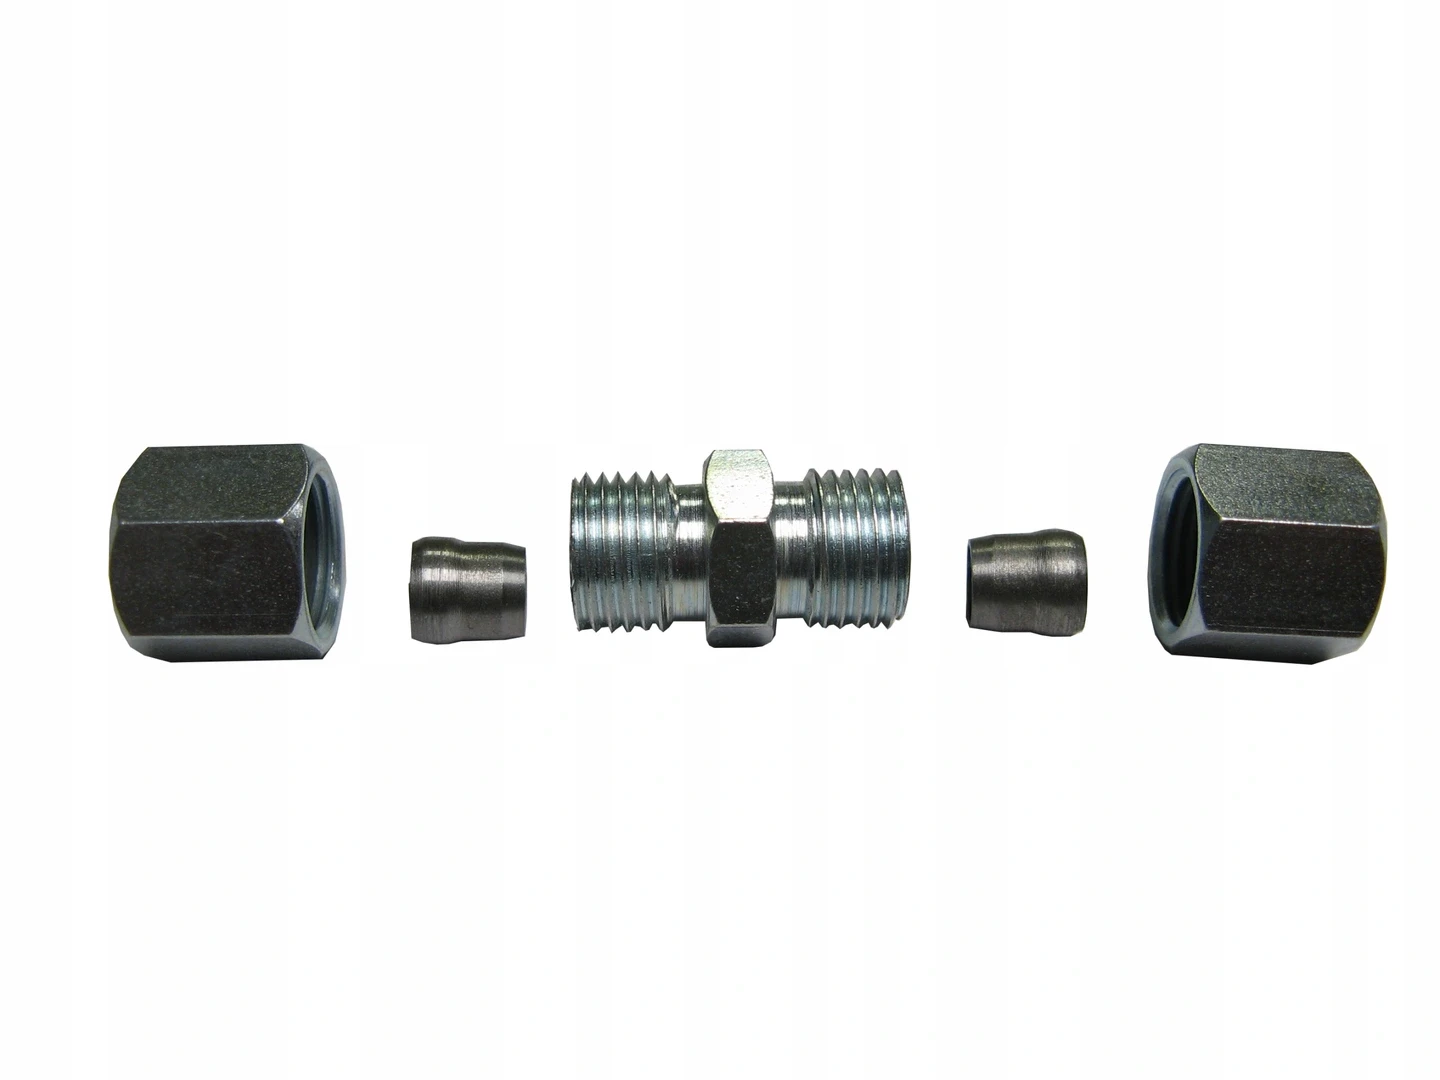
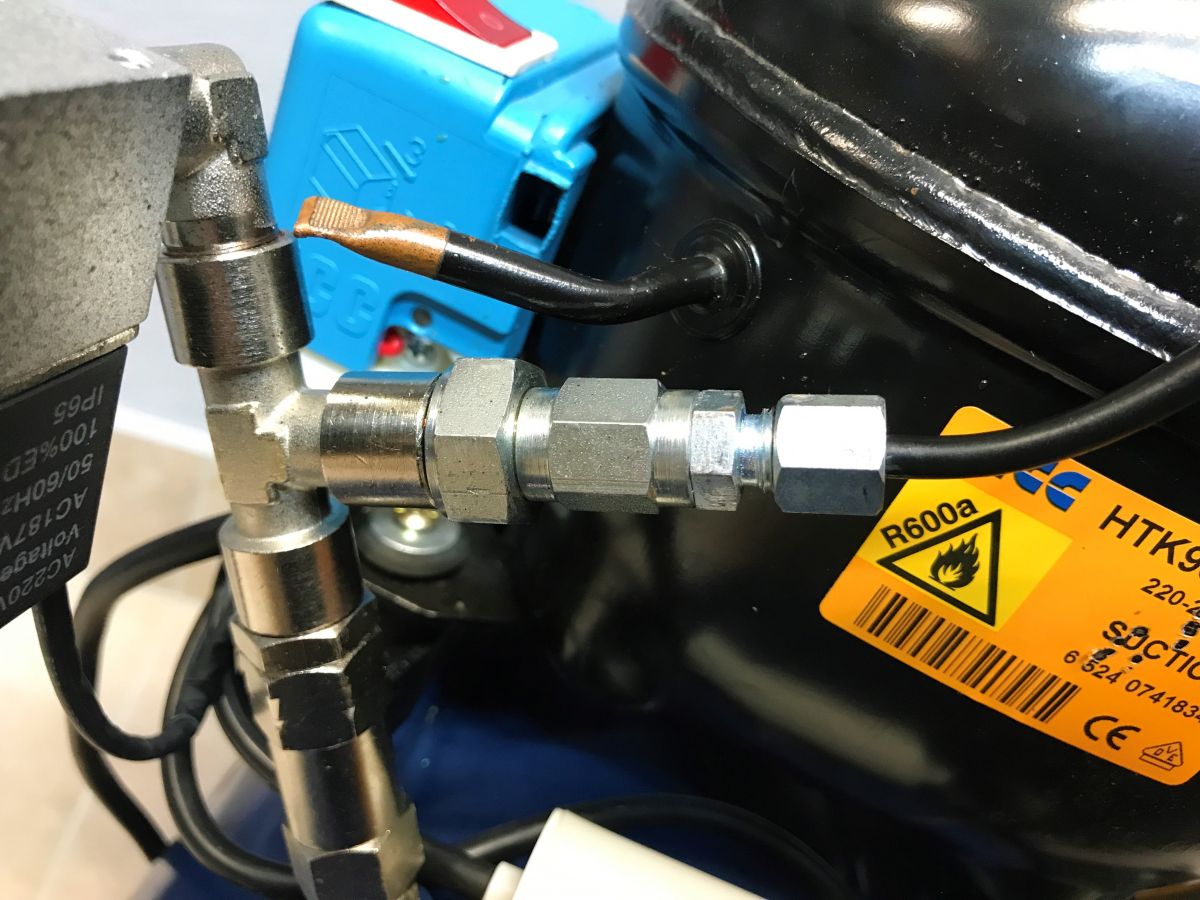
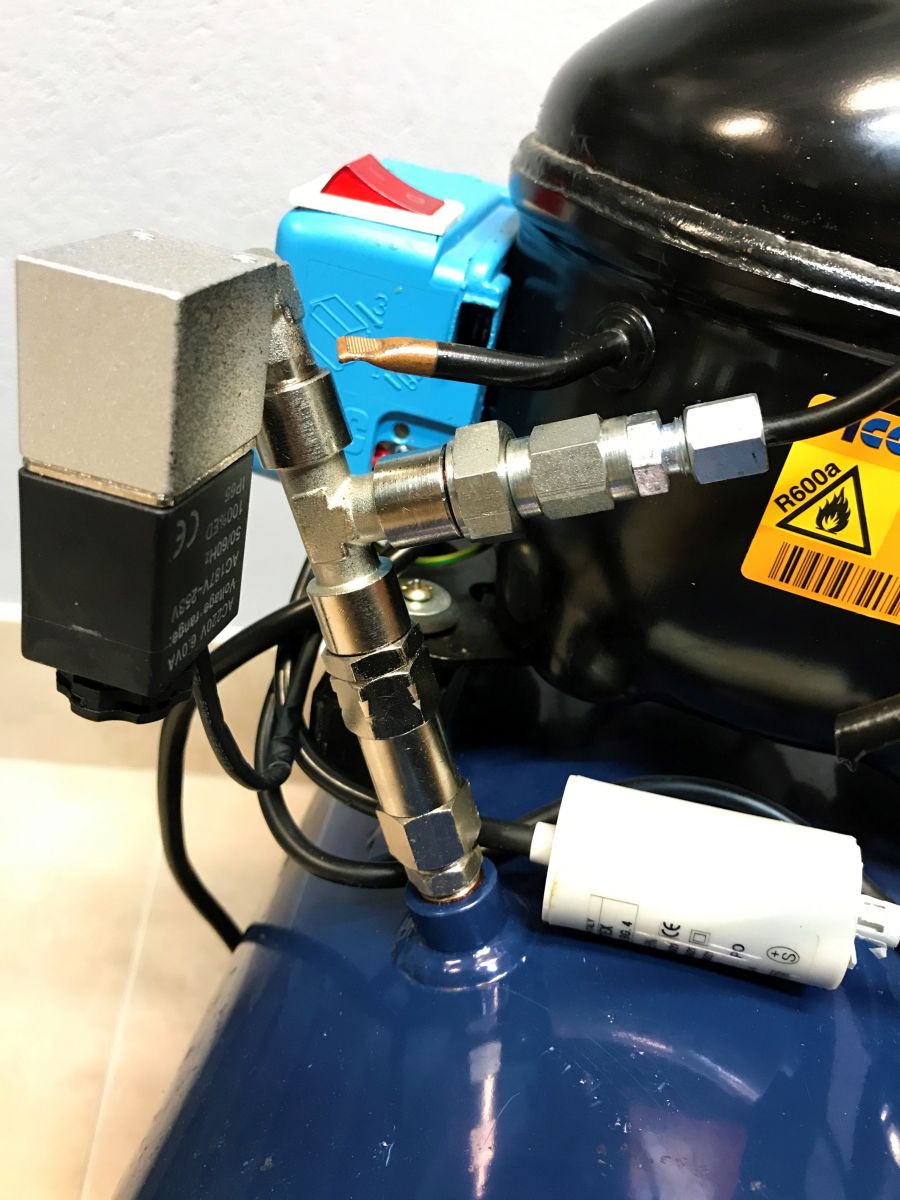
What is interesting and worth noting is the way I implemented the introduction of compressed air into the tank. I didn't want to use any flexible hoses, worm ties etc. the connection had to be secure and reliable (leak-proof). The tube coming out of the unit is steel and 4.8 mm in diameter, the same as the brake pipes used in automotive applications, so I used a brake line connector without crimping.


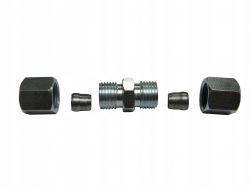
Then there is an M10 coupler screwed in and a reduction from M10 to a standard 1/4 inch outlet. This created a very solid, secure and disconnectable connection between the unit and the rest of the compressor's pneumatic system.

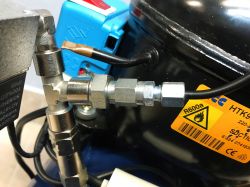
I used an electro-valve and a non-return valve in the role of the de-stressor that enables the unit to start. When the compressor is pressurised to 8 bar, it switches off the unit and the NO-valve through which the liquid escapes between the non-return valve at the tank itself and the unit. This makes it possible to start up again without pressure in the fridge compressor. I did not use a regular pressure switch with a pressure relief valve because the one that came with the cylinder did not have this option and I did not want to change it. :)

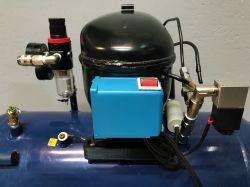
On the outlet there is a standard pressure gauge in the tank, a regulator with dehydrator and pressure gauge and a quick pressure coupling. Such standard equipment on almost every compressor. In the tank itself, I also screwed in a new safety valve and a valve for draining the condensate.

I made all the electrical connections in the factory fridge box, fitted a rocker switch on top which switches the compressor and solenoid valve via a pressure switch. Of course I did not forget the earthing. :)

Below are the pictures and feel free to comment.


About Author
kaeltaz
kaeltaz wrote 300 posts with rating 511 , helped 1 times. Live in city Piotrków Trybunalski. Been with us since 2007 year.

Comments

ADI-mistrzu 14 Jan 2022 08:27

Do I see correctly that the air is taken in without a filter? What is the time it takes to inflate the tank from 0? In what pressure range does it operate (when does it turn on and when does it turn... [Read more]

keseszel 14 Jan 2022 10:15

How about switching the genset off and on. It was a problem for me, it had to be left on for a while, to cool down. It didn't do a great job, pumped a few times and then went out of service. It waits to... [Read more]

ArturAVS 14 Jan 2022 12:15

And I like this solution with the solenoid valve, it minimises the risk of the engine locking up on start-up due to pressure. I guess this is one of the few similar designs presented on the forum equipped... [Read more]

27fwzm 14 Jan 2022 15:37

Nice kit . Can the author of the compressor post the connection diagram . Added after 41 : What is the stress reliever [Read more]

ArturAVS 14 Jan 2022 15:55

The solenoid valve that drains the pressure between the compressor output and the check valve. [Read more]

avatar 14 Jan 2022 17:21

What about the oil from the compressor - it's not all submerged in oil and a drop at a time when pumping doesn't come out ? [Read more]

Ture11 15 Jan 2022 00:38

Older gensets had electromagnetic starting, not posistor starting. You could yes start as often as you wanted. [Read more]

domel.an 15 Jan 2022 01:22

Very nice project. The only thing I would add is that this compressor on r600a runs on vacuum so hence the need for a de-stresser, starting problems and severe heating. If a compressor on r134a or r22... [Read more]

ArturAVS 15 Jan 2022 08:24

I have such a two-piston pump in the compressor and it is no revelation. Yes it has a much higher capacity but after pumping a 60l tank to ~8 Bar it has to stand for a long time to cool down. Hermetic... [Read more]

avatar 15 Jan 2022 08:28

For me, a compressor with oil in the air is not suitable for anything - not for painting and not for driving pneumatic equipment. no one is writing anything here about the dangers / emissions of chemical... [Read more]

ArturAVS 15 Jan 2022 08:34

After all, pneumatic equipment requires lubrication and such an oil mist suits them very well. Painting is a different matter, here you need a separator for both oil and condensation. [Read more]

keseszel 15 Jan 2022 21:16

I had no idea they were different. I've had some that needed to cool down. But you don't look a gift horse in the mouth ;-) . As for the oil mist, you used to give the oil separator in the form of a jar... [Read more]

kaeltaz 16 Jan 2022 15:21

The compressor pumps a 24L tank to 8.2 bar in 7.5 minutes. In the pressure switch operating range of 6 - 8.2 bar, it takes 2 minutes to re-pump. So far there is no inlet filter as I don't know what to... [Read more]

Rezystor240 16 Jan 2022 17:22

@kaeltaz You brag about using a 3D printer and so on, the housing and the chiller stand. And some kind of holder for the capacitor is missing and it's just holding on to the wires and dangling like that.... [Read more]

domel.an 16 Jan 2022 18:16

The lpg filter will catch dirt (if there is any) and oil until it is saturated with oil itself. The oil will not drain into the unit, only into the valves. To get it into the compressor, you would have... [Read more]

Rezystor240 16 Jan 2022 18:49

That's right, it won't be right away, but over time until the entire filter is covered with oil, and this oil on the filter will accumulate oil in the form of a mist already completely. Not quite... [Read more]

domel.an 16 Jan 2022 19:45

With the stubbornness of a maniac you insist on your own. I see that you have no idea how a refrigerator compressor is built. There are valves above the piston, and suction is taken from the crankcase,... [Read more]

ArturAVS 16 Jan 2022 20:15

He doesn't need to cut and peek, there is already an article describing the construction. [Read more]

Rezystor240 17 Jan 2022 06:38

@domelan I have a build like this to my credit and I know what I'm saying, at the time I hadn't applied it yet, it's been on the forum for 4 years and built another couple of years back. https://www.elektroda.pl/rtvforum/topic3521431.html And... [Read more]

FAQ

TL;DR: DIY builders are turning fridge units into quiet shop compressors; one 24 L setup hits 8.2 bar in 7.5 minutes. “The compressor pumps a 24 L tank to 8.2 bar in 7.5 minutes.” [Elektroda, kaeltaz, post #19823764] Why it matters: If you need low-cost, low-noise compressed air for a bench, this thread shows what works, pitfalls, and safer plumbing choices.

Quick Facts

How fast will a refrigerator-compressor fill a 24 L tank?

In the showcased build, it reached 8.2 bar from empty in about 7.5 minutes. The same system re-pressurized from 6.0 to 8.2 bar in roughly 2 minutes. Performance depends on the specific hermetic unit, fittings, and cooling. Keep discharge lines short, well‑sealed, and add a fan if the shell runs hot. Monitor duty cycle to avoid thermal trips. “The compressor pumps a 24 L tank to 8.2 bar in 7.5 minutes.” [Elektroda, kaeltaz, post #19823764]

What pressure range should I set the switch to?

A practical window shown was about 6.0 bar cut‑in and 8.2 bar cut‑out for a 24 L receiver. That range balances usable air with manageable heat and restart stress for small hermetic units. Verify your tank’s rating and your safety valve setting first. [Elektroda, kaeltaz, post #19823764]

Do I really need an inlet air filter?

Yes—keep dust out of the compressor. The featured build initially ran without an inlet filter, which risks abrasive wear. Fit a small foam or automotive-style filter on the suction stub and service it regularly. Clean intake air helps valves live longer and reduces noise. [Elektroda, kaeltaz, post #19823764]

What is a compressor “de‑stresser” (unloader) and why use one?

It’s a valve that vents trapped pressure between the compressor and the check valve at shut‑off. That removes start‑up backpressure so the motor spins up easily next cycle. In this thread, a normally‑open solenoid unloader is praised for reliability and softer restarts. “It minimises the risk of the engine locking up on start‑up.” [Elektroda, ArturAVS, post #19819517]

How should I plumb the discharge for a leak‑tight connection?

One robust method used the existing 4.8 mm steel discharge tube into a brake‑line compression fitting, then an M10 coupler and an M10→1/4" reducer. This provided a rigid, serviceable, and leak‑free path into the receiver’s check valve and manifold. [Elektroda, kaeltaz, post #19818944]

Will oil get into the air, and what can I do about it?

Hermetic fridge compressors carry oil into the discharge, so expect an oil mist. Add an oil separator on the outlet if you need cleaner air, especially for painting. For air tools, that mist can be beneficial, but finish work needs filtration plus a water trap. [Elektroda, ArturAVS, post #19821165]

Which oil should I top up with for hobby use?

For these repurposed builds, a contributor recommends ordinary automotive semi‑synthetic oil over transformer or gearbox oils. Keep volume modest, and service your separator so excess isn’t blown downstream. Always add oil through the intake path with the unit off. [Elektroda, domel.an, post #19827230]

Why do some R600a fridge compressors run hot or struggle to restart?

R600a units often work near vacuum on suction in fridges, so they benefit from an unloader and forced cooling when repurposed. Add a fan across the shell and keep cycles reasonable. Units designed for R134a or R22 may start more easily under load. [Elektroda, domel.an, post #19821072]

How can I return separated oil automatically to the compressor?

One effective DIY separator used a vertical chamber with a baffle and a rubber‑coated floating ball. A small capillary returned collected oil to suction when stopped; discharge pressure lifted the ball to seal during run. Simple, automatic, and low‑maintenance. [Elektroda, ArturAVS, post #19827241]

What about water in the tank—can I reduce it?

You can shift condensation upstream by lengthening copper discharge lines for cooling and adding a filter with automatic drain before the tank. This reduced receiver water accumulation in a shared build. Still open the tank drain routinely to purge condensate. [Elektroda, ADI-mistrzu, post #19827290]

My unit won’t restart hot—what’s happening?

Some users reported repeated short cycles causing heat soak and restart failure. Hermetic units can trip internal thermal protectors or struggle against head pressure. Let it cool, add an unloader, improve ventilation, and widen the pressure band to lengthen off‑time. [Elektroda, keseszel, post #19819330]

Is the fridge‑compressor build actually quiet?

Yes, that’s a big advantage. A commenter envied the “quietness of pumping” compared to a loud consumer oil‑lubed compressor. Shell‑type hermetics run smoothly, especially when rubber‑mounted and hard‑plumbed. [Elektroda, keseszel, post #19822649]

Can you outline the wiring and control scheme?

Basic approach: mains to a pressure switch; the switch feeds the compressor and a normally‑open solenoid unloader in parallel. At cut‑out, power drops and the NO valve vents the line between the check valve and compressor for easier next start. Ground the chassis. [Elektroda, kaeltaz, post #19818944]

How do I add a solenoid unloader in three steps?

  1. Install a check valve at the tank inlet and tee the compressor discharge before it.
  2. Fit a normally‑open solenoid from the tee to atmosphere, with a short muffler.
  3. Wire the solenoid in parallel with the motor through the pressure switch, so it vents only when off. [Elektroda, 27fwzm, post #19819938]

Any safety must‑do items for this conversion?

Fit a working safety valve and a manual condensate drain on the tank. Ensure protective earth is connected, shroud live terminals, and secure all plumbing. Use a pressure‑rated receiver and avoid flexible worm‑clamped discharge hoses near the shell. [Elektroda, kaeltaz, post #19818944]
Generated by the language model.
%}