
I picked up a Volumio a couple of years ago. I wrote a bit about it in my topic on guitar amplifiers. For the project I purchased a Rasberry Pi4 B, a Hifiberry DAC2 Pro and an "official" 7-inch touchscreen display. The system that was installed was Volumio 2.917 and I hooked up an encoder and IR receiver. I was going to do the enclosure but the topic was constantly put off until I finally let it go. The Volumio was used successfully for those four years. In time Volumio 3 appeared, but in its initial development phase it lacked the plug-ins I wanted and I let the update go. The topic of Volumio was revived quite recently. I asked my colleague Radek to design an advanced power supply that could switch the Raspberry Pi on and off without fear of damaging the data on the SD card due to improper system shutdown. More on that later.
On the occasion that I returned to the Volumio theme I decided to make myself one such player for work. Here I felt bad about packing 4B so I purchased a Pi Zero 2W. As a result of various turbulence I have two Pi4B's and two Pi Zero2W's.
For the 4B I purchased a 3.5inch Waweshare LCD touch panel (B) which communicated with the RPi 4B via SPI. It turned out to be a maximum failure. I passed it on to a colleague who managed it but as far as I know did not run it with Volumio. I went the other way and bought a Waveshare 16340, 4 inch, HDMI, SPI is only used for touch in it. It took a while to get it up and running but I managed. Let me just add that I know Linux poorly, but somehow managed.
For the Pi Zero2W I purchased OLED 1106 and 1109 displays, one of the 1106s I accidentally crashed so it flew into the rubbish.
A few words about the DACs. Given the lack of sound on the headphone output of the Hifiberry DAC2 Pro I decided not to buy a dac from that brand. For the small Pi zero2W I bought a Waveshare DAC based on the PCM 5122 from majfrends matching the size of the PI Zero2W, for the large PI 4B I bought two DACs. The first is an IQaudio DAC PLUS and the second is an IQaudio DAC Pro based on the 5242 DACs. All three cards/dACs work without any problems with Volumio, each exposing sound to the headphone jack without any software combinations. In addition, as a test, I connected a small DAC based on the 5102, which you can buy on their portals for 6PLN and on ours for 15PLN. It worked without any problem, I set it up in Volumio as a Hifiberry DAC PLUS.
I should add that I am not constructing any audiophile equipment here, just utility equipment.
Now a bit about the Volumio versions. On RPi4B ver1.3 I had version 2.917 installed, the new PI4B I have is ver1.5 and does not allow Volumio 2.917 to be installed.
So I started installing newer versions and it turns out that the most stable in my case for both versions of Pi4B is 3.832. Earlier versions, except 2.917 were throwing an error installing the touchpad plugin.
For Pi Zero2W, the best version turned out to be Voumio 3.251. Ver. 3.832 did run on the small PI, but the GPIO Buttons and GPIO Control plugins did not work properly. Some strange states were appearing on the GPIO. Changing to the 3.251 brought an immediate solution. I will be using GPIO control on both the 4B and 2W and this simply has to work if only because the two GPIO signals will work with the power supply.
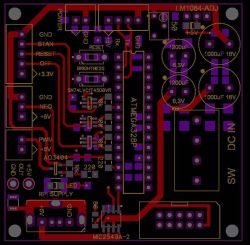
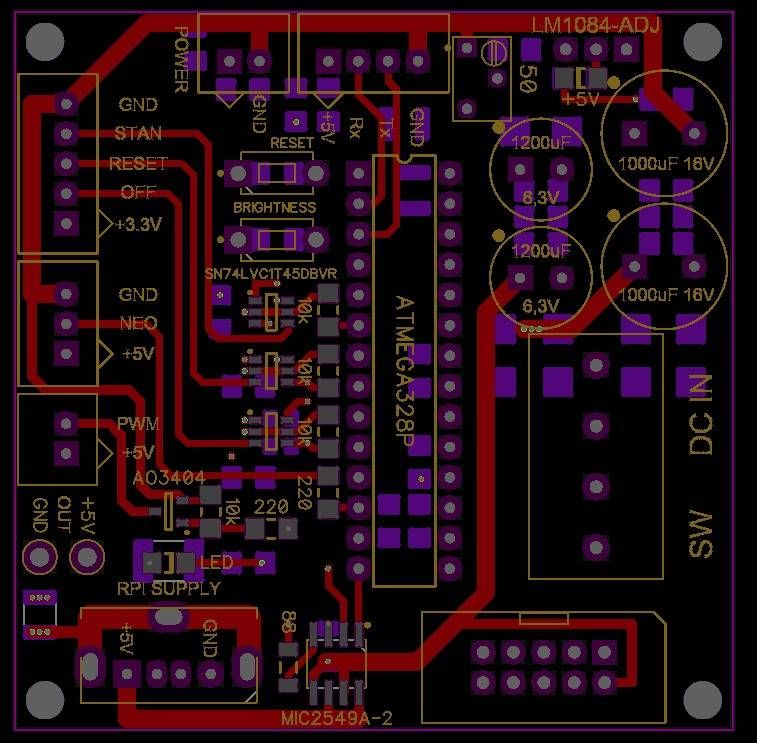
Now a bit about the power supply, I'll quote myself from the tube topic:
"Radek sent drawings of the board. They are already ordered. The atmega board is nearing completion as far as I know. I have ordered all the components for the power supply. Assembly is a matter of 2-3 weeks.
Why is the power supply so complicated? The whole thing is that I wanted a few more features, Radek added a few more from himself, and it got complicated.
The principle is simple: pressing the on/off button is to turn on the power to the RPi, during startup is to turn on the backlighting of the buttons and volume knob and to make things more difficult, I proposed to control the LEDs with PWM waveform from 0 to 100%. Pressing the on/off button again will switch off the RPi but this is to be done according to a certain procedure. First, the power supply controller issues a 1sec signal to the GPIO of the RPi responsible for turning off the Volumio, On the next GPIO the Volumio activity signal is issued and its state changes when the system is shut down. The power supply observes this state and when it changes it adds a few more seconds and then shuts down the RPI power supply. Why does it work this way? Because the Raspberry is still calculating something for 5-6 seconds and switching it off at this point could cause a problem with the program. Of course the PWM control works in the opposite direction, i.e. from 100 to 0% and the leds are supposed to fade nicely.
For proper operation you need GPIO control and this can be achieved by installing two Volumio plugins : GPIO Control and GPIO Buttons.
The stabiliser function is performed by the LM1084-5V or ADJ version. It has enough reserve current to pull the RPi 4B.
Radek suggested to use RGB programmable diodes to get proper colour, on my request he made brightness control

. In the larger Volumio project you can use RGB diodes , in smaller projects on monochrome oleds you can use PWM output.
As far as I know Radek has designed to switch on the RPi using a powerswitch with current measurement and the overload state is to be signalled by a change of backlight colour.
We will see how this works in practice."
All the players will be encapsulated, each with a power on/off button, encoder, IR receiver, LCD or OLED display and some extras. Once all the mechanical components are in place, I will start designing the front panels (front: engraving laminate - brushed aluminium) There will be some 3D printing and that kind of story. The subject is in development.


Comments
Interesting idea with this power supply. I have picoreplayer installed, volumio unfortunately in my case lost out to a paid subscription to support spotfi etc. I guerrilla power mine off the grid, 2 more... [Read more]
I was getting tired of waiting for Volumio to shut down and manually switching off the power. It had to be solved somehow in the end. The power supply boards are ready, they should be in the country... [Read more]
Have you tried MOODE Audio Player? I have a made player on this system and it works exemplarily, periodic problems after most updates are quickly fixed. I use an RPI 4 with 2GB RAM, a 7 inch touchscreen... [Read more]
I was thinking about MOODE, I might give it a try. I'll sort out the power supply and chassis and then sit on MOODE. [Read more]
To be honest, I've been getting together for a few years now to put together a player on RPi and Volumio. I've reworked various options in the meantime, but it's finally final. And, in fact, it's nearing... [Read more]
I went for a single power supply.The LM1084 powers the standby circuit and via the powerswitch will feed power to the RPI. The mentioned LM 1084 has a maximum current of 5A. The Rpi with dac and display... [Read more]
I am very familiar with the LM1084 circuit. Originally I also thought about powering the whole RPi from a linear power supply. However, in the end I chose the option with an inverter for the RPI and a... [Read more]
At my place the Volumio is actually just waiting for a case. System version 2 somethingtam (can't remember because I installed it a few months ago) on RPi2+ with HiFiBerry DAC and Waveshare 4.3" touchscreen... [Read more]
In my case, the enclosure will be made of a closed alu profile with a cross-section of 100x200mm and a length of 200-250mm. The front will be printed from transparent pet-g and covered with an engraving... [Read more]
After the system shutdown command, Volumio shuts down quite quickly; it seems to shut down in a few seconds at most. So all you need is a simple circuit that shuts down the power supply after such a time... [Read more]
On the GPIO strip the 3.3V and 5V voltages do not disappear when the system is shut down, unfortunately. I also wanted to take advantage of this but failed. [Read more]
No voltage can be lost on the GPIO. After all, you can power the RPi through this connector (I do so). That's why you need to check for the presence of voltage at the USB A connector. And on my front,... [Read more]
I will connect the power supply to the 5V GPIO. The status of the system, as I wrote earlier will be checked by the Atmega on the GPIO pin. In fact, the Atmega will shut down the Volumio system by doing... [Read more]
And do you think it's different with me? I additionally (just to be sure) check for the presence of +5V on the USB A connectors, so as not to cut power too early. https://obrazki.elektroda.pl/4... [Read more]
I wish I had known earlier that you had made such a control.... In our power supply it is added a few seconds after the system is turned off until the power is switched off. There are also other 'fiddly'... [Read more]
I get it, but I don't like in modern devices all these unnecessary features like sensing , sleep , hibernation , etc. so I'd like to avoid unnecessary complications and fitting more than I need,... [Read more]
In my case, the Attiny sends the shutdown command, waits for the USB connectors to lose voltage, additionally waits a few more seconds and only shuts down the power to the Raspberry. This is, in my opinion,... [Read more]
In my case, Volumio puts out a high state on the GPIO pin from the moment Volumio itself starts up until it shuts down, Atmega observes the state on this GPIO and adds a few seconds until the power is... [Read more]
I figured it was simpler to check 5V on USB than to add extra functions. There's a 4.3" screen on the one I've shown. But I have a 7" too, maybe there will be another version with it. [Read more]