logo elektroda
logo elektroda
X
logo elektroda

Connecting a new Cyfral Smart-5P intercom in place of the old one

grab0s 110013 47
ADVERTISEMENT
Treść została przetłumaczona polish » english Zobacz oryginalną wersję tematu
  • #1 14771912
    grab0s
    Level 10  
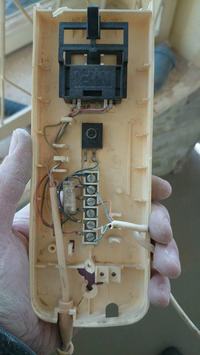
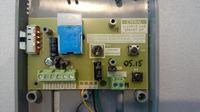
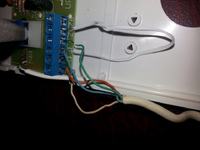
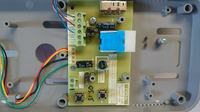
    Hello, as in the topic, I have a problem with connecting the new Cyfral Smart-5p handset in place of the old one. I attach a photo of the old connected one that worked and the new handset, please help with the diagram. greetings

    Connecting a new Cyfral Smart-5P intercom in place of the old one Connecting a new Cyfral Smart-5P intercom in place of the old one [/ img]

    .................................................. ..........................
    Announcement

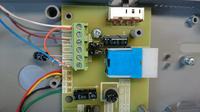
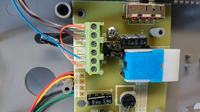
    Also read:
    1 Replacement, connecting a handset (uniphone) What handset to choose and how to mount
    2 Replacement of the intercom receiver - uniphone identification based on photos
    Cyfral uniphones. Three different cameras in the same housing


    We invite you to read the other guides, highlighted topics, articles in the field of security systems such as intercoms, gate and barrier automation, alarm systems, cameras, access control:
    Security Systems Tutorials


    If you do not find the answer to your question in the above-mentioned topics, please visit the forum:
    Security systems


    We also encourage you to visit the General Guides section, where you will find materials from other forum sections, including those for people starting their adventure with electronics:
    General Tutorials
  • ADVERTISEMENT
  • #2 14771916
    artur s
    Level 24  
    It should be written something more about the old handset, or draw a diagram. Unless you count on the help of an "expert" ;)
  • #3 14771925
    spinacz
    Level 42  
    artur s wrote:
    It should be written something more about the old handset, or draw a diagram.
    Just what is.
    Green -> RING
    White -> Mass
    Red -> SPK
    Blue -> MIC
    ZW1 removed
    ZW2 founded
    ZW3 founded
  • #4 14772049
    grab0s
    Level 10  
    After connecting in such a scheme, the call button from the outside works, but after entering the blue one on the MIC, the bolt at the door is still working and you cannot hear the conversation.
  • ADVERTISEMENT
  • #5 14772162
    spinacz
    Level 42  
    Ok so it will be like this:
    Green -> RING
    White -> Mass
    Red -> SPK
    Blue -> SW1
    You connect one capacitor contact to the MIC (the cylinder in the old uniphone) and the other to SW1
    You connect an additional cable with GROUND to SW2
    ZW1 removed
    ZW2 removed
    ZW3 removed

    Was the old uniphone working properly?
  • ADVERTISEMENT
  • #6 14772201
    grab0s
    Level 10  
    Unfortunately, I do not know because I have not checked and I do not have it anymore, and what capacitor to use because I did not read from the old one?
  • #7 14772217
    spinacz
    Level 42  
    The photo is not very legible so I am not sure either, you have to combine try 2.2 u or 10 u at 50V.
  • #8 14772226
    artur s
    Level 24  
    Or maybe it is enough to install the ZW2 and ZW3 jumpers in this configuration?
  • #9 14772237
    spinacz
    Level 42  
    artur s wrote:
    Or maybe it is enough to install the ZW2 and ZW3 jumpers in this configuration?
    In my opinion, it does not make sense because the "standard" 4-wire installation does not need an additional capacitor in the uniphone. The bolt is opened by direct shorting the microphone line to ground. At the author of the topic there is some strange installation where an additional capacitor was used, I have not encountered such an installation myself.
  • #10 14772250
    grab0s
    Level 10  
    I connected without a capacitor and there is a call and the bolt button works, I can also hear, but very poorly, to the interlocutor from the outside, but he cannot hear me, I also tried to put the ZW2 jumper on and then the bolt worked all the time. When it comes to connecting the capacitor, is the polarity important in this case?
  • #11 14772258
    spinacz
    Level 42  
    This does matter, unless you buy a bipolar electrolyte. Nobody at the bottom can hear you because you do not have a microphone connected, and as for the audibility from the bottom up, it is only possible to increase it on the central electronics.
  • #12 14772266
    artur s
    Level 24  
    From the photo it looks like the previous one had a "+" in blue
  • #13 14772287
    grab0s
    Level 10  
    I used a 4.7uF 50V capacitor and connected in different polarity, then the bolt opening button did not work
  • #14 14772295
    spinacz
    Level 42  
    Insert a photo of how you connect it, because something does not suit me here. Can you hear you downstairs?
  • #15 14772312
    grab0s
    Level 10  
    Except that I had to extend the cable and the colors are different
    Heaven -> Heaven -> MIC
    Red -> Bronze -> SPK
    Green -> Gray - RING
    White - white -> ground

    Connecting a new Cyfral Smart-5P intercom in place of the old one
  • #16 14772314
    spinacz
    Level 42  
    You connect incorrectly, read my second post where I wrote how to connect.
  • #17 14772318
    artur s
    Level 24  
    spinacz wrote:
    Ok so it will be like this:
    Green -> RING
    White -> Mass
    Red -> SPK
    Blue -> SW1
    You connect one capacitor contact to the MIC (the cylinder in the old uniphone) and the other to SW1
    You connect an additional cable with GROUND to SW2
    ZW1 removed
    ZW2 removed
    ZW3 removed

    Was the old uniphone working properly?
    This, in the photo, is a bit different. Connect the same and check.
  • #18 14772354
    grab0s
    Level 10  
    after correcting now, the interlocutor can hear very poorly both ways, maybe the value of the capacitor or its polarity can change?

    Connecting a new Cyfral Smart-5P intercom in place of the old one
  • ADVERTISEMENT
  • #19 14772362
    spinacz
    Level 42  
    You can try, however, I do not know if it will do anything, so that you can hear what someone says downstairs you have a potentiometer on the disc that clearly describes the sensitivity of the microphone. As for the volume from the bottom up, you can do nothing yourself, only administration.
  • #20 14772373
    grab0s
    Level 10  
    I tried to manipulate the potentiometer, but it did not work, I was at my neighbor's and it works ok, I also took a photo of its connection

    Connecting a new Cyfral Smart-5P intercom in place of the old one
  • #21 14772386
    spinacz
    Level 42  
    From this you could think that you had a wrong uniphone connection from the beginning.
    Try this
    Green -> GROUND
    Blue -> MIC
    Orange -> SPK
    White -> RING
    ZW1 removed
    ZW2 founded
    ZW3 founded
  • #22 14772389
    artur s
    Level 24  
    And how long was the handset removed? And did you have the wires insulated before assembly? Perhaps the intercom service disconnected something due to short circuits.
  • #23 14772435
    grab0s
    Level 10  
    I connected as follows:

    Heaven -> Heaven -> MIC
    Red -> Bronze -> SPK
    Green -> Gray - ground
    White - white -> ring

    Now you can hear the call inside, I can hear the interlocutor well from the outside, but I feel weak outside and when you try to press the opening button, the receiver starts to squeak and the bolt does not work. After hanging up the handset and pressing the button, the bolt works.
  • #24 14772446
    spinacz
    Level 42  
    My friend, there are no standards in your installation, try to swap white and orange and see what happens. If it doesn't help, call someone from the administration who deals with it and connect it as needed.
  • #25 14772549
    grab0s
    Level 10  
    I changed and nothing, but I looked into the box where all the wires are and it looks like this: blue to all blue, white to all white, orange to orange and green individually goes to the cassette
  • #26 14772720
    spinacz
    Level 42  
    Well, the only thing that is certain is that the green one should be connected to the RING, and the rest of the three should be combined. When you have good audibility up down down take the bolt.
    Try this again:
    Green -> RING
    blue -> Ground
    Red -> SPK
    white -> SW1
    You connect one capacitor contact to the MIC (the cylinder in the old uniphone) and the other to SW1
    You connect an additional cable with GROUND to SW2
    ZW1 removed
    ZW2 removed
    ZW3 removed
  • #27 14772787
    grab0s
    Level 10  
    In this configuration, as shown in the picture, the call works, you can hear it both ways, but I do not know why the bolt button works only when the receiver is hung up?

    Connecting a new Cyfral Smart-5P intercom in place of the old one
  • #28 14772814
    spinacz
    Level 42  
    Buddy, too many contradictory things, see how you described the connection on the staircase and how it is at the neighbor's. It does not match that the neighbor's green one is connected to ground and on the vertical it looks like a generator. Go to the administration and they will connect you, without knowing which, as I can see, you won't do anything, and someone who knows how it works will be able to do it in 5 minutes.
  • #29 15909727
    zybex
    Helpful for users
    This is probably out of date, but I would like to add from myself that the capacitor that was added to the old uniphone is not installed, because the new uniphone has it already built in. You just need to put on the jumper as for opening the handset (loudspeaker) line.
  • #30 16022368
    Ircys
    Intercoms specialist
    The Smart 5p uniphone does not fit into a system with a 2-wire installation.

    greetings

Topic summary

The discussion revolves around connecting a new Cyfral Smart-5P intercom to replace an old unit. Users share various wiring configurations and troubleshooting steps to achieve proper functionality. Key issues include ensuring correct connections for the microphone, speaker, and call button, as well as addressing problems with sound quality and the door bolt operation. Several users suggest using capacitors, adjusting potentiometers for microphone sensitivity, and checking wiring against the old intercom's configuration. The conversation highlights the importance of understanding the specific wiring requirements for different intercom models and the potential need for professional assistance if issues persist.
Summary generated by the language model.
ADVERTISEMENT