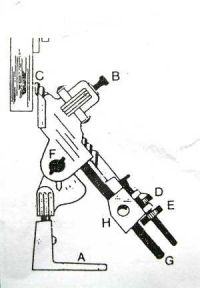
1. Loosen the clamping screw B.
2. Slacken the adjustable carriage on the 4-point guide G. Retract the adjusting screw D as far as possible and insert the drill bit. The drill should be set so that it protrudes above the edge C by the length of its diameter. Then screw the H sledge and screw B slightly. (Screw B slightly so that the drill can barely hold). Please take care that the spiral part is placed upwards C.
3. Mount the device vertically in front of the grinding stone (see sketch). The drill should be positioned at the bottom half of the stone or left or right. (Note: The device must be free to move!) Secure base A with a wing screw or clamp. so that the drill at the top has about 5mm distance from the stone.
4. Loosen the retaining screw E sufficiently. set the grinding stone in rotation and use the screw D to slowly move the drill so that it touches the stone. Then tilt the device left and right (approx. 60 °). then appropriate grinding will be obtained automatically. Depending on how deep the drill is to be ground. slowly turn screw D at intervals. Slowly. to prevent the drill from overheating and burning.
5. Tighten screw E as a control position. Loosen screw B. pull out and turn the drill around. Screw the screw D back and repeat again until the end of the screw E.


