logo elektroda
logo elektroda
X
logo elektroda

Connecting Intercom Digital 5: Cable Colors, Jumper ZW3, and Sequential Steps for Setup

laik manius 5601 7
ADVERTISEMENT
Treść została przetłumaczona polish » english Zobacz oryginalną wersję tematu
  • #1 16585726
    laik manius
    Level 2  
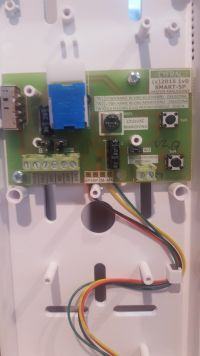
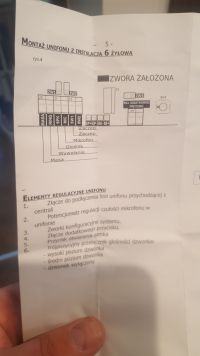
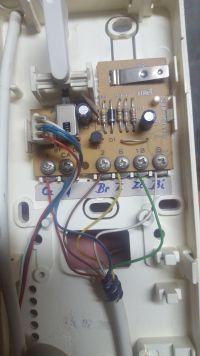
    Hello, I need help in connecting the intercom digital 5 I searched the forum are several similar themes but not exactly the same, I have different cable colors already connected in several ways but ni huhu does not work everything only partially or opening or handset etc. in the attachment pictures of the old and the diagram please if anyone knows how to connect it, and whether this jumper zw3 is to be put on or write otherwise on the intercom on the instructions, thank you in advance Connecting Intercom Digital 5: Cable Colors, Jumper ZW3, and Sequential Steps for Setup Connecting Intercom Digital 5: Cable Colors, Jumper ZW3, and Sequential Steps for Setup Connecting Intercom Digital 5: Cable Colors, Jumper ZW3, and Sequential Steps for Setup
  • ADVERTISEMENT
  • #2 16585822
    IGS

    Level 21  
    Hello Friend
    but do not write that there is no description of the function of the urmet 1132 camera in this forum, this is an intercom alphabet, just admit that you do not understand something, because certainly the colors of the veins have nothing to do with the inability to decipher ...
    good that you put both photos, something overwhelming
    and so:
    urmet - digital
    red - spk
    blue - ring
    bronze - mic
    yellow - mass
    green - sw1
    white - sw2
    I have never connected a digital 5p but from what you see after the description of the pcb PCB jumpers1,2,3 must be removed (to be verified on the installation)
    note: everything applies to the situation in which the exchanged urmet uniphone is connected in the original way, as it worked throughout the whole period of operation
    Good luck
  • ADVERTISEMENT
  • #3 16585833
    laik manius
    Level 2  
    Thanks for the info on Saturday, I will take it, write it if everything blinks
  • #4 16585847
    IGS

    Level 21  
    calmly succeed, in case you ask specific questions, photos as you do ...
    in the connection instructions you have a "guide" how to connect when you do not have the functions of the cables described and you must first feel them - stick to the instructions there / it may be useful

    https://www.elektroda.pl/rtvforum/topic3289894.html
  • ADVERTISEMENT
  • #5 16586152
    zybex
    Helpful for users
    Your old Urmet has 6 cables from the system connected. So probably the installation is 6 wires. However, in this case a bridge between 6 and 10 should be cut (and this is not the case). At this point, the installation is like 5 wires, because 6 (mass) and 10 (hook) are shorted together. If it worked for you without any problems, then do the same in the new Digital.
  • #6 16586965
    IGS

    Level 21  
    precious attention, Zybex, I did not pay attention
    in this case it is a bit of a trap, like 5 and 6 veins are shorted together and only together e e starts and meanwhile one of the terminals gets ground through the jumper, it is enough for the fitter to replace white with green, which would normally not matter with 6 wires and we have " wife "with whom no experienced ins. can get lost
    I wonder how it worked, that's why I added a note that the description applies to the situation when this urmet already worked ... and we don't know, maybe it didn't work, for some reason the author mentions it
  • #7 16589262
    laik manius
    Level 2  
    Hey

    I am fresh after installation everything works ok no problems, however you had to pull jumper No. 3 without the door opening open

    Thank you for your help !!!
  • ADVERTISEMENT
  • #8 16591618
    IGS

    Level 21  
    all you have to do is change places 5 and 6 and the jumper could stay, but that's a guess
    I'm glad it's ok

Topic summary

The discussion revolves around connecting the Urmet Digital 5 intercom system, focusing on cable color assignments and jumper configurations. Users share insights on the wiring setup, indicating that the intercom typically uses six wires, with specific colors assigned to functions such as speaker, microphone, and mass. A critical point raised is the need to cut the bridge between wires 6 and 10 to ensure proper functionality. Jumper ZW3's role is clarified, with users confirming that it should be removed during installation. The conversation concludes with a successful installation report, emphasizing the importance of following the provided wiring instructions and making necessary adjustments to wire placements.
Summary generated by the language model.
ADVERTISEMENT