logo elektroda
logo elektroda
X
logo elektroda

How to Disassemble and Replace FAAC 414 Tube Arm Seal: Preventing Water & Frost Issues

marcinoser 14919 20
ADVERTISEMENT
Treść została przetłumaczona polish » english Zobacz oryginalną wersję tematu
  • #1 16975021
    marcinoser
    Level 10  
    Hi,
    I have faac 414 gate automats. The simmering in the tube arm has solidified and it releases water to the screw mechanism, which causes problems in deeper frosts. Does anyone know to disassemble the piston and housing so that they can remove the seal?

    Added after 3 [hours] 11 [minutes]:

    I don't know if you are allowed to answer yourself, but I have solved the problem and I want to share it with those who may need it in the future.
    Disassemble the horn arm from the motor body and then remove the simmering sealing the stainless piston. First the rubber and then the metal ring, I don't know if they are separate parts or if it was originally one simmering, but it fell apart from old age. After removing the ring, vigorously tug both parts of the tube several times to knock out the Teflon sleeve that is under the simmer. Voila!
  • ADVERTISEMENT
  • #2 16976654
    kotbury
    Gantry automation specialist
    Just a question - you pick out the old simmering destructively, knock out the ring and stay on the screw, but can the new simmering be squeezed through the head of the slider? it is much wider than the chrome slider tube ....
  • ADVERTISEMENT
  • #3 16976832
    marcinoser
    Level 10  
    Well, or you should pull out the Teflon thread nut. Can it be done somehow?
  • ADVERTISEMENT
  • #4 16977108
    kotbury
    Gantry automation specialist
    It cannot be made as a whole - it is cast as a whole within the slider tube - the tube is drilled at the end and the nylon of the nut is anchored in them. I have once dealt with an actuator with a nut torn off the pipe (car shot) and tried to re-anchor it but the bonding is not done - the plastic is slippery like soap. One could try to screw with screws with countersunk heads countersunk into the wall of the pipe, but the nut has a small wall thickness, the screws would have to be very short and I do not give such fastening too much chance.
    We ended up replacing it under the warranty (somehow they accepted the warranty).

    However, it is possible to disconnect the lead screw from the drive mechanism - just remove the pin secured at the ends with pins (it is visible after sliding the actuator cover tube on a slightly extended slider). After that, you can slide the draw tube together with the tube screw.
  • #5 16977124
    marcinoser
    Level 10  
    Can you expand the last paragraph? I have unhooked the horn arm from the motor, but that's not enough to replace the sealant. I also wonder if it could be sealed in another way, PLN 300 for one piece of this screw is a lot ...: /
  • #6 16977208
    kotbury
    Gantry automation specialist
    I just took a look (I have one piece unfolded) - and I only have rather destructive ideas - or drill the piston creases on the lead screw head, remove the head and slide the piston backwards (then shoot with bolts or rivets during assembly) or roll a nylon nut to such a diameter, so that the simmering passes through it, then the gap between the tube and the nut should be supplemented with a sleeve (made, for example, of brass or bronze sheet or a tube - by mounting it with recessed screws).
  • #7 16977217
    marcinoser
    Level 10  
    I also had an idea for turning the nut sleeve. Do you know what the door catch looks like inside, i.e. if it drills the crease, does it rivet it into one whole?
  • Helpful post
    #8 16977235
    kotbury
    Gantry automation specialist
    Unfortunately, I don't know (for me these elements and sealants were OK, I only replaced the broken drive head) - but you can try to drill through - if the mount is still in some way (such as hidden welds, glue) then at most you will burn one of the demolition methods, if you do loosens and lets you slide off - you can easily rivet it by preparing the conical sockets in the tube for the heads of the rivets and grinding the heads after riveting them flush with the tube, and if the actuator does not retract to the end and the heads do not run up to the simmering - install ordinary screws.
    And if you did - let the posterity know if it was successful.
  • #9 16977246
    marcinoser
    Level 10  
    I can afford it, I have a few inches of "dead". In a week I will do it and let me know if it can be done, today rest :)
  • #10 16983087
    marcinoser
    Level 10  
    We managed to break it. You have to drill the crimps quite deeply, and cut around the head, about 5 mm, so as to avoid crimping around the neck. Now I have access to everything in the tube, I have to order a simmering, 42x32x7. It cannot be riveted because the head is a cast, so the M6 screw will go through. I plan to stretch the heat-shrinkable sleeve over the whole thing so that the screws and cuts are not visible.

    Edit: Instead of the classic simmer, I found an identical 32x42x7 / 10 ZZ scraper ring on a popular auction site.

     How to Disassemble and Replace FAAC 414 Tube Arm Seal: Preventing Water & Frost Issues
  • #11 16983459
    kotbury
    Gantry automation specialist
    Oh respect ...
    Now you know how to bite this frog.
    And it will be useful because the actuators are getting older ...

    As for riveting - if the head lasts without cracking, pressing the recesses with pins and turning the collar around will probably withstand the delicate arching of the rivet head, moreover, in most cases you will only need to rivet the hole further from the tip, the closer hole can actually be fixed with a screw (worse if someone used the maximum insertion as a stop - it happens).
  • ADVERTISEMENT
  • #12 16983531
    alster1
    CCTV and Stationary Alarms specialist
    Thanks for the description and photos, my actuators have been in use for about 12 years and there is not much left of sealants. Inspired by this topic, I start the exchange in the spring.
  • #13 16983639
    marcinoser
    Level 10  
    When it comes to riveting, I thought it was a sleeve, and it would be a tear-off one, but it completely gives up riveting in favor of screws. The head is aluminum, so if you had a press and a punch and a prism for fixing, I think you could do such a pressing. However, it must be taken into account that after this treatment, the working length decreases by about 5 mm, and the aesthetic values slightly decrease. ;) Generally, having parts and knowing what and how in order, you can repair the set in 4-5 hours. The cost is almost symbolic compared to the new tubes - by replacing scrapers and chewed cables, I will close to PLN 40.
    I am still wondering about the lubricant, whether to leave what is (some red) or replace it with ŁT?
  • #14 16983718
    kotbury
    Gantry automation specialist
    Not Łt - it hardens in frost (Poland is not Italy, such grease only for gears) - I would use low-temperature grease for the screw - aluminum green or lithium white - maybe Lubinar central lubricant or similar grease ...
  • Helpful post
    #15 16992354
    marcinoser
    Level 10  
    Time for a summary:

    After initial disassembly problems, assembly was fairly quick and without major problems. However, I decided to use simmerings instead of the scrapers, it seems to me that they will be tighter, the scraper, in my opinion, does not stick well and its rubber is quite stiff.
    In order to install the simmer / scraper properly, you need to grind about 3mm of the sleeve which is located just below it. It is possible that the original was 5mm thick, in addition, the edge is chipped during disassembly, so I sanded the sleeve to get it in deep enough.

    As for the grease ... The factory grease was completely mixed with water, so I'm not surprised it froze easily. I did not get aluminum grease in the area, so I used ŁT, I assumed that fresh and clean ŁT was better than the factory one with half water. I compared both in the freezer with the rest, I had no doubts which way to choose ... :)

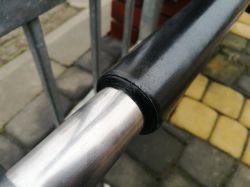
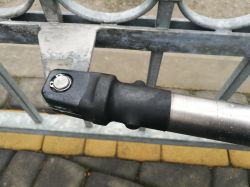
    I used one M5 screw to fasten the head, I think you don't need more. The idea with a heat-shrinkable T-shirt hit the jackpot, it looks very aesthetic, the fi40 T-shirt is sufficient.

    Replacing the motor cable is unfortunately not as easy as I thought, because the cables are woven into the stator and you need to solder about 5 cm from it. Fortunately, there is enough space in the body to fit the cables after soldering.
    Summarizing the costs:
    Simmerings - 2 x PLN 7.5 = PLN 15
    Heat-shrinkable tubing - PLN 5
    4x1 cable that I had to replace - PLN 4
    New seger rings - PLN 2
    Most of us have grease in the workshop, it comes in quite a lot
    Shipments about PLN 15
    which gives PLN 41. (new tubes 2 x 270 PLN = 540 PLN) - there is a difference :D

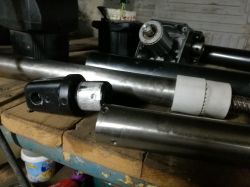
    Below photos:

     How to Disassemble and Replace FAAC 414 Tube Arm Seal: Preventing Water & Frost Issues  How to Disassemble and Replace FAAC 414 Tube Arm Seal: Preventing Water & Frost Issues  How to Disassemble and Replace FAAC 414 Tube Arm Seal: Preventing Water & Frost Issues
  • #16 16992889
    kotbury
    Gantry automation specialist
    Well, this is a complete tutorial on changing sealants. Very good. Respect for willingness and consistency, I will not say that I will not use it ..

    I would like to add that there are simmerings with an additional scraper flange (or actually protecting - I have seen them on the output of half axles in cars) - they look like a combination of a scraper with simmering - I will try to track them (although it may not be such a dimension - these are probably dedicated automotive products)
  • #17 18365088
    Ricorro
    Level 17  
    Dear users, I just recently put the 414 on a 100mmx100mm post and it works perfectly. I have a question that bothers me. Namely, what do you do if there is ice on the tubes and turning on the actuator causes this ice to degrade the sealants, because they have to pick it up, if nothing happens to them. All in all, you could make covers for the top of the tube that would work. The question is whether it makes sense to do this. Write me your feelings about this item. Looking at the performance, is it probably the weakest element of this actuator?
  • #18 18365139
    marcinoser
    Level 10  
    It is probably best to prevent icing so as not to scrape the chrome. Replacing the seals requires scraping the entire actuator, but the sealant itself is cheap. In my opinion, these sealants are wearing out time and UV, much more so than ice on a tube.
  • #19 18365267
    Ricorro
    Level 17  
    Already measured
    The diameter of the thicker pipe than the actuator is 45mm
    The widest diameter of the extendable arm when fixing the gate is 43mm (the handle at its widest point - then connected with the extendable tube)
    Otherwise I am already looking for a black corrugated tube with UV 55/46
    Or a larger equivalent, minimum length 50, preferably 60 cm for one arm, will look good and fulfill its function. I will mark the inspection holes tightened near the connection with the gate, draining any water at the bottom.
    If I find black fluted or smooth with UV, the look will be great.
  • #20 19571740
    RobertKiszlo
    Level 1  
    Thanks for the tutorial,
    servomotors repaired, loose simmering replaced.
    I had a problem with drilling the pressed elements, only a visit to a friendly workshop helped, and even one cutter gave up. Hard material.
    It is not necessary to remove the entire cylinders, just detach the arms from the engine.
  • #21 19571807
    kotbury
    Gantry automation specialist
    Quote:
    It is not necessary to remove the entire cylinders, just detach the arms from the engine

    Obvious obviousness. You unscrew the bolt, the pin on the seger and the tube in your hand.
    PS. For the price of scrap I got 2 pieces. The segers from the inside of the gear were detached and spilled out. It was enough to pull out the plasters under the u-bolt, remove the seger (forceps with very long spouts are needed), the bearing comes out with your fingers. You can also check the condition of the clutch.

Topic summary

The discussion revolves around the disassembly and replacement of the FAAC 414 tube arm seal to prevent water and frost issues. Users share their experiences with solidified seals causing water ingress into the screw mechanism, leading to operational problems in cold weather. The main solution involves disassembling the horn arm from the motor, removing the old seal, and replacing it with a new one. Various methods for accessing the internal components are discussed, including drilling and using screws for reassembly. Users also explore alternative sealing options and lubricants suitable for low temperatures. The conversation highlights the importance of proper maintenance to extend the lifespan of the actuator.
Summary generated by the language model.
ADVERTISEMENT