logo elektroda
logo elektroda
X
logo elektroda

De'Longhi ECAM 350.55B - Infuser Attachment Issue & Solution After Descaling Process

soja93 54132 65
ADVERTISEMENT
Treść została przetłumaczona polish » english Zobacz oryginalną wersję tematu
  • #1 16995034
    soja93
    Level 9  
    Hello, I have a De'Longhi ECAM 350.55B coffee machine. After 2 months of using the machine, a message appeared to carry out descaling. I did everything as described in the user manual, after descaling the coffee machine worked properly for about a week. After this time, the message "attach the infuser" popped up. I do everything as in the instructions, but the message does not disappear, the machine does not work. What to do?
  • ADVERTISEMENT
  • #2 16995114
    pawlok7797
    Level 12  
    And you hear that the brewer surprises in its place?
  • #4 16995214
    pawlok7797
    Level 12  
    If there is a guarantee, I will send it to the service, from the top and bottom switches I would suggest to start checking.
  • #5 16996340
    nioop

    Home appliances specialist
    It looks more like a hall sensor to me.
    The brewer stops at the top and bottom, does not try to push it by force.
    However, the verification will not be easy .. I would suggest trying to replace the hall sensor. If this does not help, then the problem may be in the lift magnets.
  • ADVERTISEMENT
  • #6 17320830
    kesy1
    Level 10  
    Hello
    I have the same problem and I intend to order a hall sensor. After the exchange I will write if it helped
  • ADVERTISEMENT
  • #7 17929798
    soja93
    Level 9  
    I gave the machine for guarantees and so far there is no problem
  • #8 18843488
    Demek1991
    Level 9  
    Does anyone have a specific solution to the problem? I replaced the ompkr at home and read that a reset is needed later, but I don't know how to do it. Someone help? I suspect that it could be similar for you
  • #9 18892754
    piatkowski92
    Level 1  
    Perhaps someone will find it useful.
    I had a similar problem with the machine showing the general alarm message. The machine did not rinse, did not make coffee, did not turn off properly. The problem appeared right after making two coffees and turning off the machine.

    I have cleaned the entire brewing unit, including taking it apart and lubricating it. Most of the dirt was under the strainer.

    I unscrewed and cleaned the thermoblock strainer. This can be done from inside the machine. It was very dirty.

    The last step (crucial in my case) is running hot water twice as a whole process.

    If there is a problem with removing the brewing unit, you need to rotate the toothed wheel from the motor with your finger.

    The fault occurred after 1.5 years of use.
  • #10 20026880
    wojtastomasz85
    Level 7  
    Hello, has any of you found a solution to this fault "Install the infuser"? Replaced the hall sensor, unfortunately no improvement.
    Please help
  • ADVERTISEMENT
  • #11 20090687
    radeks1968
    Level 13  
    wojtastomasz85 wrote:
    Hello, has any of you found a solution to this fault "Install the infuser"? Replaced the hall sensor, unfortunately no improvement.
    Please help
    is the problem solved?
  • #12 20090963
    wojtastomasz85
    Level 7  
    Unfortunately not. From what I was able to find out, after replacing the sensor, you should restart the board. There is no information anywhere on how to do this.
  • #13 20094620
    radeks1968
    Level 13  
    Replacing the Hall sensor helped so much that the brewer stops as it should. Install the brewing unit is displayed. Probably electronics.
  • #14 20107513
    djszaman
    Level 11  
    Most often, the problem occurs when there is play in the brewing unit's carriage or it is dirty, then it misreads impulses from the hall. It is best to replace the upper and lower switches and reset the encoder
  • #15 20110278
    radeks1968
    Level 13  
    After two weeks, the return will see the same again with these backlash.
  • #16 20110402
    djszaman
    Level 11  
    Manually, it is difficult to assess these clearances, and the sensor will have a few pulses missing and an error will be crashed. The encoder reset itself without replacing the switches should do the trick, but it's better to replace because the contacts may be overheated and not always catch
  • #17 20325149
    domis33
    Level 15  
    Hello friend. I have the same problem - suggest how to RESET ENCODER - I will be very grateful.
  • #18 20325174
    djszaman
    Level 11  
    @domis33 wrote a DM
  • #19 20325377
    domis33
    Level 15  
    Thanks a lot. I will write if it helped.
  • #20 20326307
    domis33
    Level 15  
    Thanks to my friend *djszaman* - on topic.
  • #21 20330841
    gsl24
    Level 8  
    djszaman wrote:
    @domis33 wrote a DM


    Hello and welcome,

    I see that the topic is new, so I will ask for help,

    For me, the elevator goes up and starts buzzing loudly but it looks like it is reaching the very end on an open housing, but the motor is still pushing,
    If I remove and press this microswitch, the elevator sets up correctly and goes down

    I can't fix it

    Regards,
    Tom

    Added after 2 [minutes]:

    Hi

    Will you share your knowledge about it
    How to do it?
  • #22 20330869
    djszaman
    Level 11  
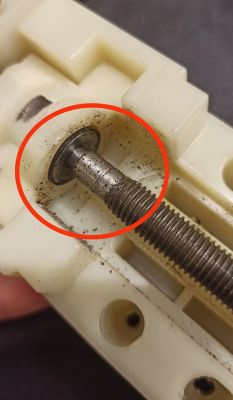
    There are 2 options. Since the button works and the machine reacts to its pressing, maybe its handle just needs to be tightened. Or something has come under the brewing cart where there is a screw on top and preventing it from reaching the end. They are mostly crushed coffee beans. De'Longhi ECAM 350.55B - Infuser Attachment Issue & Solution After Descaling Process
  • #23 20332700
    gsl24
    Level 8  
    @Dj Shaman

    Hi, thanks for taking a moment. If I don't press this button, it creaks to the max, but eventually it will go down and then it crashes the "attach the camera" error. So how to do this whole encoder reset? Maybe it will help...

    Regards,
    Tom
  • #24 20332824
    djszaman
    Level 11  
    @gsl24 encoder reset is to restore the number of steps on the hall sensor. In your case, the brewing unit is clearly not pressing the microswitch. Only after removing the cause, you can possibly perform a reset so that the coffee machine saves new data
  • #25 20336813
    gsl24
    Level 8  
    djszaman wrote:
    @gsl24 encoder reset is to restore the number of steps on the hall sensor. In your case, the brewing unit is clearly not pressing the microswitch.
    Only after removing the cause, you can possibly perform a reset so that the coffee machine saves new data


    Hi,

    You were right,

    However, it was not the upper microswitch that unscrewed and the infusor itself did not reach the microswitch, after gluing the 1.5 mm thick rubber, the infusor presses the microswitch and the elevator goes down. The coffee is brewed correctly without leaking. I'm just worried that the brewer will fail after some time. Now how to do a reset so that everything works perfectly?


    Regards,
    Tom
  • #26 20336988
    djszaman
    Level 11  
    You still haven't removed the cause, he should commute without gluing himself.
    As I wrote earlier, grains could come up or there is still an option that the propeller unscrewed and moved it back a bit, but it's more of a mess than cleaning the propeller itself. Reset here will not change anything and maybe even spoil it, I can send you instructions on how to do it, but you will do it at your own risk, because something is clearly wrong with this drive.
    I sent instructions in DM
  • #27 20373331
    Premos
    Level 2  
    The patent with a piece of rubber from a bicycle tube worked for me (I have a Delonghi ECAM 23.460). After replacing the Hall sensor, all gaskets, gear screws, removing all play, this message continued to pop up. I cut a small circle out of a bicycle tube and glued it to the piston element of the thermoblock that pushes the upper microswitch. After two days of digging and actually major renovation, it turned out that only a piece of rubber did the trick :)
  • #28 20373933
    djszaman
    Level 11  
    @Premos replacing the hall itself without reset will not do anything, data on the number of steps is saved on the motherboard, so after replacing it had to be reset.
    That's why it didn't work after this general overhaul. Most likely, it was enough to just do a reset without digging and replacing anything.
  • #29 20374283
    gsl24
    Level 8  
    djszaman wrote:
    @Premos replacing the hall itself without reset will not do anything, data on the number of steps are saved on the motherboard, so after replacing it had to be reset.
    That's why it didn't work after this general overhaul. Most likely, it was enough to just do a reset without digging and replacing anything.


    Hello and welcome,

    Can we expand on the hall sensor?
    How exactly does it determine the destinations of the brew unit?

    Is a similar sensor a popular sensor mounted e.g. in the flap of the coffee machine door in Saeco / Philips to detect whether something is or is not in a certain place?

    Therefore, I believe that it marks the place of "rest" of the brewer in the "lying" position.
    Any deviation from the correct position would indicate a shift of the magnet itself.

    Remember that we have two positions "standing" and "lying". This should distinguish when what is the fault. Whether it's "laying down" or "getting up".


    These are my thoughts on it.
    Regards,
    Tom
  • #30 20374349
    Premos
    Level 2  
    djszaman wrote:
    @Premos replacing the hall itself without reset will not do anything, data on the number of steps are saved on the motherboard, so after replacing it had to be reset.
    That's why it didn't work after this general overhaul. Most likely, it was enough to just do a reset without digging and replacing anything.


    Could you please send me the encoder reset procedure? I will be grateful.

    Added after 2 [hours] 21 [minutes]:

    Hello and welcome,

    Can we expand on the hall sensor?
    How exactly does it determine the destinations of the brew unit?

    Is a similar sensor a popular sensor mounted e.g. in the flap of the coffee machine door in Saeco / Philips to detect whether something is or is not in a certain place?

    Therefore, I believe that it marks the place of "rest" of the brewer in the "lying" position.
    Any deviation from the correct position would indicate a shift of the magnet itself.

    Remember that we have two positions "standing" and "lying". This should distinguish when what is the fault. Whether it's "laying down" or "getting up".


    These are my thoughts on it.
    Regards,
    Tom[/quote]

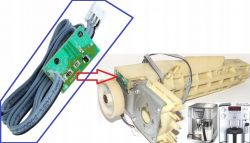
    The sensor is screwed parallel to the gear pulley, in which there are four strong neodymium magnets (they demagnetized my magnetic screwdriver). A coil is clearly visible on the Hall sensor, which is excited by the magnets of the rotating pulley. I am not a service technician but an ordinary layman, but in my opinion the sensor only measures the number and speed of rotation of the pulley. De'Longhi ECAM 350.55B - Infuser Attachment Issue & Solution After Descaling Process
    Added after 8 [minutes]:

    From my experience, I think that's what he said djshaman it was enough to do a reset and everything would work, i.e. the system would learn to push the piston a fraction of a millimeter higher to turn on the upper microswitch. The rubber band is still working :)

Topic summary

The discussion revolves around issues with the De'Longhi ECAM 350.55B coffee machine, specifically the "attach the infuser" error that appears after descaling. Users report that after following the descaling process, the machine functions for a short period before displaying the error. Suggested solutions include checking the hall sensor, replacing it, and ensuring the brewing unit is clean and properly seated. Some users recommend resetting the encoder after replacing the hall sensor, as the machine may not recognize the new sensor without this step. Various users share their experiences, troubleshooting steps, and solutions, including cleaning the brewing unit and checking for blockages in the system. The conversation highlights the importance of proper maintenance and the potential need for service intervention if issues persist.
Summary generated by the language model.
ADVERTISEMENT