logo elektroda
logo elektroda
X
logo elektroda

[Solved] How to integrate FastLED with WebServer on ESP8266 for WS2812?

crbjsfso 2238 9
ADVERTISEMENT
Treść została przetłumaczona polish » english Zobacz oryginalną wersję tematu
  • #1 17945499
    crbjsfso
    Level 8  
    I'm building an LED light using a 16 piece WS2812 and an ESP8266 module, exactly like the kit in the link below:
    Quote:
    aliexpress.com/item/ESP8266-ESP01-ESP-01-RGB-LED-Controller-Adpater-WIFI-Module-for-Arduino-IDE-WS2812-WS2812B-5050/32955220849.html

    I have already checked the whole circuit with the code below and everything works as expected.
    Code: C / C++
    Log in, to see the code
    Now I would like my network interface to look like the following video:
    Quote:
    youtube.com/watch?v=8BcGnMfq9zc
    .
    The description below the video links to GitHub:
    Quote:
    github.com/jasoncoon/esp8266-fastled-webserver
    .
    Where the 'installation' procedure is described:
    Quote:
    Installing
    The app is installed via the Arduino IDE which can be downloaded here. The ESP8266 boards will need to be added to the Arduino IDE which is achieved as follows. Click File > Preferences and copy and paste the URL "http://arduino.esp8266.com/stable/package_esp8266com_index.json" into the Additional Boards Manager URLs field. Click OK. Click Tools > Boards: ... > Boards Manager. Find and click on ESP8266 (using the Search function may expedite this). Click on Install. After installation, click on Close and then select your ESP8266 board from the Tools > Board: ... menu.

    The app depends on the following libraries. They must either be downloaded from GitHub and placed in the Arduino 'libraries' folder, or installed as described here by using the Arduino library manager.

    FastLED
    IRremoteESP8266
    Arduino WebSockets

    Download the app code from GitHub using the green Clone or Download button from the GitHub project main page and click Download ZIP. Decompress the ZIP file in your Arduino sketch folder.

    The web app needs to be uploaded to the ESP8266's SPIFFS. You can do this within the Arduino IDE after installing the Arduino ESP8266FS tool.

    With ESP8266FS installed upload the web app using ESP8266 Sketch Data Upload command in the Arduino Tools menu.

    Then enter your wi-fi network SSID and password in the WiFi.h file, and upload the sketch using the Upload button.
    .
    In the meantime, I still need to embrace the ESP8266FS:
    Quote:
    Uploading files to file system
    ESP8266FS is a tool which integrates into the Arduino IDE. It adds a menu item to Tools menu for uploading the contents of sketch data directory into ESP8266 flash file system.

    Download the tool: github.com/esp8266/arduino-esp8266fs-plugin/releases/download/0.2.0/ESP8266FS-0.2.0.zip.
    In your Arduino sketchbook directory, create tools directory if it doesn't exist yet
    Unpack the tool into tools directory (the path will look like <home_dir>/Arduino/tools/ESP8266FS/tool/esp8266fs.jar)
    Restart Arduino IDE
    Open a sketch (or create a new one and save it)
    Go to sketch directory (choose Sketch > Show Sketch Folder)
    Create a directory named data and any files you want in the file system there
    Make sure you have selected a board, port, and closed Serial Monitor
    Select Tools > ESP8266 Sketch Data Upload. This should start uploading the files into ESP8266 flash file system. When done, IDE status bar will display SPIFFS Image Uploaded message.
    .
    My problem starts more or less at:
    Quote:
    Decompress the ZIP file in your Arduino sketch folder..
    .
    Since I don't know where this web interface code is, there is no specific *.ino file in this archive, if I am to create a "Data" folder using ESP8266FS, what should I put there? What about css/html files, should they go there? Are they uploaded differently, or is it automatically flown through the Arduino IDE? Perhaps someone has already encountered this and has an instructional video perhaps?
  • ADVERTISEMENT
  • Helpful post
    #2 17945533
    kaczakat
    Level 34  
    On github you have the whole project which needs to be uploaded to your Arduino project directory. When compiling, you select the appropriate flash drive capacity (spiffs) to fit everything in the data directory (this is where the web page code is, all these files will be uploaded to spiffs) and upload the sketch normally. If you have the option to use spiffs installed (it's a plugin of some sort) then in the menu above where you select the ESP8266 board parameters the appropriate option will appear. The plugins are separate for the ESP8266 and ESP32.
    Helpful post? Buy me a coffee.
  • ADVERTISEMENT
  • #3 17945586
    crbjsfso
    Level 8  
    With some files I get an error: error(-10010), on the internet I found information that this is related to file paths being too long, can something be done about this?

    [SPIFFS] data   : D:\Download\sketch_may05b\data
    [SPIFFS] size   : 256
    [SPIFFS] page   : 256
    [SPIFFS] block  : 4096
    /.travis.yml
    
    /examples/avr/WebSocketClientAVR/WebSocketClientAVR.ino
    
    /examples/esp32/WebSocketClient/WebSocketClient.ino
    
    /examples/esp32/WebSocketClientSSL/WebSocketClientSSL.ino
    
    /examples/esp32/WebSocketServer/WebSocketServer.ino
    
    /examples/esp8266/WebSocketClient/WebSocketClient.ino
    
    /examples/esp8266/WebSocketClientSocketIO/WebSocketClientSocketIO.ino
    
    /examples/esp8266/WebSocketClientSSL/WebSocketClientSSL.ino
    
    /examples/esp8266/WebSocketClientStomp/WebSocketClientStomp.ino
    
    /examples/esp8266/WebSocketClientStompOverSockJs/WebSocketClientStompOverSockJs.ino
    
    /examples/esp8266/WebSocketServer/WebSocketServer.ino
    
    /examples/esp8266/WebSocketServerAllFunctionsDemo/WebSocketServerAllFunctionsDemo.ino
    
    /examples/esp8266/WebSocketServerFragmentation/WebSocketServerFragmentation.ino
    
    /examples/esp8266/WebSocketServerHttpHeaderValidation/WebSocketServerHttpHeaderValidation.ino
    
    /examples/esp8266/WebSocketServer_LEDcontrol/WebSocketServer_LEDcontrol.ino
    
    /examples/Nginx/esp8266.ssl.reverse.proxy.conf
    
    /examples/particle/ParticleWebSocketClient/application.cpp
    
    /library.json
    
    /library.properties
    
    /src/libb64/AUTHORS
    
    /src/libb64/cdecode.c
    
    /src/libb64/cdecode_inc.h
    
    /src/libb64/cencode.c
    
    /src/libb64/cencode_inc.h
    
    /src/libb64/LICENSE
    
    /src/libsha1/libsha1.c
    
    /src/libsha1/libsha1.h
    
    /src/WebSockets.cpp
    
    /src/WebSockets.h
    
    /src/WebSocketsClient.cpp
    
    /src/WebSocketsClient.h
    
    /src/WebSocketsServer.cpp
    
    /src/WebSocketsServer.h
    
    /tests/webSocket.html
    
    /tests/webSocketServer/index.js
    
    /tests/webSocketServer/package.json
    
    /travis/common.sh
    
    skipping .gitignore
    
    SPIFFS_write error(-10010): unknown
    
    error adding file!
    
    Error for adding content from WebSocketClientAVR!
    
    SPIFFS_write error(-10010): unknown
    
    error adding file!
    
    Error for adding content from WebSocketClient!
    
    SPIFFS_write error(-10010): unknown
    
    error adding file!
    
    Error for adding content from WebSocketClientSSL!
    
    SPIFFS_write error(-10010): unknown
    
    error adding file!
    
    Error for adding content from WebSocketServer!
    
    SPIFFS_write error(-10010): unknown
    
    error adding file!
    
    Error for adding content from WebSocketClient!
    
    SPIFFS_write error(-10010): unknown
    
    error adding file!
    
    Error for adding content from WebSocketClientSocketIO!
    
    SPIFFS_write error(-10010): unknown
    
    error adding file!
    
    Error for adding content from WebSocketClientSSL!
    
    SPIFFS_write error(-10010): unknown
    
    error adding file!
    
    Error for adding content from WebSocketClientStomp!
    
    SPIFFS_write error(-10010): unknown
    
    error adding file!
    
    Error for adding content from WebSocketClientStompOverSockJs!
    
    SPIFFS_write error(-10010): unknown
    
    error adding file!
    
    Error for adding content from WebSocketServer!
    
    SPIFFS_write error(-10010): unknown
    
    error adding file!
    
    Error for adding content from WebSocketServerAllFunctionsDemo!
    
    SPIFFS_write error(-10010): unknown
    
    error adding file!
    
    Error for adding content from WebSocketServerFragmentation!
    
    SPIFFS_write error(-10010): unknown
    
    error adding file!
    
    Error for adding content from WebSocketServerHttpHeaderValidation!
    
    SPIFFS_write error(-10010): unknown
    
    error adding file!
    
    Error for adding content from WebSocketServer_LEDcontrol!
    
    SPIFFS_write error(-10010): unknown
    
    error adding file!
    
    Error for adding content from Nginx!
    
    SPIFFS_write error(-10010): unknown
    
    error adding file!
    
    Error for adding content from ParticleWebSocketClient!
    
    SPIFFS_write error(-10010): unknown
    
    error adding file!
    
    Error for adding content from webSocketServer!
    
    [SPIFFS] upload : C:\Users\Admin\AppData\Local\Temp\buildeba3675622c6c2c6e2699dcb8ece8aba.spiffs/sketch_may05b.spiffs.bin
    [SPIFFS] address: 0xBB000
    [SPIFFS] reset  : ck
    [SPIFFS] port   : COM7
    [SPIFFS] speed  : 115200
    
    Uploading 262144 bytes from C:\Users\Admin\AppData\Local\Temp\buildeba3675622c6c2c6e2699dcb8ece8aba.spiffs/sketch_may05b.spiffs.bin to flash at 0x000BB000
    
    ................................................................................ [ 31% ]
    
    ................................................................................ [ 62% ]
    
    ................................................................................ [ 93% ]
    
    ................                                                                 [ 100% ]
    
  • #4 17945703
    kaczakat
    Level 34  
    In the examples for ESP you have one with spiffs, use the example and upload. In the ESP Async Webserver library there is also an example with a data directory to be uploaded by the spiffs plugin. I don't know which paths you are referring to, the ones in the spiffs structure or the file layout on disk. To be sure, you can upload the project directly to C, I in this case have a very long path, I have all the files traditionally in "My Documents" followed by a few levels deep, and of course a few up.
    Maybe there is a problem with the flash, I had a couple of ESP-01s with 1MB flash, they behave strange sometimes and spiffs up, there was some trick involving changing the file in core. It's better to use chips with 4MB flash to start with, here I've never had problems - Wemos MINI, NodeMCU, etc with an ESP-12E or F chip.
    Are you sure you have set the right size spiffs? Because if you have this ESP-01 it probably doesn't fit at all, the date is over 600kB here. In this case, just for the upload test, you can delete some, move some, because obviously it won't work properly.
    I downloaded this project, after completing the libraries, adding secrets.h and a small modification (D5 to 5) I compiled this for the NodeMCU board and uploaded it to the Witty board. Spiffs set to 1MB, everything works OK, led I didn't connect, but the page loaded of course. Also maybe just upload to the standard Arduino project directory.
    Well and everything unfortunately you have to have the same as the author of this project, e.g. many things don't work for me with the newer core for ESP8266, I still keep version 2.4.2 for this reason.
    Helpful post? Buy me a coffee.
  • ADVERTISEMENT
  • #5 17946423
    crbjsfso
    Level 8  
    The memory chip is a PN25F08 in an SOP-8 case, so according to the datasheet below it should have 8 Mbit = 1 MB? If so, however, the project falls through due to lack of space required.
    Quote:
    xtxtech.com/upfile/2016082517095182.pdf


    A bit too complicated for me. Is it possible to do this without spiffs? So that an interface appears at 192.168.0.100 that has:
    1. an "ON / OFF" button.
    2. a "Brightness" slider.
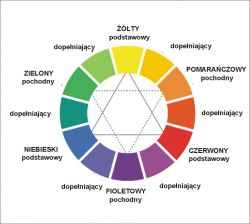
    3. A colour wheel for colour selection, something like this:
    How to integrate FastLED with WebServer on ESP8266 for WS2812? .
    4. field with the currently set colour.
    5. "Set new colour" button.
    More or less something like this. Probably best if the page code is inside the draft *.ino project (<body style="background: #3f4d5a; text-align: centre; font: 12pt/14pt Verdana, sans-serif;"> ect.) so that no additional *.css files are needed. Does this have a senescence?
  • ADVERTISEMENT
  • Helpful post
    #7 17947112
    kaczakat
    Level 34  
    You can even run the whole site on a PC or server on the network, a network drive, or download pieces from outside as @oskar777 . Only then you have to have everything on the same network or internet access (servers are as low as $3 per year). Well, and you have to rewrite the files so that the web program knows where to look for it and where its websocket device (ESP) is that it "talks" to.
    If you want to use a ready-made one, it is simpler to buy exactly what is used in the author's project.
    Helpful post? Buy me a coffee.
  • #8 17949454
    crbjsfso
    Level 8  
    I don't want to use external components because the ESP8266-01 has memory for the code. I solved it from the code level like this:
    Code: C / C++
    Log in, to see the code
    .
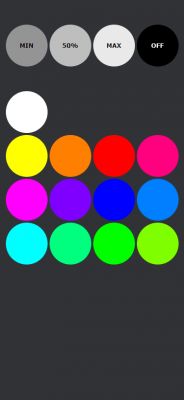
    The GUI looks like this:
    How to integrate FastLED with WebServer on ESP8266 for WS2812? .

    3 brightness levels, on-off switch, 12 colours from the colour wheel below + white.
    How to integrate FastLED with WebServer on ESP8266 for WS2812? .
  • Helpful post
    #9 17949461
    khoam
    Level 42  
    All these strings for creating the page are probably better put in a static array, and then just display with a single println() in a loop the next lines of this array. It will be easier for you to make any modifications to the page.
  • #10 17950199
    crbjsfso
    Level 8  
    Good idea, I will use in the next version.

    Added after 14 [hours] 42 [minutes]: .

    Resolved using the code from the following post.
    Quote:
    elektroda.pl/rtvforum/topic3579221.html#17949454

Topic summary

The discussion revolves around integrating FastLED with a WebServer on the ESP8266 for controlling WS2812 LED strips. The user successfully tested the circuit and code using the Adafruit_NeoPixel library and ESP8266WiFi. However, they encountered issues with file path lengths when uploading files to SPIFFS, which is necessary for serving web pages. Suggestions included using examples from the ESP Async Webserver library and ensuring the correct SPIFFS size is set. Alternatives to using SPIFFS were discussed, such as embedding HTML and CSS directly in the code. The user also sought to create a web interface with controls for turning the LEDs on/off, adjusting brightness, and selecting colors. The conversation highlighted the importance of memory capacity in ESP8266 modules and the potential for using external servers for hosting web files.
Summary generated by the language model.
ADVERTISEMENT